1. Introduction
This manual provides essential information for the safe and efficient operation of your Jesverty SS-30P 13.8V 30A DC Regulated Bench Power Supply. Please read this manual thoroughly before use and retain it for future reference. The SS-30P is designed to convert AC power to a stable 13.8V DC output, suitable for various electronic devices, including HAM and amateur radio equipment.

Figure 1.1: Front view of the Jesverty SS-30P power supply.
2. Safety Information
WARNING: Failure to follow these safety instructions may result in electric shock, fire, or serious injury.
- Always connect the power supply to a grounded AC outlet.
- Do not operate the device in wet or damp conditions.
- Ensure proper ventilation. Do not block the cooling fan or vents.
- Do not open the power supply casing. There are no user-serviceable parts inside. Refer all servicing to qualified personnel.
- Verify that the input voltage matches your local AC supply (115V AC for this model).
- Ensure that the total current draw of connected devices does not exceed the power supply's maximum output of 30 Amps.
- Disconnect the power supply from the AC outlet before making or changing any DC connections.
- Keep out of reach of children.
3. Package Contents
Verify that all items are present in the package:
- Jesverty SS-30P Power Supply (x1)
- AC Power Cord (x1)
- Instruction Manual (x1)

Figure 3.1: The SS-30P power supply shown with its included AC power cord.
4. Product Overview
4.1 Key Features
- AC to DC Conversion: Provides a stable 13.8V DC output from a 115V AC input.
- Dual Output Terminals: Equipped with two sets of Anderson connectors on the front panel and 5-way binding posts on the rear for versatile connectivity.
- High Current Capacity: Delivers up to 25 Amps continuous and 30 Amps surge current.
- Safety Protections: Includes overheat, short-circuit, and overcurrent protection.
- Integrated Cooling Fan: Features a built-in cooling fan to maintain optimal operating temperature.
- Durable Construction: Rugged housing designed for tabletop or desktop placement.
4.2 Component Identification

Figure 4.1: Front and rear panel overview with labeled components.
Front Panel:
- Power ON/OFF Switch: Toggles the power supply on or off. This switch is illuminated when the unit is powered on.
- Anderson Connectors Output Terminal: Two sets of Anderson Powerpole connectors for quick and secure DC connections.


Figure 4.2: Details of the illuminated power switch and Anderson connectors.
Rear Panel:
- DC Outputs (Binding Posts): 13.8V DC output terminals (red for positive, black for negative) for screw-type or banana plug connections.
- Intelligent Cooling Fan: Automatically activates to dissipate heat.
- AC Power Cable Input: Standard IEC C14 inlet for the AC power cord.
- Fuse: User-replaceable fuse for overcurrent protection.


Figure 4.3: Details of the DC output binding posts and intelligent cooling fan.
5. Setup
- Placement: Place the power supply on a stable, flat surface with adequate ventilation. Ensure that the cooling fan and side vents are not obstructed.
- AC Power Connection: Connect the provided AC power cord to the AC input on the rear panel of the power supply, then plug the other end into a standard 115V AC grounded wall outlet.
- DC Load Connection:
- Using Anderson Connectors (Front Panel): Connect your DC device's Anderson Powerpole cable to one of the two Anderson connector sets on the front panel. Ensure correct polarity (red for positive, black for negative).
- Using Binding Posts (Rear Panel): For devices requiring screw-type or banana plug connections, connect the positive (+) lead to the red binding post and the negative (-) lead to the black binding post on the rear panel. Tighten the posts securely.
Note: Both front and rear output terminals can be used simultaneously, but the total current draw across all outputs must not exceed 30 Amps.

Figure 5.1: Example of the SS-30P providing power to a radio.
6. Operating Instructions
- Power On: After connecting the AC power and DC load(s), press the ON/OFF switch on the front panel to the 'ON' position. The switch will illuminate, indicating the power supply is active.
- Operation: The power supply will provide a regulated 13.8V DC output. Your connected devices should now receive power.
- Power Off: To turn off the power supply, press the ON/OFF switch to the 'OFF' position. The illumination will turn off.
- Disconnecting Devices: Always turn off the power supply before disconnecting any DC loads.

Figure 6.1: The SS-30P is suitable for various radio communication applications.
7. Maintenance
- Cleaning: Disconnect the power supply from the AC outlet before cleaning. Use a soft, dry cloth to wipe the exterior. Do not use liquid cleaners or solvents.
- Ventilation: Regularly check that the cooling fan and vents are free from dust and obstructions to ensure proper airflow.
- Fuse Replacement: If the power supply fails to turn on, check the fuse located on the rear panel. Replace it with a fuse of the same type and rating (8A).
- Storage: When not in use for extended periods, store the power supply in a cool, dry place, away from direct sunlight and extreme temperatures.
8. Troubleshooting
| Problem | Possible Cause | Solution |
|---|---|---|
| Power supply does not turn on. | No AC power; Blown fuse; Faulty power cord. | Check AC outlet and power cord connection. Replace fuse if blown. |
| No DC output. | Power supply off; Incorrect DC connection; Overload protection activated. | Ensure power is ON. Verify DC cable polarity and connection. Reduce load to below 30A. |
| Power supply overheats. | Blocked ventilation; Excessive load. | Ensure vents are clear. Reduce load. Operate in a cooler environment. |
| Fan runs constantly or loudly. | High internal temperature; Normal operation under load. | This may be normal. Ensure ventilation is not blocked. If persistent and unusual, contact support. |
9. Specifications
| Feature | Specification |
|---|---|
| Model Number | SS-30P |
| Input Voltage | 115 Volts (AC) |
| Output Voltage | 13.8 Volts (DC) |
| Output Current (Continuous) | 25 Amps |
| Output Current (Surge) | 30 Amps |
| Output Wattage | 414 Watts |
| Dimensions (L x W x H) | 7.32 x 5.08 x 2.4 inches (18.6 x 12.9 x 6.1 cm) |
| Item Weight | 6.67 pounds (approx. 3.02 kg) |
| Cooling Method | Air (Built-in fan) |
| Connector Type | Anderson connector, Binding Posts |
| Compatible Devices | Two Way Radios (HAM, CB, GMRS, LMR), Scanners, 13.8V equipment |
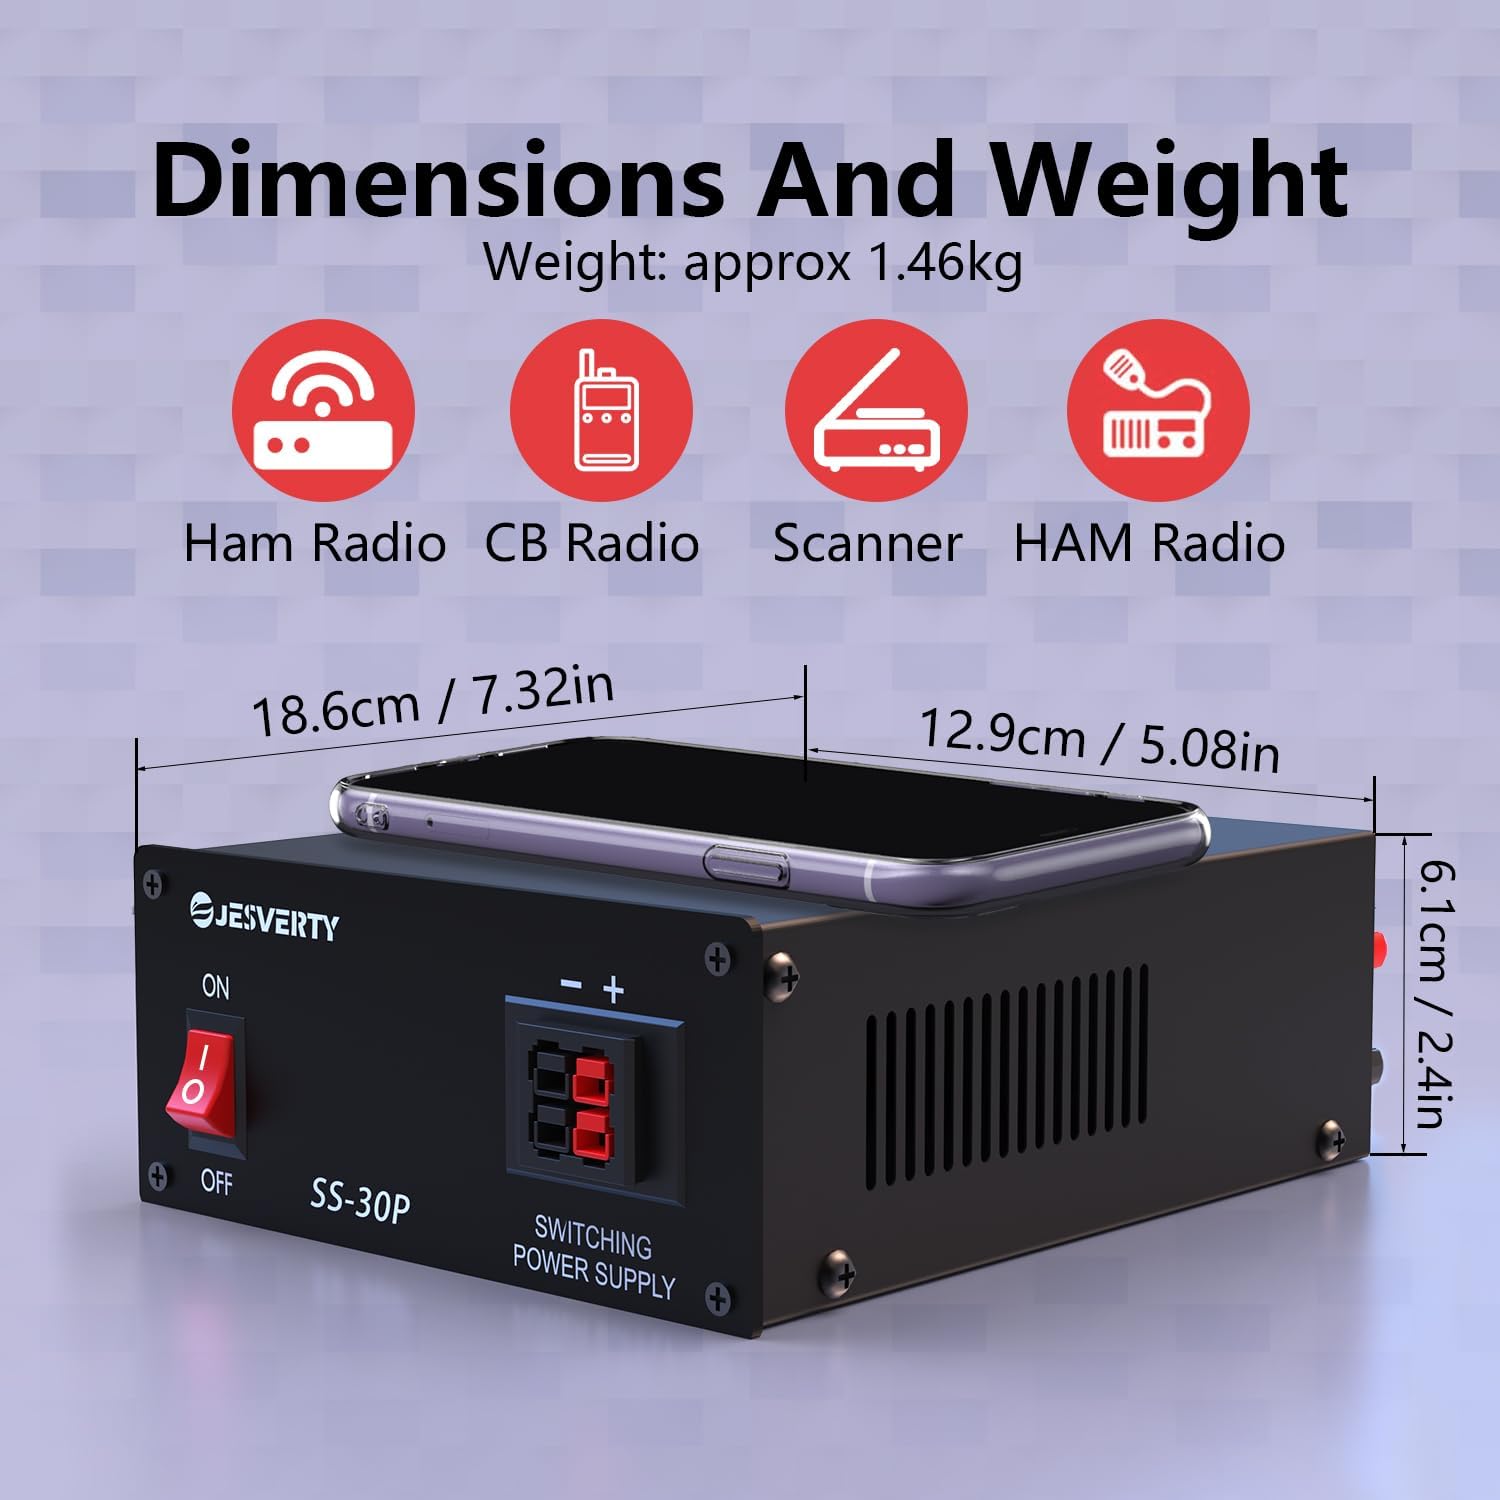
Figure 9.1: Physical dimensions and weight of the SS-30P power supply.
10. Warranty and Support
Jesverty provides lifetime technical support for the SS-30P power supply. If you encounter any issues or are not satisfied with the product, please contact Jesverty customer service for assistance. Refer to the product packaging or the official Jesverty website for contact information.


