Introduction
Thank you for choosing the ILAVIE 20 Bar Espresso Machine. This manual provides essential information for the safe and efficient operation, maintenance, and troubleshooting of your new espresso machine. Please read it thoroughly before first use and keep it for future reference.

Image: Front view of the ILAVIE 20 Bar Espresso Machine, showcasing its sleek stainless steel design and digital display.
Important Safety Information
Always follow basic safety precautions when using electrical appliances to reduce the risk of fire, electric shock, and/or injury to persons.
- This appliance is for 120V/60HZ ONLY. Using any adapter/converter may cause malfunction.
- Do not immerse the appliance, power cord, or plug in water or other liquids.
- Ensure the machine is placed on a stable, level surface away from hot surfaces or open flames.
- Always unplug the machine before cleaning or when not in use.
- Keep hands and cords away from hot surfaces and steam.
- Do not operate the machine with a damaged cord or plug.
- Children should be supervised to ensure they do not play with the appliance.
Components and Parts
Your ILAVIE Espresso Machine comes with the following components:
- Espresso Machine (Main Unit)
- Portafilter
- One Shot Filter
- Double Shot Filter
- Spoon & Tamper
- Removable Water Tank (1.8L capacity)
- Detachable Drip Tray
- User Manual

Image: Detailed view of the espresso machine's features including the digital display, cup warmer, 1.8L removable water tank, and detachable drip tray.
Setup
- Unpacking: Carefully remove all components from the packaging. Retain packaging for future storage or transport.
- Placement: Place the espresso machine on a stable, flat, and heat-resistant surface. Ensure adequate ventilation around the machine.
- Water Tank Installation: Remove the 1.8L water tank from the back of the machine. Fill it with fresh, cold water up to the MAX line. Reinsert the water tank securely into its position.
- Initial Rinse: Before first use, perform an initial rinse cycle. Fill the water tank, place a large cup under the portafilter spout (without coffee grounds), and run a brewing cycle. This cleans the internal components and primes the pump.
- Power Connection: Plug the power cord into a grounded 120V/60Hz electrical outlet.
Operating Instructions
Brewing Espresso
- Preheat: Turn on the machine. Allow it to preheat until the digital display shows the optimal brewing temperature (e.g., 198°F).
- Prepare Portafilter: Insert either the single or double shot filter into the portafilter. Add desired amount of finely ground coffee. For a single shot, use approximately 7-8g; for a double shot, use 14-16g.
- Tamp Coffee: Use the included tamper to firmly press the coffee grounds. Ensure an even and level surface.
- Attach Portafilter: Securely attach the portafilter to the brewing head by aligning it and twisting it to the right until it locks into place.
- Brew: Place your espresso cup(s) on the drip tray beneath the portafilter. Press the single cup or double cup button on the control panel. The machine will begin brewing, and a countdown will appear on the display.
- Enjoy: Once brewing is complete, remove your cup(s). Carefully remove the portafilter by twisting it to the left.

Image: A hand using the included tamper to press coffee grounds into the 51mm portafilter, ensuring a perfect dose for extraction.

Image: Diagram illustrating the ThermoJet heating system, which allows the machine to be ready in a few seconds, and the built-in pressure gauge for optimal brewing.

Image: Close-up of the machine highlighting the 1350W Thermocoil Heating System, which precisely controls water temperature for maximum flavor extraction.
Milk Frothing (for Cappuccinos, Lattes, Macchiatos)
- Prepare Milk: Fill a stainless steel milk frothing pitcher with cold milk (dairy or non-dairy). Do not fill more than halfway.
- Activate Steam: Press the steam button on the control panel. Wait for the machine to reach steaming temperature, indicated on the display.
- Purge Steam Wand: Position the steam wand over the drip tray and briefly open the steam knob to purge any condensed water. Close the knob.
- Froth Milk: Immerse the tip of the 360-degree rotatable steam wand just below the surface of the milk. Open the steam knob fully. Angle the pitcher to create a swirling motion. As the milk expands and heats, lower the pitcher slightly to keep the tip just below the surface.
- Monitor Temperature: Continue frothing until the milk reaches desired temperature and texture (typically 140-150°F or when the pitcher is too hot to touch comfortably).
- Clean Steam Wand: Immediately after frothing, close the steam knob. Wipe the steam wand with a damp cloth to remove any milk residue. Briefly open the steam knob again to purge any milk from inside the wand.

Image: A hand demonstrating the use of the 360-degree rotatable steam wand to create silky microfoam for milk-based coffee drinks.
Maintenance
Regular cleaning and maintenance will ensure the longevity and optimal performance of your espresso machine.
- Daily Cleaning:
- Empty and clean the detachable drip tray after each use.
- Rinse the portafilter and filter baskets under warm water.
- Wipe down the exterior of the machine with a damp cloth.
- Clean the steam wand immediately after each use as described in the operating instructions.
- Water Tank: Empty and rinse the water tank regularly, especially if the machine will not be used for an extended period.
- Descaling: Depending on water hardness, descaling should be performed every 2-3 months. Use a commercial descaling solution designed for espresso machines and follow the product's instructions.
Troubleshooting
| Problem | Possible Cause | Solution |
|---|---|---|
| No coffee dispenses | No water in tank; clogged filter; machine not preheated. | Fill water tank; clean filter; allow machine to preheat. |
| Espresso brews too slowly/quickly | Coffee grind too fine/coarse; improper tamping. | Adjust grind size; ensure proper tamping pressure. |
| Steam wand not producing steam | Clogged steam wand; not at steaming temperature. | Clean steam wand; wait for machine to reach steam temp. |
| Machine not turning on | Not plugged in; power outage; internal issue. | Check power connection; verify outlet; contact support if persistent. |
Specifications
- Brand: ILAVIE
- Model Name: EM3209
- Coffee Maker Type: Espresso Machine
- Operation Mode: Semi-Automatic
- Pump Pressure: 20 Bar
- Power: 1350W
- Voltage: 120V/60HZ
- Water Tank Capacity: 1.8L (approx. 61 oz)
- Product Dimensions: 14.17"D x 7.48"W x 13.39"H
- Item Weight: 9.78 pounds
- Color: Bright Silver
- Filter Type: Reusable
- Special Feature: Programmable, Digital Temperature Control (PID Technology)
- Human Interface Input: Buttons
- Date First Available: April 12, 2024
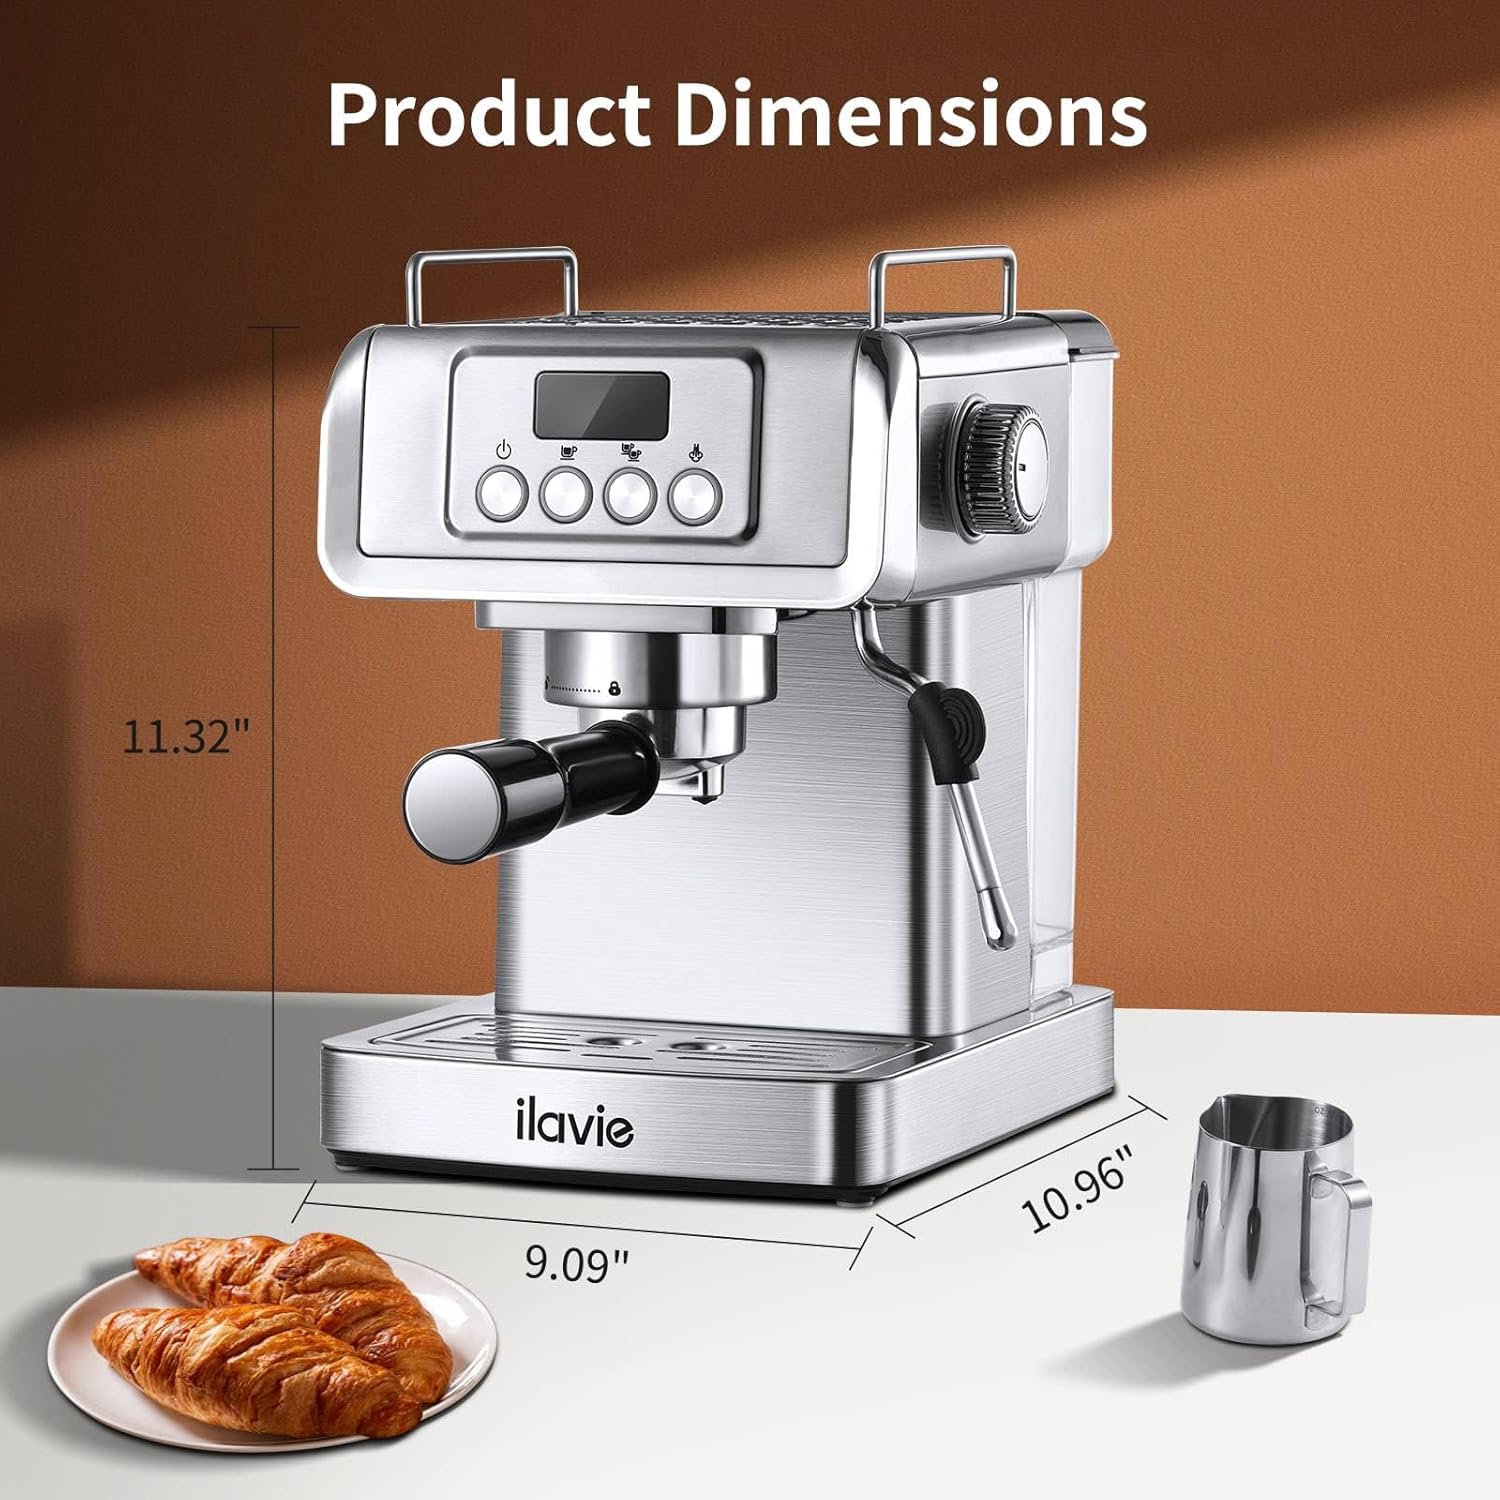
Image: Diagram showing the dimensions of the ILAVIE Espresso Machine: 14.17" depth, 7.48" width, and 13.39" height.
Warranty and Support
Your ILAVIE Espresso Machine comes with a one-year guarantee from the date of purchase. This warranty covers defects in materials and workmanship under normal use.
What is NOT Covered:
- Damage caused by misuse, abuse, accident, or alteration.
- Damage from using an adapter/converter with the machine.
- Normal wear and tear.
For any questions, concerns, or warranty claims, please contact our after-sales team. We provide 24-hour after-sales service.
Please refer to the contact information provided in your quick start guide or on the official ILAVIE website for support.