Introduction
This manual provides detailed instructions for the installation, operation, and maintenance of your Mangood Wireless Remote Control Switch. Please read this manual thoroughly before use to ensure proper functionality and safety.
The Mangood Wireless Remote Control Switch is designed for various electrical applications, offering convenient remote control over lights, motors, fans, and other devices. It operates on a wide voltage range of AC 85V-240V and utilizes 433Mhz RF technology for stable and reliable signal transmission.
Product Overview
The Mangood Wireless Remote Control Switch system consists of a receiver module and one or more remote control transmitters. The receiver is designed to be integrated into your electrical circuit, while the transmitters provide wireless control.
Key Features:
- Wide Voltage Compatibility: Operates with AC 85V-240V, 110V, and 220V loads.
- RF Wireless Control: No direct wiring needed between the switch and the light/device for control.
- Stable RF Signal: 433Mhz RF technology ensures high reception sensitivity and signal penetration through walls, floors, and doors.
- Simplified Installation: Easy to install between the power supply and the device, suitable for hidden junction boxes.
- Secure Operation: Utilizes RF encrypted remote control for secure and reliable operation.
- Versatile Applications: Suitable for industrial, home, farm, office, and laboratory settings for controlling various electrical equipment.
Components:

Image: The Mangood Wireless Remote Control Switch receiver module, two remote control transmitters, and the internal circuit board of the receiver.

Image: A detailed view of the receiver's internal circuit board, highlighting key components such as the Antenna, Relay, Learn Button, and Indicator LED.

Image: Dimensions of the receiver module (47mm x 67mm x 23mm) and the remote control transmitter (29mm x 60mm x 45mm including keyring).
Specifications
| Feature | Specification |
|---|---|
| Product Dimensions | 2.56 x 1.57 x 0.79 inches (65 x 40 x 20 mm); 1.6 ounces |
| Operating Voltage | AC 85V-240V (110V, 220V compatible) |
| Current Rating | 10 Amps (Maxload) |
| RF Frequency | 433Mhz |
| Operation Mode | ON-OFF |
| Contact Type | Normally Closed |
| Connector Type | Plug In (Screw Terminals) |
| Actuator Type | Remote Control |
| Circuit Type | 1-way |
| Remote Batteries | 2 LR44 batteries (included) |
Setup and Installation
Safety Warning: Installation should only be performed by qualified personnel. Ensure power is disconnected before beginning any wiring work to prevent electric shock.
Wiring Diagram:
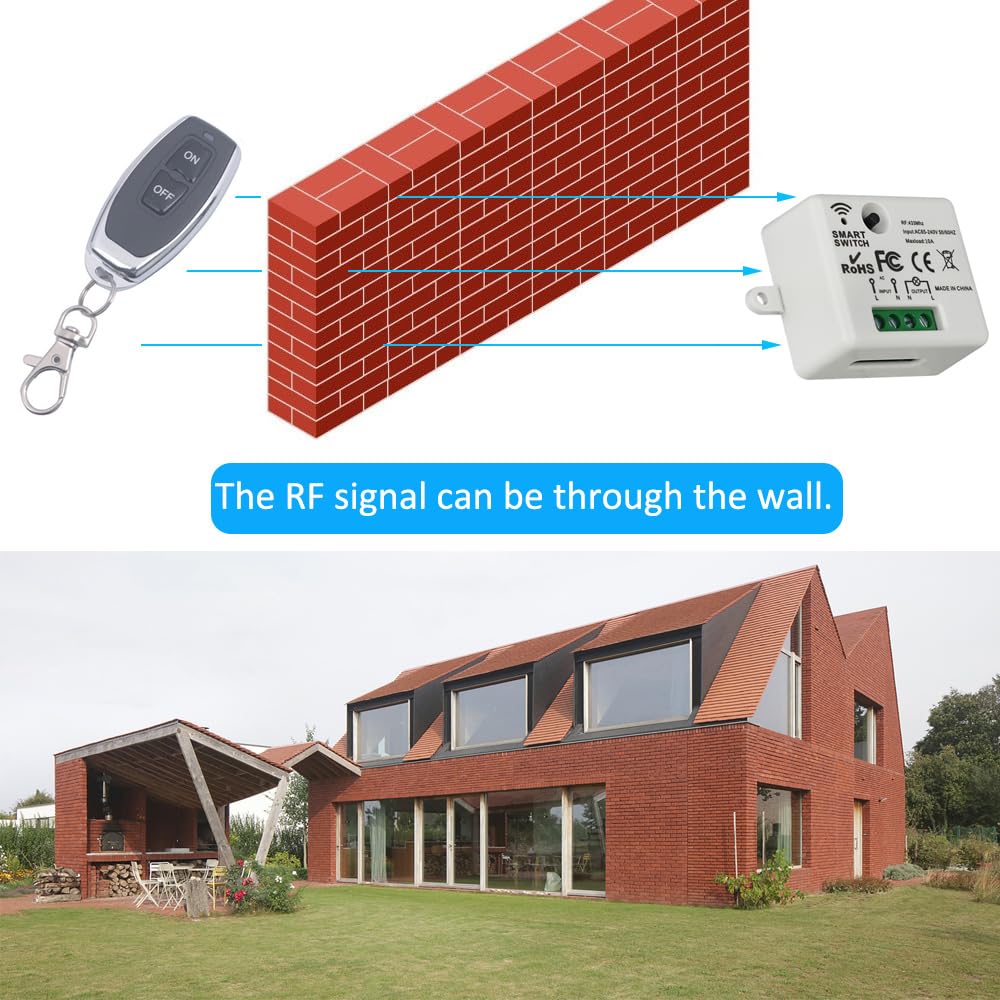
Image: Wiring diagram showing how to connect the AC 85V-250V power source to the input terminals (L and N) and the load (e.g., a light bulb) to the output terminals (L and N) of the receiver module.
- Disconnect Power: Turn off the main power supply to the circuit where the switch will be installed.
- Identify Wires: Locate the Live (L) and Neutral (N) wires from your AC power source and to your electrical load (e.g., light fixture, motor).
- Connect Input: Connect the Live (L) wire from the AC power source to the 'INPUT L' terminal on the receiver. Connect the Neutral (N) wire from the AC power source to the 'INPUT N' terminal on the receiver.
- Connect Output: Connect the Live (L) wire of your electrical load to the 'OUTPUT L' terminal on the receiver. Connect the Neutral (N) wire of your electrical load to the 'OUTPUT N' terminal on the receiver.
- Secure Connections: Ensure all wire connections are tight and secure within the screw terminals.
- Mount Receiver: Place the receiver in a suitable location, such as a hidden junction box, ensuring it is protected from moisture and physical damage. The housing is made of anti-flaming ABS plastic.
- Restore Power: Once all connections are secure and the receiver is safely mounted, restore power to the circuit.
Note: The terminals are small. Use appropriate gauge wiring (e.g., 14-18 AWG) and a precision screwdriver for secure connections. Avoid using excessively thick wires that may not fit properly.
Operating Instructions
The Mangood Wireless Remote Control Switch supports multiple work modes. You can program the remote control to operate the receiver in different ways.
Work Modes:

Image: Diagram showing the receiver's internal board with the "Learn Button" and "Indicator LED" labeled, along with instructions for programming different work modes.
- Momentary Mode:
Operation: Press and hold the remote button, the relay is ON. Release the button, the relay is OFF.
Programming: Press the "Learn Button" on the receiver 1 time. Then press the desired control button on your remote.
- Toggle/Self-lock Mode:
Operation: Press the remote button once, the relay is ON. Press the same button again, the relay is OFF.
Programming: Press the "Learn Button" on the receiver 2 times. Then press the desired control button on your remote.
- Inter-lock/Latched Mode:
Operation: Press button 1 on the remote, relay 1 is ON and relay 2 is OFF. Press button 2 on the remote, relay 2 is ON and relay 1 is OFF. (This mode is typically for receivers with multiple relays, but for a single-channel switch, it might behave like Toggle mode or require two distinct buttons for ON/OFF if available on the remote).
Programming: Press the "Learn Button" on the receiver 3 times. Then press button 1 on your remote, wait 3 seconds, then press button 2 on your remote.
- Delay Off Mode (5S/10S/15S/20S):
Operation: Press the remote button, the relay is ON, then automatically turns OFF after the set delay (5, 10, 15, or 20 seconds).
Programming: Press the "Learn Button" on the receiver 4, 5, 6, or 7 times respectively for 5S, 10S, 15S, or 20S delay. Then press the desired control button on your remote.
How to Remove/Delete Remote Control Pairing:
To clear all paired remote controls from the receiver's memory:
- Press and hold the "Learn Button" on the receiver for approximately 5-8 seconds until the indicator LED flashes off. This indicates that all stored remote control codes have been cleared.
Applications
The Mangood Wireless Remote Control Switch is suitable for a wide range of applications due to its versatility and ease of installation.

Image: A collage demonstrating various applications such as controlling recessed lighting, staircase lighting, electric motors, ceiling fans, outdoor lighting, water pumps, and aquarium equipment.
- Lighting Control: Ideal for remotely switching on/off indoor and outdoor lights, including recessed lights, ceiling lights, and landscape lighting.
- Motor Control: Can be used to control small motors, fans, and ventilation devices.
- Home Automation: Integrate into existing systems for remote control of various appliances.
- Industrial Use: Applicable in factories, laboratories, and farms for controlling equipment.
- Security Applications: Can be used for electrically operated doors, locks, and windows.

Image: A diagram illustrating how the RF signal from the remote control can pass through a wall to reach the receiver, enabling control from another room.
Troubleshooting
- Device not responding to remote:
- Check if the receiver has power.
- Ensure the remote control batteries (2 LR44) are not depleted.
- Verify that the remote is properly paired with the receiver according to the "Operating Instructions" section. Try re-pairing.
- Confirm the remote is within the effective range (up to 50 meters without obstacles).
- Check for strong RF interference from other devices.
- Wiring issues:
- Ensure all wires are securely connected to the correct terminals (Live to L, Neutral to N). Loose connections can cause intermittent operation or failure.
- Confirm the load (e.g., light bulb) is functioning correctly when directly connected to power.
- Remote control quantity discrepancy:
- Some packages may state "2 Transmitters" but contain only one. Please verify package contents upon receipt. If a discrepancy exists, contact customer support.
- Small terminals for wiring:
- The receiver has small screw terminals. Use appropriate wire gauges (e.g., 14-18 AWG) and a precision screwdriver to ensure secure and safe connections. Avoid forcing overly thick wires into the terminals.
Maintenance
- Cleaning: Wipe the receiver and remote control with a dry, soft cloth. Do not use liquid cleaners or solvents.
- Battery Replacement: Replace the LR44 batteries in the remote control when its range decreases or it stops responding. Ensure correct polarity when inserting new batteries.
- Environmental Protection: Keep the receiver away from excessive moisture, heat, and direct sunlight. The housing is not waterproof.
- Regular Checks: Periodically check wiring connections for tightness, especially in high-vibration environments.
Warranty and Support
Mangood is committed to providing quality products and good after-sales service. While specific warranty details are not provided in this manual, please retain your proof of purchase for any warranty claims.
For technical support, troubleshooting assistance, or inquiries regarding your Mangood Wireless Remote Control Switch, please refer to the seller's contact information or visit the official Mangood store on Amazon:
We strive to solve customer problems and ensure satisfaction with our products.


