
Dewenwils HODT01F
Contents
DEWENWILS Pool Pump Timer User Manual
Model: HODT01F
1. Introduction
This manual provides detailed instructions for the installation, operation, and maintenance of your DEWENWILS Outdoor Digital Timer Box, Model HODT01F. This heavy-duty timer is designed for controlling high-power outdoor appliances such as pool pumps, water heaters, pool filters, spas, irrigation systems, and landscape lighting. Please read this manual thoroughly before installation and use to ensure safe and efficient operation.
2. Safety Information
WARNING: Risk of Electric Shock!
- Installation should only be performed by a qualified electrician in accordance with all local and national electrical codes.
- Always turn OFF power at the circuit breaker before installing or servicing this timer or the equipment it controls. More than one disconnect switch may be required to de-energize the device before servicing.
- This timer is designed for 240VAC applications. Ensure your electrical supply matches the product specifications.
- Use copper conductors only. For supply connections, use copper wire AWG 8-18 suitable for 90°C (194°F).
- Always close the door after use. Use the listed wiring connector for grounding terminals.
- Do not immerse in water. This product is IP44 waterproof, meaning it is protected against solid objects larger than 1mm and splashing water from any direction, but not immersion.
- Ensure the timer is securely mounted to a stable surface.
3. Product Features
- Programmable Schedules: Up to 12 ON/OFF schedules for 7-day repeat cycles or single-day settings.
- Multiple Modes: Options for Always ON/OFF, AUTO ON/OFF, and manual override.
- Daylight Saving Time (DST) Support: Easily adjust for DST.
- Built-in Battery Backup: Maintains clock and settings for up to 6 months during power outages.
- Heavy-Duty Capacity: 40 AMP, 3HP, 240VAC rating for demanding applications.
- Durable Construction: Corrosion-resistant metal housing with IP44 waterproof rating, resin PC core, and flame-retardant insulation. Operates from -40°F to 140°F.
- Easy Wiring: Innovative design simplifies installation by eliminating complex jumper steps.
- ETL Certified: Ensures product safety and quality standards are met.
4. Package Contents
- DEWENWILS Outdoor Digital Timer Box (Model HODT01F)
- User Manual
- Mounting Hardware (screws, anchors)
5. Product Overview and Components
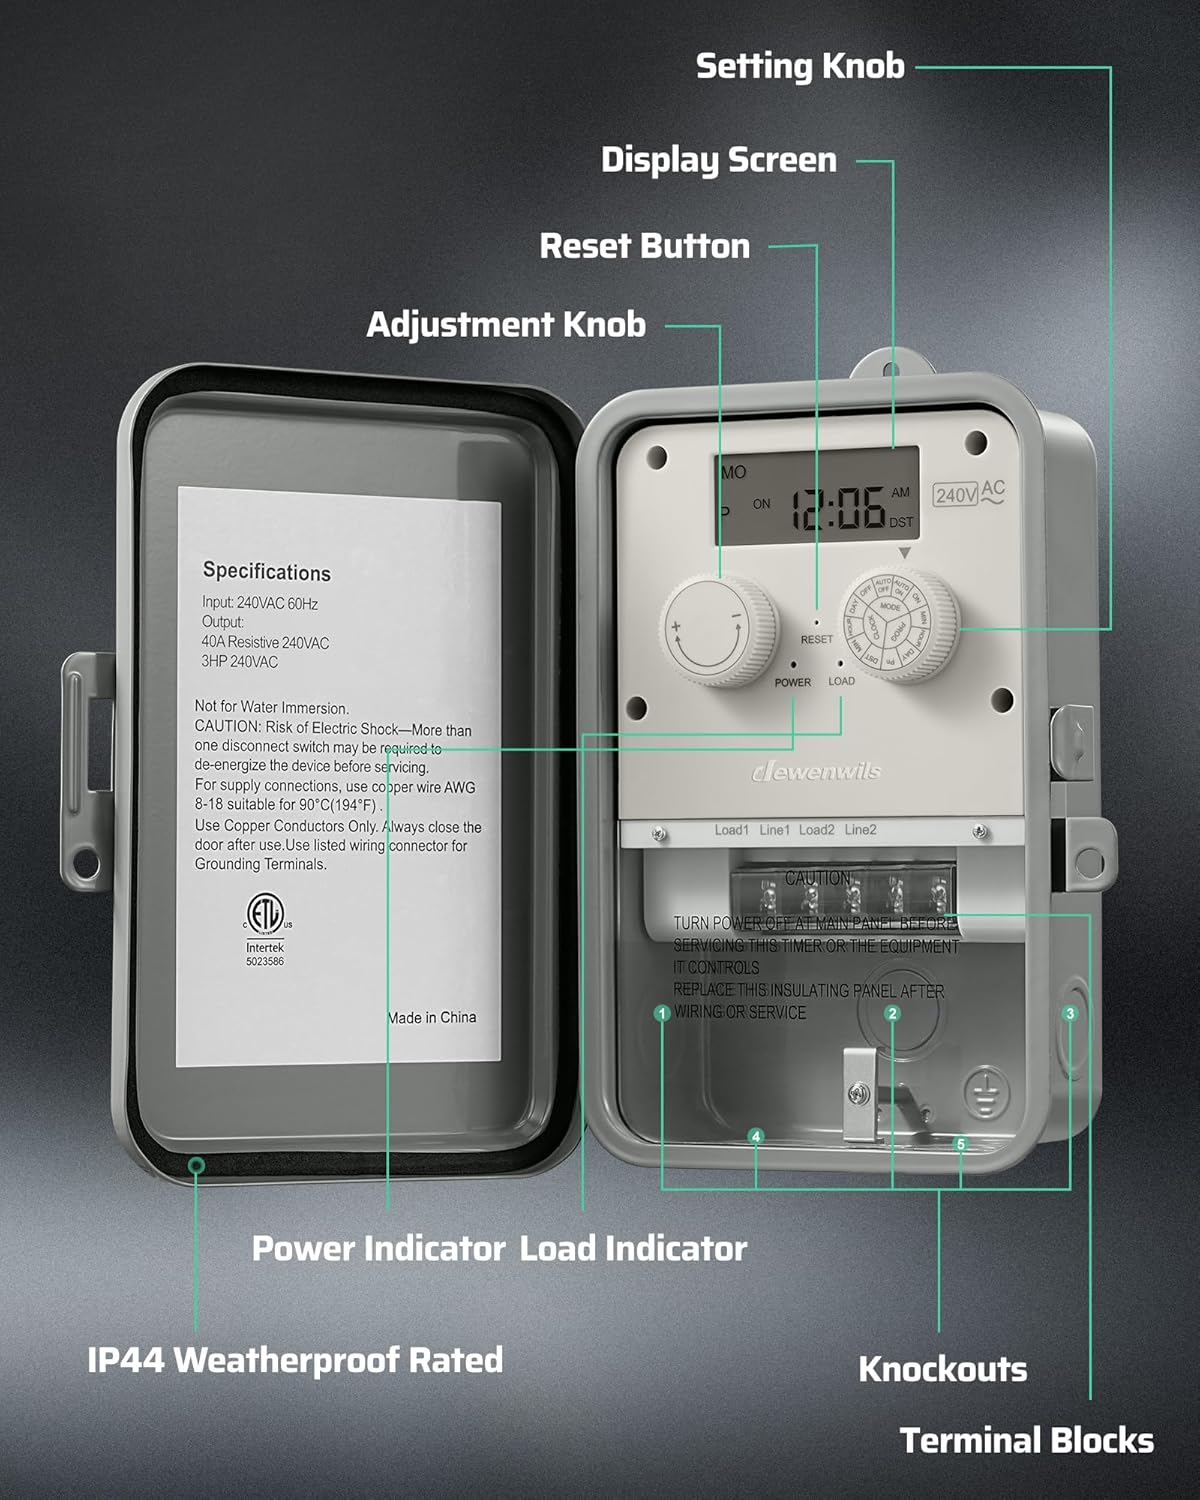
Figure 5.1: Overview of the DEWENWILS Outdoor Digital Timer Box with key components labeled. This image highlights the display screen, setting knob, adjustment knob, reset button, power and load indicators, terminal blocks for wiring, knockouts for conduit, and the IP44 weatherproof rated housing.
- Display Screen: Shows current time, day, and program status.
- Setting Knob: Used to navigate through settings and modes.
- Adjustment Knob (+/-): Used to adjust time, program settings, and other values.
- Reset Button: Resets the timer to factory defaults.
- Power Indicator: Illuminates when power is supplied to the unit.
- Load Indicator: Illuminates when the connected load is active.
- Terminal Blocks: Secure connection points for input power and output load wiring.
- Knockouts: Pre-punched holes for electrical conduit entry.
- IP44 Weatherproof Rated Housing: Durable metal enclosure providing protection against outdoor elements.
6. Installation
6.1 Mounting the Timer
Choose a suitable outdoor location for mounting the timer, ensuring it is protected from direct heavy rain and accessible for wiring and operation. Use appropriate screws and anchors for the mounting surface.
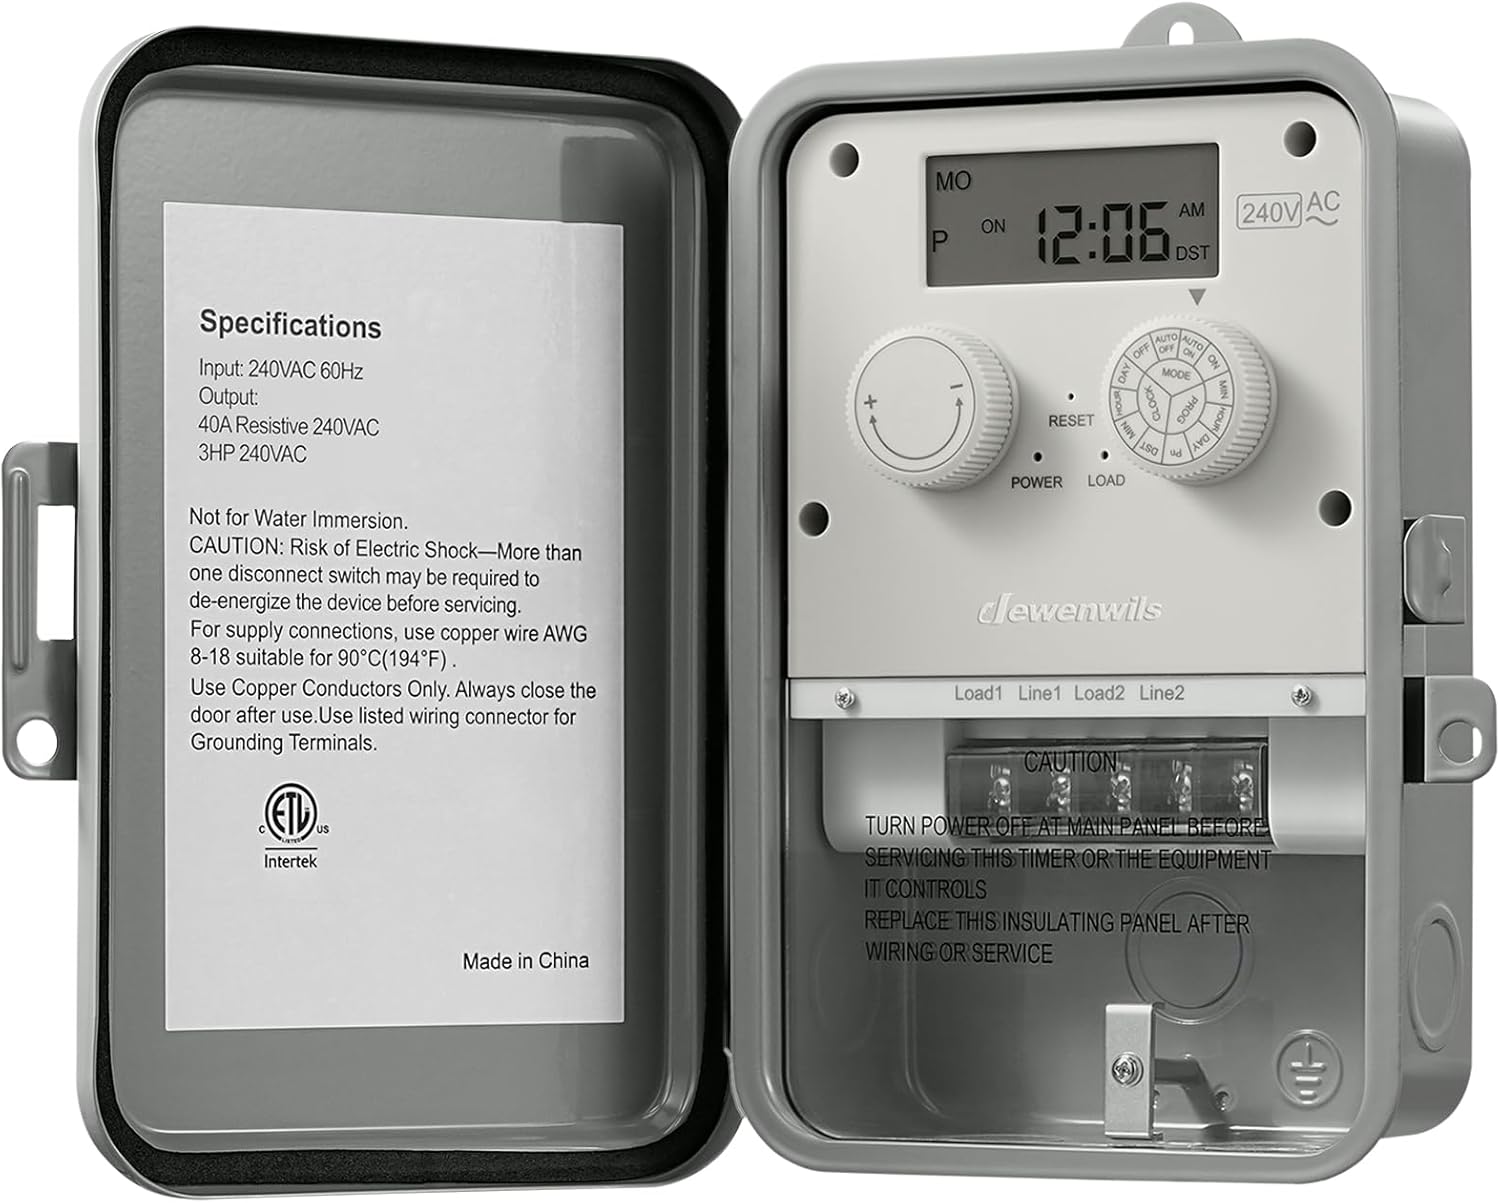
Figure 6.1: The DEWENWILS Pool Pump Timer shown mounted, with its protective cover open, revealing the internal components and wiring specifications. This illustrates the typical installation appearance.
6.2 Wiring Instructions
IMPORTANT: Ensure all power is OFF at the circuit breaker before proceeding with wiring.
The DEWENWILS timer is designed for 240VAC single-phase loads. Follow the wiring diagrams below carefully. This timer controls one 240VAC load.

Figure 6.2: Wiring diagram for connecting the timer to control a single 240VAC load. This diagram shows how to connect Power L1 and Power L2 from the circuit breaker to the timer's Line 1 and Line 2 terminals, and then connect the Load L1 and Load L2 from the timer's Load 1 and Load 2 terminals to the appliance.
- Connect the 240VAC power supply (L1 and L2 from your circuit breaker) to the "Line 1" and "Line 2" terminals on the timer.
- Connect your 240VAC appliance (e.g., pool pump) to the "Load 1" and "Load 2" terminals on the timer.
- Ensure all connections are tight and secure.
- Close the timer's protective door.
- Restore power at the circuit breaker.
For specific applications like water heaters, refer to the following diagram:

Figure 6.3: Wiring diagram for connecting the timer to control a hot water heater. This diagram illustrates how the 240VAC dual-phase power from the circuit breaker connects to the timer, and then the timer's load outputs connect to the hot water tank's 120VAC inputs.
7. Operating Instructions
7.1 Initial Setup: Setting Current Time and Day
Upon first power-up or after a long power outage (beyond battery backup), you may need to set the current time and day.
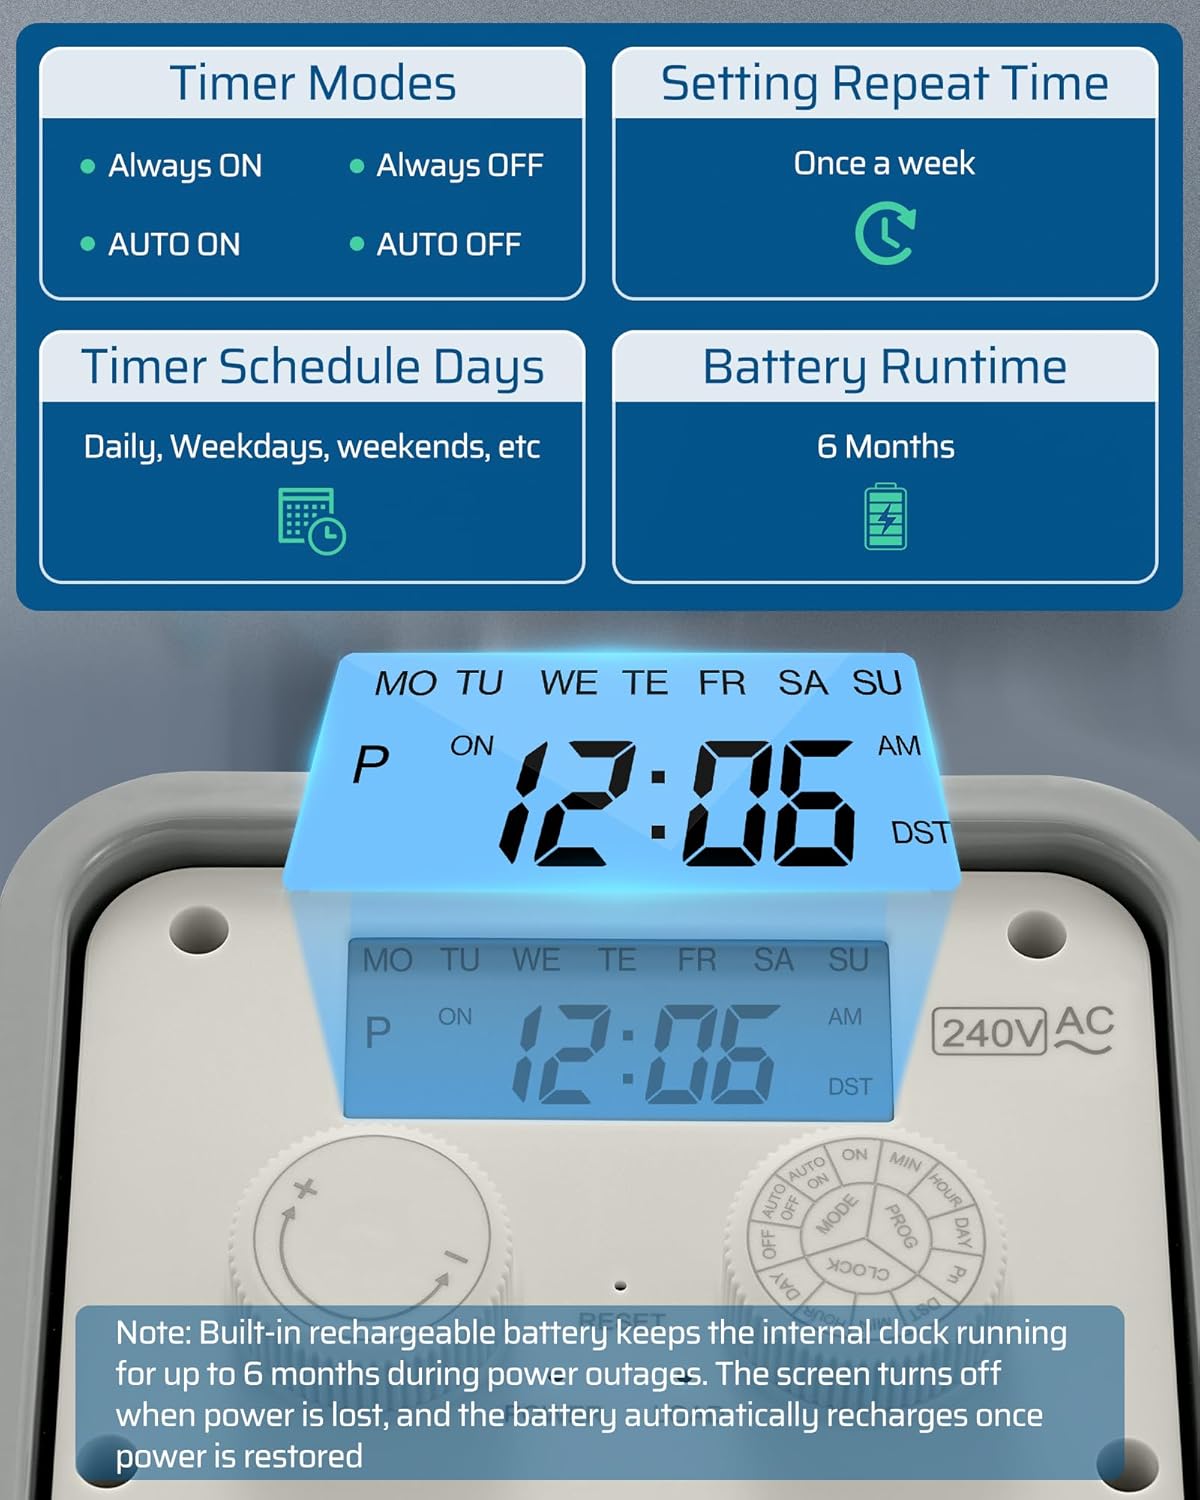
Figure 7.1: The timer's digital display showing the current time, day of the week, and DST indicator. This image also highlights the various timer modes and battery runtime information.
- Turn the Setting Knob to "CLOCK" position.
- Use the Adjustment Knob (+/-) to set the current hour and minute.
- Press the DAY button (part of the Setting Knob assembly) to select the current day of the week.
- To enable/disable Daylight Saving Time (DST), press and hold the DAY button for 3 seconds. The "DST" indicator will appear/disappear.
- Turn the Setting Knob back to "AUTO ON/OFF" to save settings and return to normal operation.
7.2 Programming ON/OFF Schedules
The timer supports up to 12 ON/OFF programs. Each program can be set for specific days of the week or for daily/weekend/weekday cycles.

Figure 7.2: Visual representation of the timer's key programming capabilities, including 7-day programmability, up to 12 ON/OFF settings, and support for Daylight Saving Time (DST).
- Turn the Setting Knob to "PROG" position. The display will show "1 ON".
- Use the Adjustment Knob (+/-) to set the desired ON time for Program 1.
- Press the DAY button repeatedly to select the desired day(s) for this ON event (e.g., MO TU WE TH FR SA SU, MO TU WE TH FR, SA SU, MO, TU, etc.).
- Turn the Setting Knob to "PROG" again. The display will show "1 OFF".
- Use the Adjustment Knob (+/-) to set the desired OFF time for Program 1.
- Press the DAY button to select the desired day(s) for this OFF event (should match the ON event days).
- Repeat steps 1-6 for additional programs (up to 12 ON/OFF pairs). To advance to the next program number, turn the Setting Knob to "PROG" after setting the previous OFF time.
- Once all programs are set, turn the Setting Knob back to "AUTO ON/OFF" for the programs to take effect.
7.3 Operating Modes and Manual Override
The timer offers several operating modes, which can be selected using the Setting Knob.

Figure 7.3: Illustration of the manual override settings available on the timer: Always ON, Always OFF, AUTO ON, and AUTO OFF. These modes allow for immediate control of the connected appliance, overriding programmed schedules as needed.
- AUTO ON/OFF: This is the standard operating mode where the timer follows the programmed ON/OFF schedules. The display will show "AUTO" and "ON" or "OFF" depending on the current state.
- ALWAYS ON: Turns the connected appliance ON indefinitely, overriding all programmed schedules. The display will show "ON".
- ALWAYS OFF: Turns the connected appliance OFF indefinitely, overriding all programmed schedules. The display will show "OFF".
- MODE Button: While in AUTO ON/OFF mode, pressing the MODE button will cycle through the current state (ON/OFF) and temporarily override it until the next programmed event. For example, if the timer is currently OFF in AUTO mode, pressing MODE will turn it ON until the next scheduled OFF time.
8. Maintenance
- Cleaning: Wipe the exterior of the timer with a soft, damp cloth. Do not use abrasive cleaners or solvents. Ensure the door is closed tightly after cleaning.
- Battery Backup: The built-in battery is designed to maintain settings during power outages. No user maintenance is required for the battery. If the display is blank after a power outage, the battery may be fully discharged and will recharge once power is restored.
- Inspection: Periodically inspect the timer and its wiring for any signs of damage, corrosion, or loose connections. Address any issues promptly.
- Environmental Protection: Ensure the timer's door is always securely latched to maintain its IP44 weatherproof rating.
9. Troubleshooting
| Problem | Possible Cause | Solution |
|---|---|---|
| Timer display is blank. | No power supply; Battery backup depleted. | Check circuit breaker. Ensure power is supplied to the timer. If power is restored, the battery will recharge. |
| Appliance does not turn ON/OFF at programmed times. | Timer is not in "AUTO ON/OFF" mode; Incorrect program settings; Power issue to appliance. | Ensure Setting Knob is on "AUTO ON/OFF". Verify program times and days are correctly set. Check appliance power supply. |
| Timer is not responding to button presses. | Temporary software glitch. | Press the RESET button (use a pointed object like a pen tip). This will clear all settings, requiring re-programming. |
| Appliance is always ON or always OFF. | Timer is set to "ALWAYS ON" or "ALWAYS OFF" mode. | Turn the Setting Knob to "AUTO ON/OFF" mode. |
10. Specifications
| Parameter | Value |
|---|---|
| Model Number | HODT01F |
| Input Voltage | 240VAC, 60Hz |
| Output Rating | 40A Resistive, 3HP, 240VAC |
| Operating Temperature | -40°F to 140°F (-40°C to 60°C) |
| Material | Metal Housing |
| IP Rating | IP44 (Weatherproof) |
| Battery Backup | Up to 6 months |
| Certifications | ETL Listed |
| Product Dimensions | 11.99 x 16.99 x 19.99 cm (4.72 x 6.69 x 7.87 inches) |
| Item Weight | 1.32 kg (2.91 lbs) |
11. Warranty and Support
DEWENWILS products come with a standard manufacturer's warranty. For specific warranty details, technical support, or assistance with installation and programming, please contact DEWENWILS customer service.
Email: service@dewenwils.com
Please have your model number (HODT01F) and purchase information ready when contacting support.
Ask a question about this manual
Ask about setup, troubleshooting, compatibility, parts, safety, or missing instructions. Manuals+ will review the question and use this page’s manual context to help answer it.