Introduction
This manual provides detailed instructions for the assembly, operation, and maintenance of your Aoodor 12 x 16 ft Outdoor Pergola. Designed to enhance your outdoor living space, this pergola features a durable aluminum frame, a retractable shade canopy, and two roller shade curtains for adjustable sun protection. Please read these instructions thoroughly before beginning assembly or use to ensure safe and correct operation.

Figure 1: Overview of the Aoodor 12 x 16 ft Outdoor Pergola in an outdoor setting.
Safety Information
WARNING: Failure to follow these safety guidelines may result in injury or damage to the product.
- Always follow the assembly instructions carefully.
- Keep children and pets away from the pergola during assembly and disassembly.
- Do not exceed the weight limit of the pergola.
- Secure the pergola to a stable foundation to prevent it from tipping over in windy conditions.
- Be cautious when operating the rolling curtains to prevent injury.
Parts List
Before beginning assembly, ensure all parts are present and undamaged. Refer to the included parts diagram in your packaging for specific component identification. All parts are clearly labeled with letters for easy identification.
- Aluminum Frame Components (Posts, Beams, Crossbars)
- Retractable Shade Canopy Fabric
- Roller Shade Curtains (2 pieces)
- Hardware Kit (Screws, bolts, washers, anchoring plates)
- Tools (Allen keys, wrenches, etc., as specified in packaging)
Setup and Assembly
Assembly typically requires two people and can be completed in approximately 2 hours. Follow the step-by-step instructions provided in your product packaging. Ensure you have adequate space and all necessary tools before starting.
- Unpack and Identify Parts: Carefully remove all components from the packaging. Lay them out and compare them against the parts list and diagram to ensure nothing is missing or damaged.
- Assemble the Frame: Connect the main posts and beams according to the numbered steps in your manual. Ensure all connections are secure but do not fully tighten bolts until the frame is complete.
- Attach Crossbars and Trellis: Install the decorative crisscross trellis design elements and any additional crossbars as instructed.
- Install Retractable Canopy: Carefully attach the retractable shade canopy fabric to the designated tracks or rods. Ensure the pulley system operates smoothly.
- Install Roller Shade Curtains: Mount the two roller shade curtains to the side posts. Verify their rolling and locking mechanisms function correctly.
- Anchor the Pergola: Secure the pergola to a stable surface using the provided anchoring plates and hardware. The base plates have 4 pre-drilled holes for enhanced stability. This step is crucial for safety, especially in windy conditions.
- Final Tightening: Once the entire structure is assembled and anchored, go back and fully tighten all bolts and screws.

Figure 2: Product Dimensions for planning and assembly.

Figure 3: Detail of the stable anchoring stand for secure installation.

Figure 4: Frame details, including the trellis design and aluminum construction.
Video 1: Aoodor Pergola with Retractable Canopy, Aluminum Frame. This video provides a visual overview of the pergola's features and design, which can aid in understanding the assembly process.
Operating Instructions
Retractable Shade Canopy
The main canopy is easily adjustable for optimal shade. Use the smooth pulley operation to extend or retract the canopy. A locking system is integrated to secure the canopy in your desired position, preventing it from moving unintentionally.
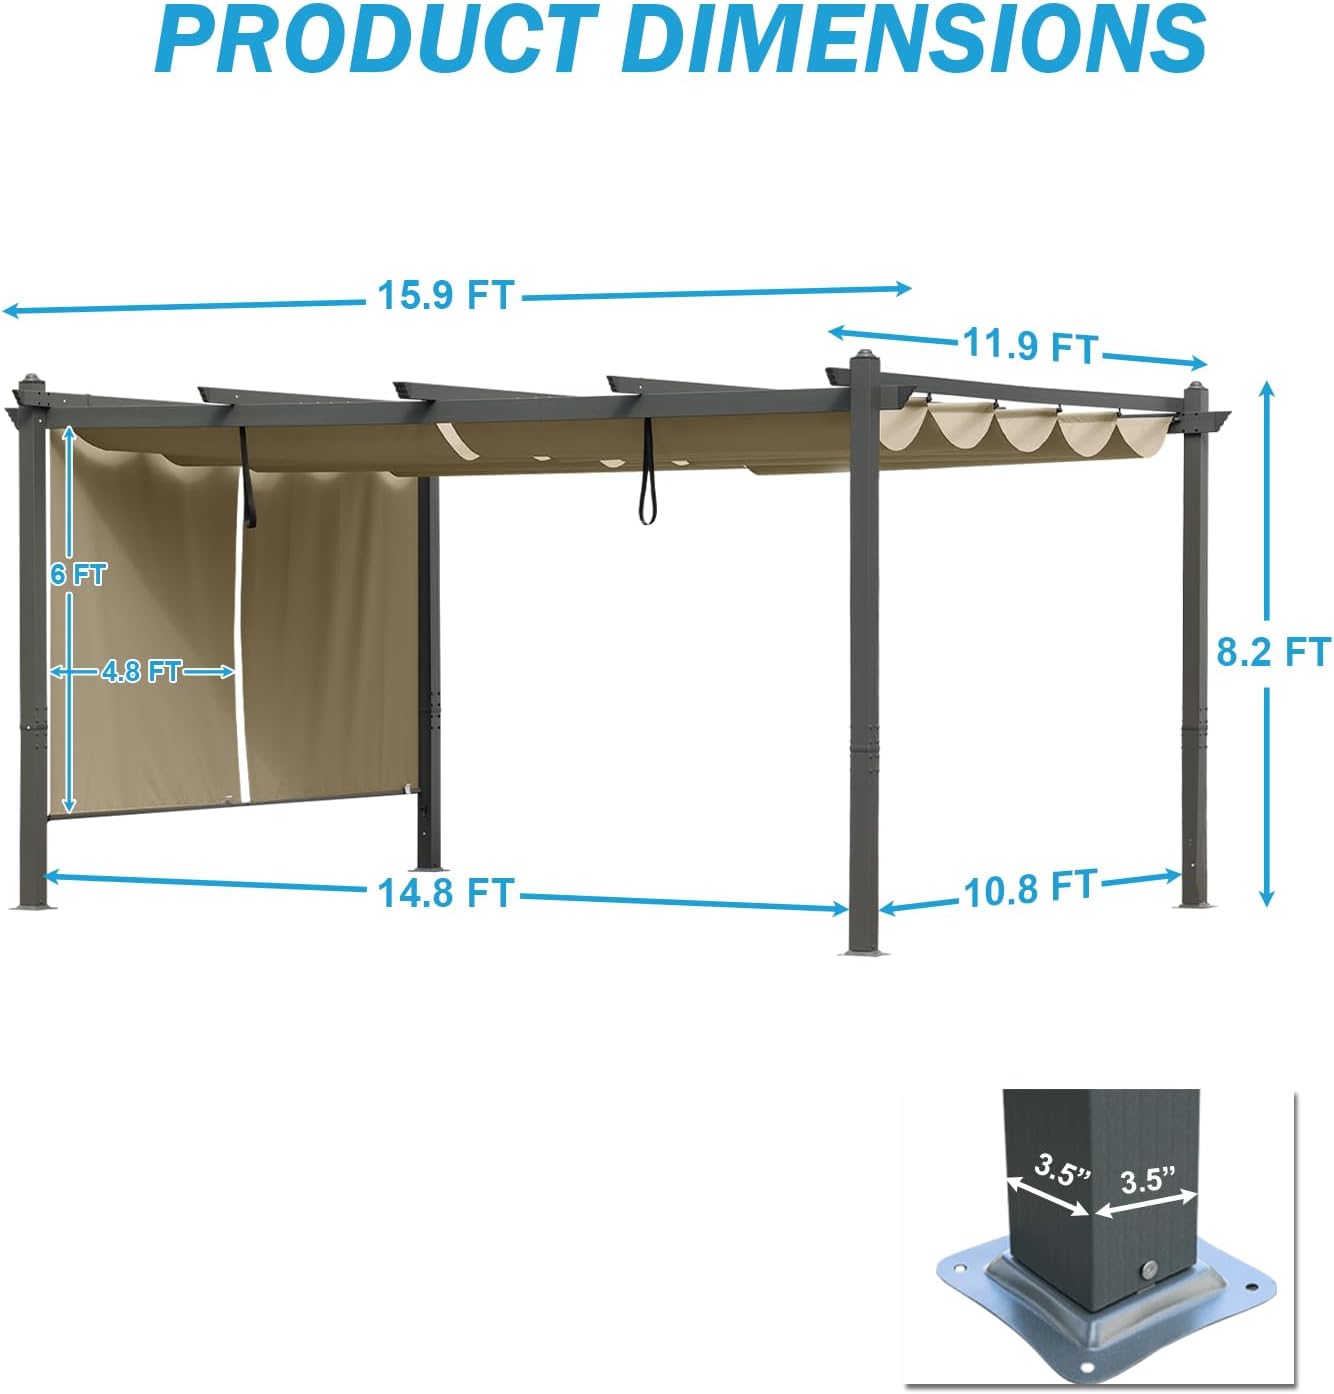
Figure 5: Adjustable canopy mechanism for sun control.
Roller Shade Curtains
The two roller shade curtains provide additional privacy and sun protection on the sides of the pergola. These can be rolled up or down as needed. Ensure the locking system for each curtain is engaged to keep them in place.

Figure 6: Detailed view of the roller shade curtains and their locking mechanism.
Maintenance
- Cleaning the Frame: Wipe the aluminum frame with a damp cloth and mild soap. Avoid abrasive cleaners that could damage the powder coating. Rinse thoroughly and dry.
- Cleaning the Canopy and Curtains: The polyester fabric is UV and fade resistant and coated with PA for waterproof performance. Clean with a soft brush, mild soap, and water. Allow to air dry completely before retracting or storing to prevent mildew.
- Regular Inspection: Periodically check all bolts and connections to ensure they remain tight. Inspect the fabric for any tears or damage.
- Winter Storage: In areas with heavy snow or extreme weather, it is recommended to remove the canopy and curtains for storage indoors to prolong their lifespan.
Troubleshooting
| Problem | Possible Cause | Solution |
|---|---|---|
| Canopy or curtains do not move smoothly. | Obstruction in the track; mechanism dirty; fabric misalignment. | Check tracks for debris. Clean with a damp cloth. Gently adjust fabric alignment. |
| Pergola feels unstable or wobbly. | Anchoring not secure; bolts loose. | Ensure the pergola is properly anchored to a solid surface. Tighten all frame bolts. |
| Water pooling on canopy. | Canopy not fully extended or retracted; improper slope. | Ensure canopy is fully extended or retracted to allow proper water runoff. Check for any sagging. |
| Missing or damaged parts. | Shipping error; assembly issue. | Contact Aoodor customer support for replacement parts. |
Specifications
| Feature | Detail |
|---|---|
| Brand | Aoodor |
| Model Number | A160-PKICG-USWL0 |
| Material | Aluminum (Frame), Polyester Fiber (Canopy/Curtains) |
| Frame Material | Aluminum with Powder Coating |
| Product Dimensions (L x W x H) | 190.8"L x 142.8"W x 98.4"H (15.9 ft x 11.9 ft x 8.2 ft) |
| Floor Area | 192 Square Feet |
| Water Resistance Level | Water Resistant (PA coated fabric) |
| Ultraviolet Light Protection | Yes (UV resistant fabric) |
| Assembly Required | Yes |
| Color | Brown |
Warranty
Warranty information for the Aoodor 12 x 16 ft Outdoor Pergola is not explicitly detailed in the provided product data. For specific warranty terms, conditions, and registration, please refer to the manufacturer's official website or contact Aoodor customer support directly. Keep your proof of purchase for any warranty claims.
Customer Support
For any questions regarding assembly, missing parts, operation, or maintenance of your Aoodor pergola, please contact Aoodor customer support. Contact details, including phone numbers, email addresses, or online support portals, can typically be found on the product packaging, the official Aoodor website, or through your retailer's customer service channels.


