1. Introduction
This manual provides detailed instructions for the installation, operation, and maintenance of your ezcap Dual 4K HDMI Video Capture Card. This device is designed to capture video from two HDMI sources simultaneously in stunning 4K resolution, making it ideal for dual-camera setups, multi-source streaming, recording, and gaming across Windows, macOS, and Linux platforms.
What's in the Box
- ezcap Dual 4K HDMI Video Capture Card
2. Safety Information
Please read and understand all safety instructions before using this product. Failure to follow these instructions may result in electric shock, fire, or damage to the device or connected equipment.
- Do not expose the device to water, moisture, or extreme temperatures.
- Do not attempt to open or modify the device. Refer all servicing to qualified personnel.
- Ensure proper ventilation around the device to prevent overheating.
- Handle the PCIe card by its edges to avoid touching the gold connectors or components.
- Always power off your computer and disconnect it from the power source before installing or removing the capture card.
3. Product Overview
The ezcap Dual 4K HDMI Video Capture Card is an internal PCIe card designed for high-performance video capture. Familiarize yourself with its components and ports.
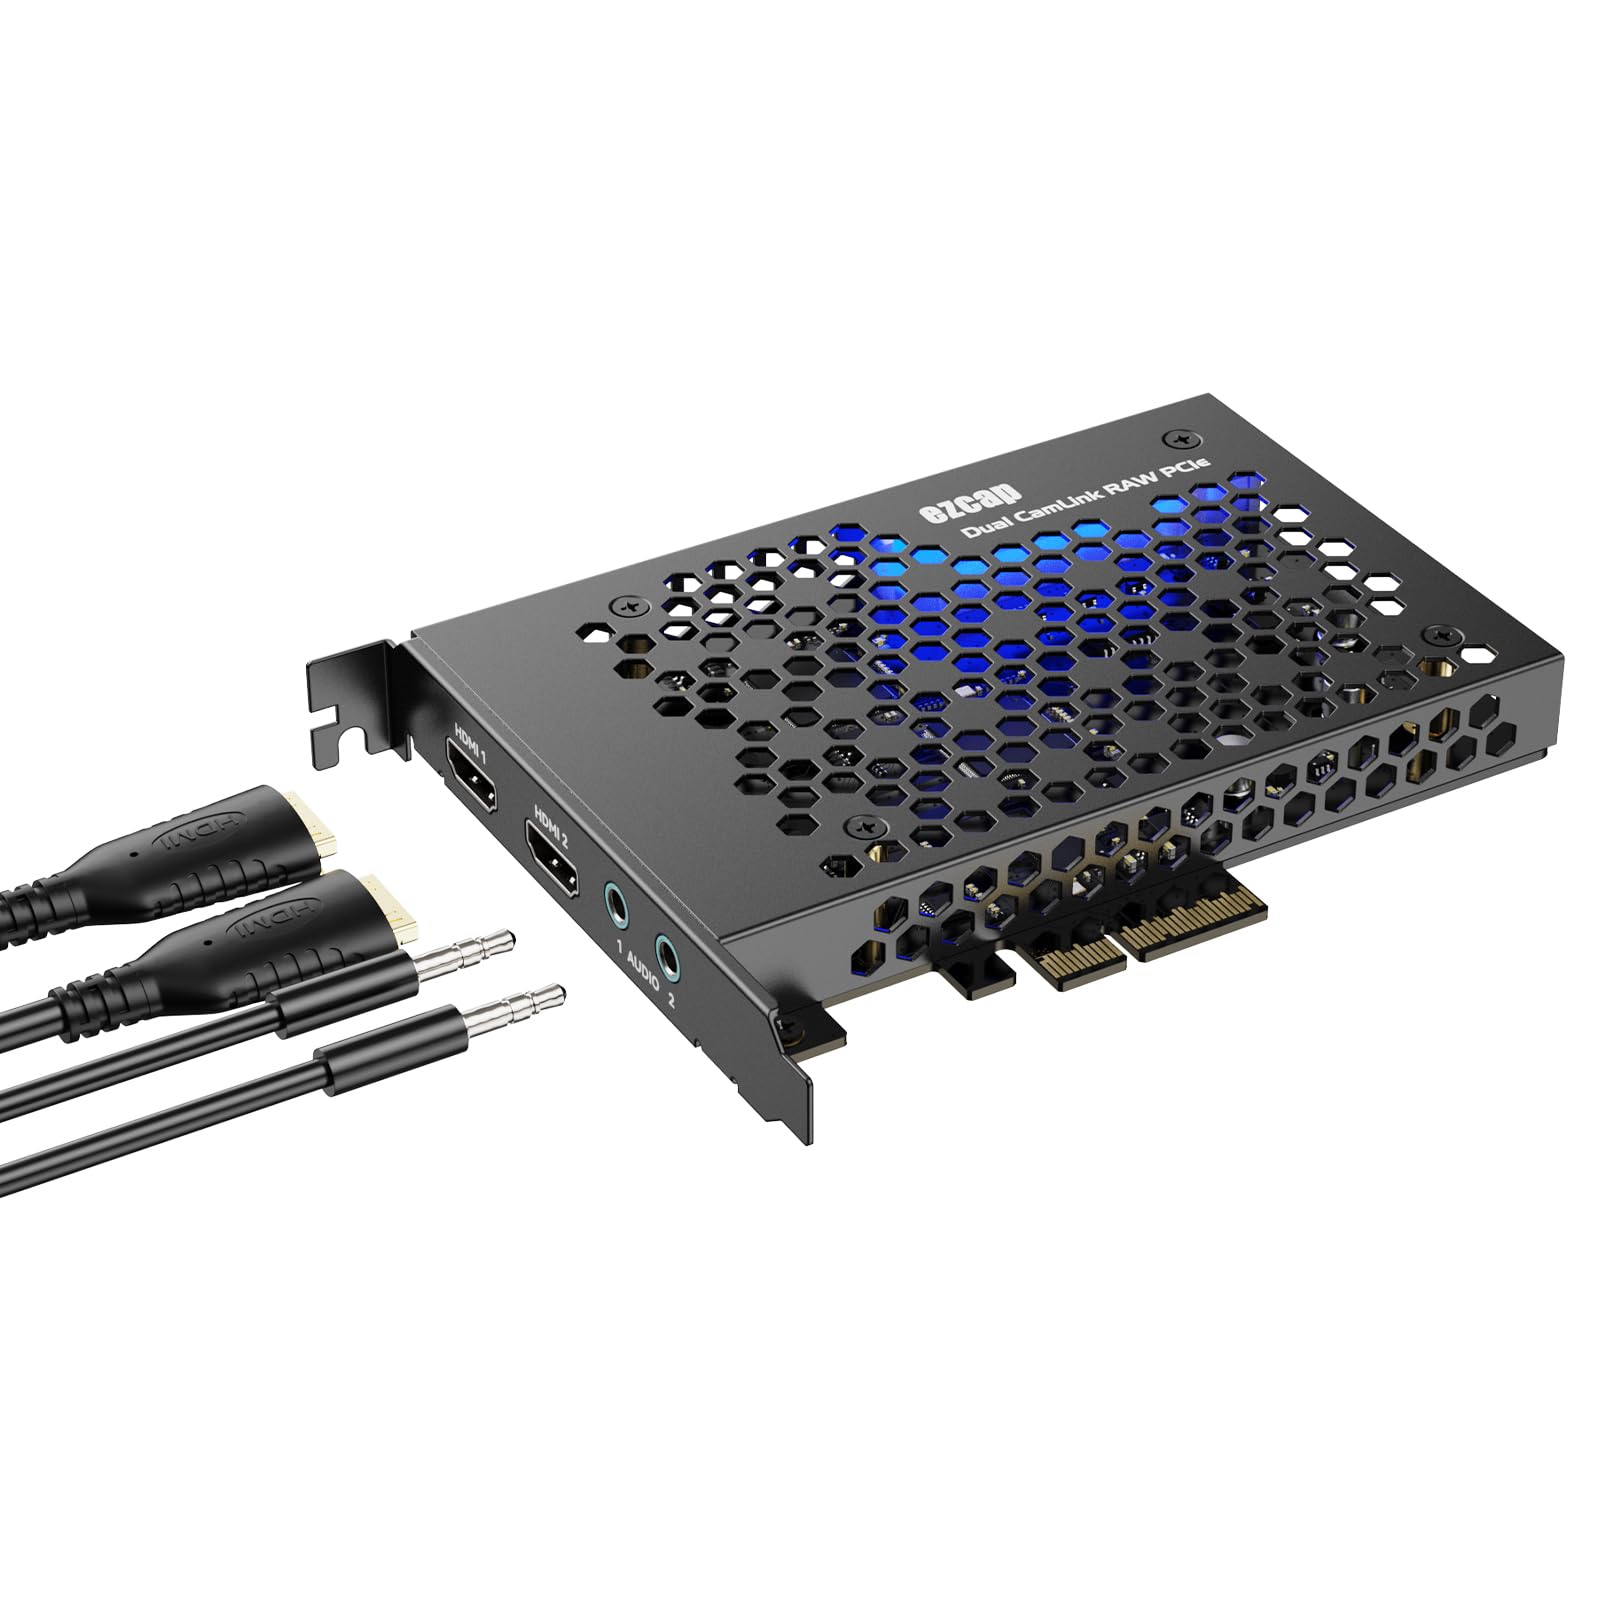
Figure 3.1: Angled view of the ezcap Dual 4K HDMI Video Capture Card. This image shows the overall design of the PCIe card, including its cooling vents and the ezcap branding.

Figure 3.2: Port view of the ezcap Dual 4K HDMI Video Capture Card. This image highlights the two HDMI input ports (HDMI 1, HDMI 2) and two 3.5mm audio input jacks (Audio 1, Audio 2) located on the card's bracket.
Key Components:
- HDMI 1 Input: Connect your first HDMI source (e.g., camera, game console).
- HDMI 2 Input: Connect your second HDMI source.
- Audio 1 Input: 3.5mm jack for external audio input for HDMI 1.
- Audio 2 Input: 3.5mm jack for external audio input for HDMI 2.
- PCIe Connector: For installation into a compatible PCIe slot on your motherboard.
4. Setup
Follow these steps to properly install and set up your ezcap Dual 4K HDMI Video Capture Card.
4.1 Hardware Installation
- Power Off Computer: Shut down your computer completely and disconnect the power cable from the wall outlet.
- Open Computer Case: Remove the side panel of your computer case to access the motherboard.
- Locate PCIe Slot: Find an available PCIe x4 or higher slot on your motherboard.
- Remove Slot Cover: Carefully remove the metal slot cover from the back of your computer case corresponding to the chosen PCIe slot.
- Insert Capture Card: Align the capture card with the PCIe slot and firmly press it down until it is securely seated. Ensure the bracket is flush with the case.
- Secure Card: Use a screw to secure the capture card's bracket to the computer case.
- Close Case: Replace the computer case side panel and reconnect the power cable.
4.2 Connecting Devices
- Connect HDMI Sources: Connect your HDMI source devices (e.g., cameras, game consoles) to the HDMI 1 and HDMI 2 input ports on the capture card using high-quality HDMI cables.
- Connect Audio Sources (Optional): If using external audio, connect your 3.5mm audio devices to the Audio 1 and Audio 2 input jacks.
4.3 Software Setup
The ezcap Dual 4K HDMI Video Capture Card features plug-and-play functionality, meaning no additional drivers are typically required for Windows, macOS, or Linux. The operating system should automatically detect the device.
- Power On Computer: Start your computer.
- Verify Device Recognition: Open your operating system's device manager (Windows) or system information (macOS/Linux) to confirm the capture card is recognized. It should appear as a video and audio input device.
- Install Streaming/Recording Software: Install your preferred streaming or recording software (e.g., OBS Studio, VLC, XSplit, vMix).
5. Operating Instructions
This section guides you through using your ezcap Dual 4K HDMI Video Capture Card with common software applications.
5.1 Using with OBS Studio (Example)
- Launch OBS Studio: Open OBS Studio on your computer.
- Add Video Source: In the 'Sources' dock, click the '+' icon and select 'Video Capture Device'.
- Create New Source: Choose 'Create New' and give it a descriptive name (e.g., "HDMI 1 Camera"). Click 'OK'.
- Select Device: In the properties window, select your ezcap capture card from the 'Device' dropdown menu. You may see multiple entries for HDMI 1 and HDMI 2.
- Configure Resolution/FPS: Set the 'Resolution/FPS Type' to 'Custom' and select your desired resolution (e.g., 3840x2160 for 4K) and frame rate (e.g., 30 FPS).
- Configure Audio: Under 'Audio Output Mode', select 'Output desktop audio (WaveOut)' or 'Custom Audio Device' and choose the corresponding audio input from your capture card.
- Repeat for Second HDMI: Repeat steps 2-6 to add the second HDMI input as a separate video capture device source.
- Arrange Sources: Arrange and resize your video sources within the OBS scene as needed.
- Start Streaming/Recording: Click 'Start Streaming' or 'Start Recording' to begin your broadcast or capture session.
5.2 Dual 4K HDMI Input Functionality
The card supports simultaneous capture from two distinct HDMI sources. This allows for advanced setups such as:
- Dual Camera Live Streaming: Use two cameras for different angles or subjects.
- Game Console + Facecam: Capture gameplay and your reaction simultaneously.
- Presentation + Speaker: Ideal for webinars or educational content.
Ensure your software supports multiple video capture devices simultaneously for optimal use of this feature.
6. Maintenance
Proper maintenance ensures the longevity and optimal performance of your capture card.
6.1 Cleaning
- Power Off: Always power off your computer and disconnect it from the power source before cleaning.
- Dust Removal: Use a can of compressed air to gently remove dust from the card's surface and cooling vents. Hold the can upright to prevent propellant discharge.
- Surface Cleaning: For external surfaces, wipe with a soft, dry, lint-free cloth. Do not use liquid cleaners or solvents.
6.2 Storage
- If removing the card for storage, place it in an anti-static bag to protect it from electrostatic discharge.
- Store in a cool, dry place away from direct sunlight and extreme temperatures.
7. Troubleshooting
If you encounter issues with your ezcap Dual 4K HDMI Video Capture Card, refer to the following common problems and solutions.
| Problem | Possible Cause | Solution |
|---|---|---|
| No video signal in software |
|
|
| No audio or distorted audio |
|
|
| Capture card not detected by computer |
|
|
| Poor video quality or dropped frames |
|
|
8. Specifications
Detailed technical specifications for the ezcap Dual 4K HDMI Video Capture Card.
| Feature | Specification |
|---|---|
| Input Ports | 2 x HDMI, 2 x 3.5mm Audio |
| Video Input Resolution | Up to 4K (3840x2160) at 30Hz |
| Capture Resolution | Up to 4K (3840x2160) at 30Hz, 1080p at 60Hz |
| Interface | PCIe (USB 3.1 internal interface for data transfer) |
| Operating System Compatibility | Windows, macOS, Linux |
| Plug and Play | Yes, no driver installation required |
| Latency | Minimal |
| Item Weight | Approximately 10.6 ounces (300 grams) |
9. Warranty and Support
For warranty information and technical support, please refer to the official ezcap website or contact their customer service directly. Keep your purchase receipt as proof of purchase for warranty claims.
Online Resources: Visit the ezcap official website for FAQs, updated drivers (if applicable), and additional support documentation.
Customer Service: Contact information for customer support can typically be found on the ezcap website or on the product packaging.


