
PowMr PowMr3000
Contents
PowMr 3000W Solar Inverter User Manual
Model: PowMr3000
1. Introduction
This manual provides comprehensive instructions for the installation, operation, and maintenance of your PowMr 3000W Solar Inverter. Please read this manual thoroughly before installation and use to ensure optimal performance and safety.

Figure 1: PowMr 3000W Solar Inverter
The PowMr 3000W Solar Inverter is a hybrid inverter designed for off-grid solar systems, converting 24VDC to 110VAC. It features a built-in 60A MPPT charge controller and pure sine wave output, suitable for various battery types including lead-acid and lithium. This inverter is capable of handling peak power up to 9000W, making it ideal for both residential and commercial applications requiring stable and reliable power delivery.
2. Safety Information
Always adhere to local electrical codes and regulations during installation. Ensure proper grounding and use appropriate circuit breakers. Disconnect all power sources before performing any maintenance or wiring. Only qualified personnel should perform installation and maintenance.

Figure 2: Multi-Protection Functions
The inverter is equipped with multiple protection functions including overload protection, charge short protection, AC reverse protection, short-circuit protection, bypass over current protection, battery over voltage protection, battery low voltage protection, and parallel connection error protection. These features enhance the safety and longevity of the unit and connected appliances.
3. Setup and Installation
Proper installation is crucial for the inverter's performance and safety. Follow these guidelines for connecting the inverter to your solar array, batteries, and AC loads.
3.1 Connection Diagram
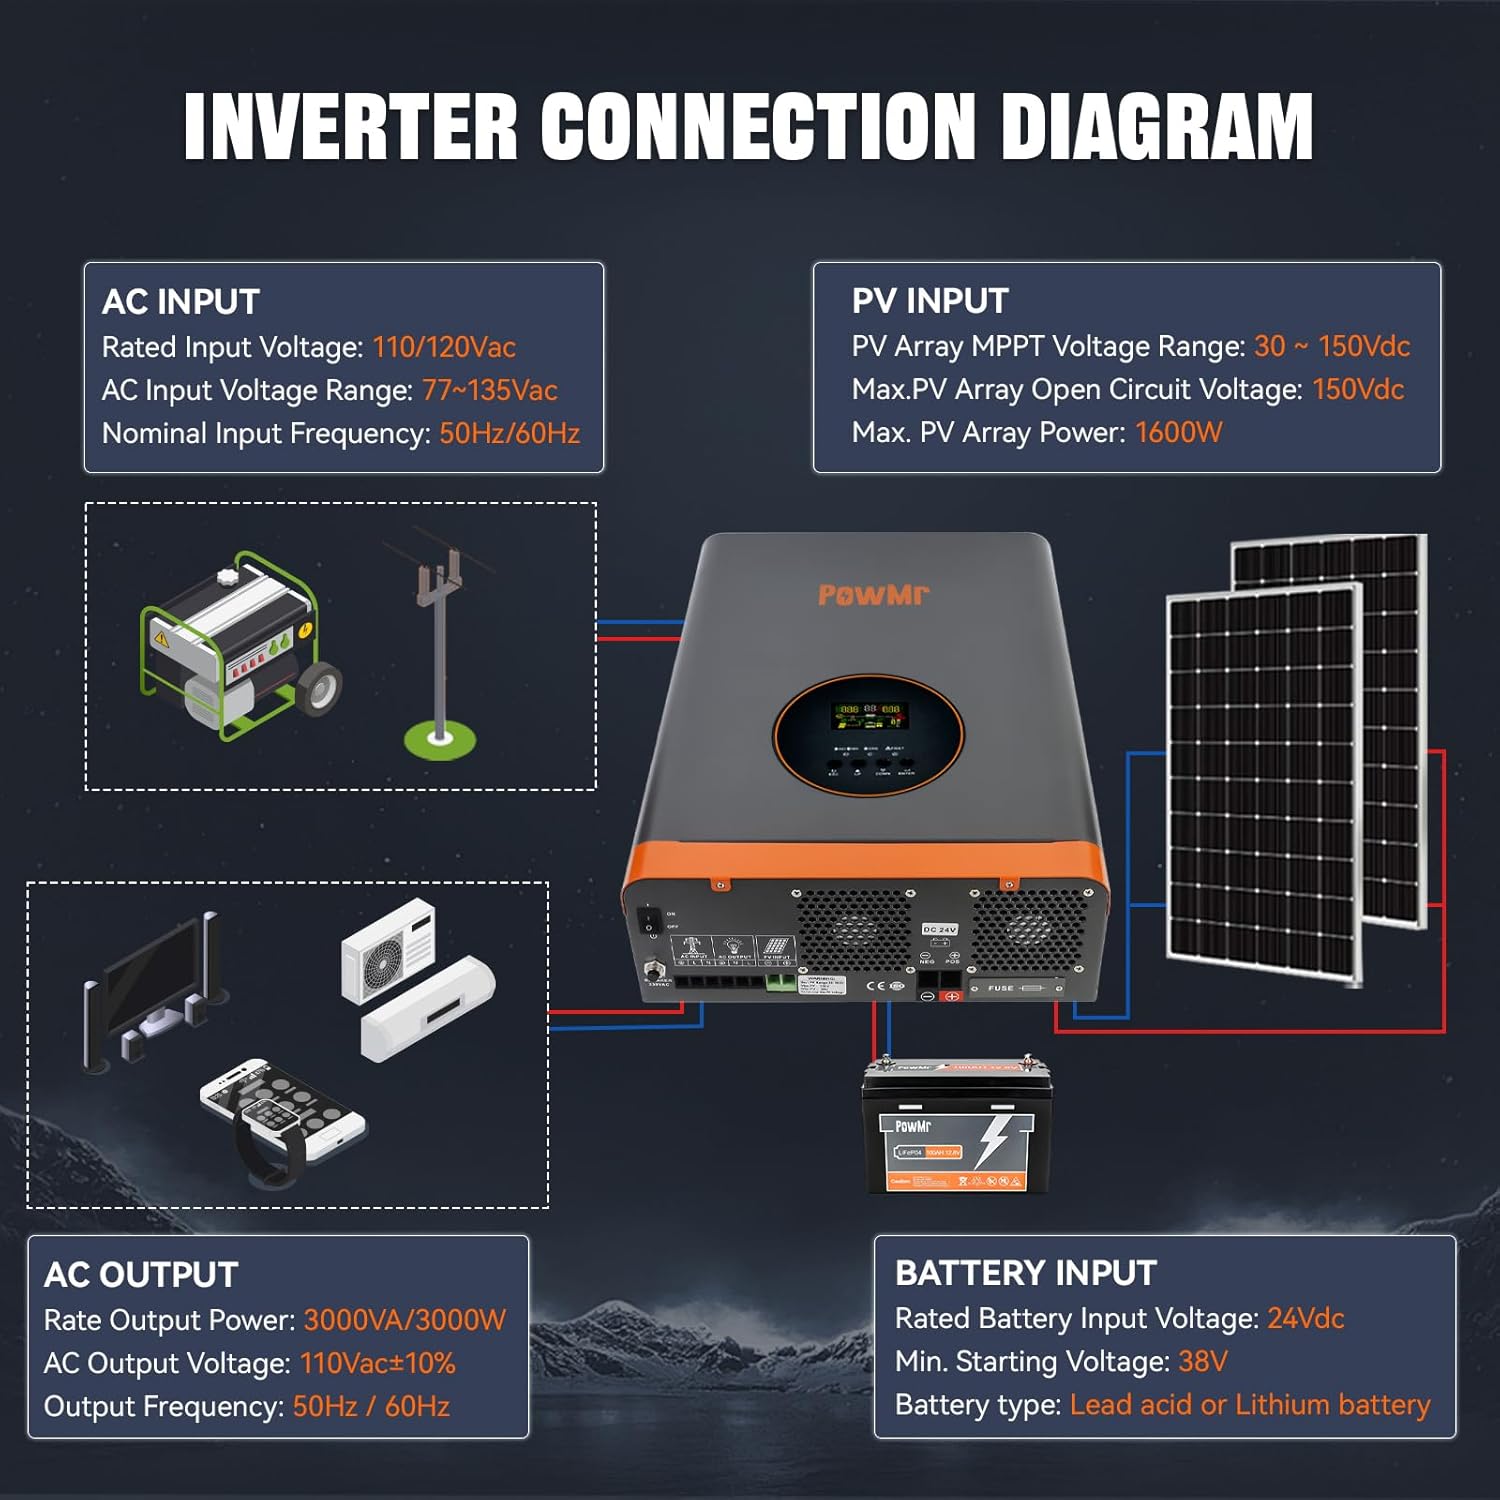
Figure 3: Inverter Connection Diagram
This diagram illustrates the typical connections for the PowMr solar inverter, including AC input (from utility or generator), PV input (from solar panels), battery input (from 24V battery bank), and AC output (to household appliances). Ensure all connections are secure and correctly polarized.
3.2 Battery Compatibility
The inverter supports various 24V battery types. Refer to your battery's manual for specific voltage requirements.

Figure 4: Compatible Battery Types
The PowMr inverter is compatible with a variety of 24V battery types, including Flooded (FLD), LiCoMnNiO2 (LI), LiFePO4 (LI), AGM, Gel, and user-defined types. The built-in 60A MPPT charge controller efficiently manages charging from solar panels, and a 38A AC charger supports charging from utility or generator sources.
3.3 Setup Video Guide
Video 1: How to set up the low frequency solar Inverter
This official video from PowMr demonstrates the step-by-step setup process for the low-frequency solar inverter, including initial power-on and basic configuration. It provides a visual guide to complement the written instructions.
4. Operating Instructions
The inverter features an LCD screen and control buttons for monitoring and configuring its operation. After turning on the inverter, press the ENTER key for 10 seconds to enter the settings mode.

Figure 5: Inverter Display and Controls
The inverter's front panel features an LCD screen for dynamic display of system data and operating status, along with control buttons (ESC, UP, DOWN, ENTER) for navigation and setting adjustments.
4.1 System Settings
- #00 Grid Input Voltage Range: Configures the AC input voltage range.
- Narrow Range: KE Model: 180-265Vac ±3V, KU Model: 92-132Vac ±3V. Quickly disconnects to protect equipment if voltage exceeds set range. Suitable for regions with stable voltage.
- Wide Range: KE Model: 155-265Vac ±3V, KU Model: 77-132Vac ±3V. Accommodates greater input voltage fluctuations, ensuring continuous and stable power supply in areas with significant voltage variations.
- #01 Grid Frequency Range: Configures the AC frequency voltage range.
- Wide Range: 40-65Hz
- Narrow Range: 45-65Hz
- #02 Operating Mode: Configures the operation mode or load output power priority.
- UTI Mode (Utility Priority): Utility grid is primary power source. If utility is unavailable, solar and battery power are used.
- SOL Mode (Solar Priority): Solar power is primary source. If solar cannot meet load requirements, battery power supplements. If solar is unavailable, output switches to utility grid even if battery is sufficiently charged.
- SBU Mode (Inverter Priority): Solar and battery power are prioritized. Solar power is used first, with battery supplementing if necessary. If solar power is unavailable, output switches to battery power. When battery voltage drops to undervoltage warning level, output switches to utility grid.
- #03 Charging Mode: Configures the charging mode.
- CUE Mode (Utility Power Priority): Utility power primarily charges the battery, with solar simultaneously charging. When battery voltage falls below the voltage set in Setting 9, charging source switches to utility. When battery voltage exceeds the value set in Setting 10, it switches back to solar.
- CSO Mode (Solar Priority): Solar power primarily charges the battery. When battery voltage falls below the voltage set in Setting 9, charging source switches to utility. When battery voltage exceeds the value set in Setting 10, it switches back to solar.
- OSO Mode (Only Solar): Only solar power charges the battery.
- #04 Grid Charging Current Percentage: Configures the percentage of total charging current allocated to utility charging.
- #05 Solar Charging Current Percentage: Configures the percentage of total charging current allocated to solar charging.
- #06 Boost Charging Voltage (CV): Configures the boost charging voltage, which should be set according to the battery manual.
- #07 Float Charging Voltage: Configures the float charging voltage, also referencing the battery manual.
- #08 Battery Discharge Cutoff Shutdown Voltage: Configures the battery discharge cut-off voltage to protect the battery from over-discharge. If the battery voltage falls below this value, the inverter will automatically shut down.
- #09 Enable Grid Charging Voltage: Configures the voltage at which the charging source switches to utility in CSO mode.
- #10 Exit Grid Charging Voltage: Configures the voltage at which the charging source switches back to solar in CSO mode.
- #11 Inverter Output Voltage: Configures the inverter output voltage, referencing the ranges for low and high voltage models displayed on the screen.
- #12 Grid Detection Speed: Configures the AC detection speed.
- HI-Fast: Fast response quickly reacts to sudden voltage changes, protecting sensitive loads but may increase wear on the inverter due to frequent switching.
- IDE-Medium: Medium response balances protection and device lifespan, suitable for general appliances and lighting.
- LO-Slow: Slow response reduces wear but may not protect sensitive loads from sudden voltage spikes.
- #13 Inverter Output Frequency: Configures the inverter output frequency to either 50Hz or 60Hz.
- #14 Fault Restart Switch: Enables or disables the automatic restart function. If enabled, the inverter will attempt to restart three times after a short circuit or overload fault.
- #15 Backlight Control: Configures the backlight function.
- Always On
- Always Off
- Delayed Off: Backlight turns off after one minute of inactivity.
- #16 Buzzer Control Switch: Enables or disables the buzzer alarm function. If enabled, the inverter will sound an alarm during faults.
- #17 Battery Under Voltage Alarm Switch: Enables or disables the low battery voltage alarm. It is recommended not to disable this to protect the battery from irreversible damage due to undervoltage or over-discharge.
- #18 Load Limitation: Used to enable or disable the battery undervoltage shutdown function. When enabled, if the battery voltage falls below the inverter's built-in preset threshold, the inverter will automatically shut down. It will remain off until it detects photovoltaic (PV) or AC input, at which point it will automatically restart. This undervoltage shutdown function provides a higher level of protection compared to the undervoltage cut-off voltage control. Under undervoltage cut-off protection, if the battery voltage drops below a certain threshold, the inverter will stop outputting to the load but will remain in standby mode, consuming a small amount of battery power. To prevent prolonged standby power consumption and to protect the battery, the undervoltage shutdown function will completely shut off the inverter when the battery voltage falls below the shutdown threshold, thereby halting all battery power consumption.
- #19 Unsupported Settings: This setting is not user-configurable.
- #20 Baud Rate: Configures the baud rate for communication between the inverter and external devices, with selectable baud rates shown on the screen.
- #21 Unsupported Settings: This setting shows the inverter output voltage and is not user-configurable.
- #22 Startup Battery Voltage: Configures the battery voltage required to manually start the inverter after an abnormal shutdown.
- #23 Undervoltage Shutdown Recovery Voltage: Configures the undervoltage recovery voltage, allowing the inverter to automatically restart when the battery voltage exceeds this value.
- #24 Battery Type: Configures the battery type.
- User-define option
- Ternary Lithium battery
- Lithium Iron Phosphate battery
- Sealed Lead-Acid battery
- GEL battery
- Flooded Lead-Acid battery
If customizable, ternary lithium or lithium iron phosphate is selected, the charging parameters can be manually set. If lithium batteries with BMS communication are used, manual parameter setting is unnecessary.
- #25 BMS Function Switch: Enables or disables BMS communication. When BMS communication with lithium batteries is successful, settings 26 to 29 can be configured, and the inverter will use the SOC value as a reference for battery charging and discharging.
- #26 Undervoltage Shutdown SOC: Configures the SOC at which the inverter will shut down due to undervoltage.
- #27 Switch to Utility Mode SOC: Configures the SOC at which the operating mode switches to utility.
- #28 Switch to Inverter Mode SOC: Configures the SOC at which the operating mode switches to inverter priority.
- #29 Restart SOC: Configures the SOC required for normal operation after the inverter is turned on.
- #30 Restore Factory Settings: Allows for a one-click restore to factory settings.
- #ECO ECO Energy Saving Mode: Enables or disables the energy-saving mode.
5. Maintenance
Regular maintenance ensures the longevity and efficient operation of your PowMr inverter.
- Keep the inverter clean and free from dust. The durable finish with high anti-corrosion and dust-proof design helps prolong its lifespan.
- Ensure proper ventilation. The dual cooling fan design efficiently dissipates heat.
- Periodically check all electrical connections for tightness and signs of corrosion.
- Inspect the battery terminals and cables for any damage or loose connections.
6. Troubleshooting
If you encounter issues with your inverter, refer to the LCD display for error codes and indicators. Common issues and their solutions are listed below:
| Problem | Possible Cause | Solution |
|---|---|---|
| Inverter not turning on | No battery connection or low battery voltage. | Check battery connections. Ensure battery voltage is above startup threshold (Setting 22). |
| No AC output | Overload, short circuit, or undervoltage shutdown. | Reduce load. Check for short circuits. Verify battery voltage. Check operating mode (Setting 02). |
| Charging issues | Incorrect charging mode (Setting 03) or insufficient solar/utility input. | Adjust charging mode. Check solar panel output or utility grid availability. |
| Buzzer alarm active | Fault condition (e.g., overload, over-temperature). | Identify the fault indicated on the LCD. Address the underlying issue. Refer to Setting 16 to manage buzzer. |
7. Specifications
| Feature | Value |
|---|---|
| Rated Output Power | 3000W |
| Peak Power | 9000W |
| DC Input Voltage | 24VDC |
| Rated Output Voltage | 110VAC ±10% |
| Output Frequency | 50Hz/60Hz |
| Max PV Input Power | 1600W 150V |
| Maximum PV Input Current | 60A |
| MPPT Input Voltage Range | 60-150VDC |
| Maximum AC Input Current | 38A |
| Hybrid Charging Max Charger Current (AC+PV) | 60A |
| Item Weight | 44 pounds |
| Package Dimensions | 20 x 15 x 8 inches |
8. Warranty and Support
For warranty information and technical support, please refer to the documentation included with your product or visit the official PowMr website. You may also contact PowMr customer service directly for assistance.
Protection plans are available for extended coverage:
- 2-Year Protection Plan
- 3-Year Protection Plan
- Complete Protect: One plan covers all eligible past and future purchases (monthly subscription).
Ask a question about this manual
Ask about setup, troubleshooting, compatibility, parts, safety, or missing instructions. Manuals+ will review the question and use this page’s manual context to help answer it.