
1. Introduction
This manual provides detailed instructions for the installation, operation, and maintenance of the Generic AI-7782 Temperature Controller. This device is designed for precise temperature control in various applications, including ovens and Biological Oxygen Demand (BOD) incubators. It supports both PID (Proportional-Integral-Derivative) and ON-OFF control modes and features an integrated sock timer function. Please read this manual thoroughly before using the controller to ensure safe and efficient operation.
2. Product Overview
The AI-7782 is a compact and versatile temperature controller, typically measuring 72x72mm, suitable for integration into control panels. It accepts thermocouple or Pt-100 sensor inputs and offers relay or SSR (Solid State Relay) output selections to manage heating or cooling elements.
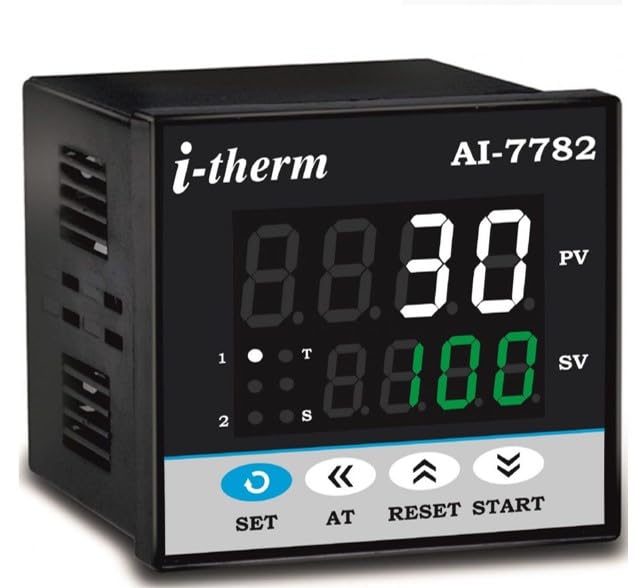
Figure 1: Front panel of the AI-7782 temperature controller. This image shows the digital display for temperature readings and the control buttons used for setting parameters and operating the device.
3. Setup and Installation
3.1 Unpacking and Inspection
Carefully unpack the controller and inspect it for any signs of damage during transit. Report any damage to your supplier immediately.
3.2 Mounting
The AI-7782 is designed for panel mounting. Ensure the panel cutout matches the controller's dimensions (typically 72x72mm). Secure the controller using the provided mounting brackets.
3.3 Wiring
WARNING: All wiring should be performed by a qualified electrician with the power supply disconnected to prevent electric shock.
- Power Supply: Connect the controller to the specified power supply voltage as indicated on the device label.
- Sensor Input: Connect your thermocouple or Pt-100 sensor to the designated input terminals. Ensure correct polarity for thermocouples.
- Output: Connect your heating or cooling element to the relay or SSR output terminals. Observe maximum current ratings.
Refer to the wiring diagram printed on the side of the controller or in the included quick-start guide for specific terminal connections.
4. Operating Instructions
4.1 Powering On
Once wired correctly, apply power to the controller. The display will illuminate, showing the current process value (PV) and setpoint value (SV).
4.2 Setting the Setpoint (SV)
Press the SET button to enter setpoint adjustment mode. Use the UP and DOWN arrow buttons to adjust the desired temperature. Press SET again to confirm and exit.
4.3 Control Modes (PID / ON-OFF)
The AI-7782 supports both PID and ON-OFF control. The specific method for switching between these modes and adjusting PID parameters (P, I, D) will be detailed in the full technical manual. Generally, this involves accessing a parameter menu by holding down a specific button or combination of buttons.
- ON-OFF Control: Simple control where the output is either fully ON or fully OFF, based on whether the temperature is below or above the setpoint, often with a hysteresis band.
- PID Control: Advanced control that calculates a proportional, integral, and derivative response to minimize the difference between the process value and the setpoint, resulting in more stable and precise temperature regulation.
4.4 Sock Timer Function
The sock timer allows for a timed delay or duration for the control process. Consult the detailed parameter settings in the full technical manual to configure the sock timer. This typically involves setting the timer duration and activation conditions.
5. Maintenance
5.1 Cleaning
Keep the controller's front panel clean. Use a soft, dry cloth. Do not use abrasive cleaners or solvents, as they may damage the display or casing.
5.2 Environmental Conditions
Ensure the controller operates within its specified environmental conditions (temperature, humidity) to ensure longevity and accurate performance. Avoid exposure to excessive dust, moisture, or corrosive gases.
5.3 Calibration
While the controller is factory calibrated, periodic calibration may be required for applications demanding extreme precision. Refer to the technical manual or contact support for calibration procedures.
6. Troubleshooting
If you encounter issues with your AI-7782 controller, perform the following basic checks:
- No Power: Check power supply connections and ensure the voltage is correct. Verify fuses if applicable.
- Incorrect Temperature Reading: Verify the sensor type is correctly configured in the controller's parameters. Check sensor wiring for loose connections or damage. Ensure the sensor is properly installed in the measurement area.
- Output Not Activating: Check the setpoint value. Ensure the control mode (PID/ON-OFF) is appropriate. Verify output wiring and the functionality of the connected heating/cooling element.
- Display Errors: Consult the full technical manual for specific error codes and their meanings.
If problems persist after performing these checks, contact technical support.
7. Specifications
| Feature | Specification |
|---|---|
| Model Number | AI 7782 |
| Brand | Generic |
| Colour | Black |
| Material | Plastic |
| Display Type | LCD or LED |
| Operating Temperature | Up to 245 Degrees Celsius |
| Input | Thermocouple or Pt-100 Sensor |
| Output | Relay or SSR (selectable) |
| Unit Count | 1 Count |
| Country of Origin | India |
8. Warranty Information
The Generic AI-7782 Temperature Controller comes with a 1-year warranty from the date of purchase. This warranty covers manufacturing defects and faulty components under normal operating conditions. It does not cover damage caused by improper installation, misuse, unauthorized modifications, or external factors such as power surges or environmental damage. Please retain your proof of purchase for warranty claims.
9. Support & Contact
For technical assistance, warranty claims, or further information regarding the AI-7782 Temperature Controller, please contact the manufacturer:
Manufacturer: SYSTEM CONTROLS
Address: 27, Hareram Industrial Estate, I.B. Patel Road, Opp. Shanta Ind. Est., Goregaon East, Mumbai 400063, India
Contact Number: 9324466415
