Introduction
This manual provides detailed instructions for the installation, operation, and maintenance of your TREEWELL Wireless Light Switch and Receiver Kit, Model TWLS11A. This kit offers a convenient solution for controlling lighting fixtures without the need for complex in-wall rewiring, utilizing a reliable RF signal for remote operation.
Please read this manual thoroughly before installation and use to ensure proper function and safety.
Product Features
- No Rewiring Required: Simplifies adding or relocating light switches by wiring the receiver between the power source and lighting fixture.
- Pre-Programmed: Ready for immediate use upon installation.
- Wide Application: Compact receiver (1.38 x 1.96 inches) fits in limited spaces such as rose/canopy, electrical junction boxes, and switch boxes.
- High Power Rating: Supports up to 10A/1200W (1000W tungsten/600W fluorescent/200W LED) for various appliances.
- Extended Remote Range: Strong RF signal works through walls, doors, and windows, offering up to 200 feet of control range.
- Dual-Use Detachable Switch: Functions as a wall-mounted switch or a portable handheld remote.
- Programmable and Expandable: Supports free pairing, allowing one switch to control multiple devices, or multiple switches to control one device, without interference.
Package Contents
- 1 x Wireless Wall Switch
- 1 x Wireless Receiver
- 1 x CR2032 Battery (pre-installed in switch)
- Mounting Hardware (screws and anchors)

Image showing the TREEWELL wireless light switch and its compact receiver module side-by-side. The switch has 'ON' and 'OFF' buttons, and the receiver displays wiring terminals and a 'treewell' logo.
Specifications
| Parameter | Value |
|---|---|
| Model Number | TWLS11A |
| Brand | treewell |
| Operating Voltage | 125 Volts AC |
| Current Rating | 10 Amps |
| Max Power Rating | 1200 Watts (1000W Tungsten / 600W Fluorescent / 200W LED) |
| RF Range | Up to 200 feet (through walls, doors, windows) |
| Switch Style | Push Button |
| Material | Polybutylene Terephthalate |
| Receiver Dimensions | 1.38 x 1.96 inches (approx.) |
| Battery Type (Switch) | 1 x CR2032 Lithium Metal (included) |
Setup and Installation
Safety Precautions
- ALWAYS CUT OFF POWER to the circuit at the circuit breaker before installing the receiver.
- Ensure all wiring connections are secure and insulated.
- If you are unsure about electrical wiring, consult a qualified electrician.
- Do not exceed the maximum load rating of 10A/1200W.
Receiver Wiring
The receiver is wired between the power input and the lighting fixture. It is designed to fit into standard electrical boxes, rose/canopy, or junction boxes.
- Turn off the main power supply at the circuit breaker.
- Identify the Live (Black) and Neutral (White) wires from your power source and to your lighting fixture.
- Connect the receiver's input wires to the power source:
- Connect the receiver's Black Input (L) wire to the Live (Black) wire from the power source.
- Connect the receiver's White Input (N) wire to the Neutral (White) wire from the power source.
- Connect the receiver's output wires to the lighting fixture:
- Connect the receiver's Black Output (L) wire to the Live (Black) wire of the lighting fixture.
- Connect the receiver's White Output (N) wire to the Neutral (White) wire of the lighting fixture.
- Ensure all connections are secure with wire nuts and properly insulated.
- Carefully place the receiver and wires into the electrical box or canopy.

Detailed wiring diagram for the TREEWELL wireless receiver, showing connections between AC power input (100-125V), neutral (white), live (black), and the lamp. The diagram also includes dimensions of the compact receiver, suitable for rose/canopy, junction box, and switch box installations.
Switch Installation
The wireless switch can be mounted on a wall or used as a portable remote.
- For Wall Mounting:
- Choose a desired location for the switch.
- Use the provided screws and anchors to secure the switch backplate to the wall.
- Slide the remote switch module into the backplate.
- Attach the decorative faceplate over the backplate and switch module.
- For Portable Use: The remote switch module can be easily removed from the backplate for handheld operation.

Step-by-step visual guide for the easy installation of the wireless light switch. It shows mounting the backplate, attaching the switch to the backplate, inserting the remote switch, and securing the faceplate.

Image demonstrating the dual-use functionality of the remote switch. One part shows it mounted as a 'Wall Switch' in a hallway, and the other shows it detached as a 'Portable Handheld Switch'.
Operating Instructions
Once the receiver is wired and power is restored, and the switch is installed, the system is ready for use.
- Press the 'ON' button on the wireless switch to turn the connected light or appliance ON.
- Press the 'OFF' button on the wireless switch to turn the connected light or appliance OFF.
The switch is pre-programmed to control the receiver it came with. The responsive remote control provides instant ON/OFF functionality without lag.

Image illustrating the flexibility of placing the wireless switch anywhere in a living room setting, controlling a ceiling fan. Text highlights 'Add the Wall Switch Anywhere without Rewiring'.
Pairing and Expansion
The TREEWELL Wireless Light Switch system supports free pairing and expansion, allowing for flexible control configurations without interference.
Adding Additional Switches or Receivers
To pair a new switch with an existing receiver, or a new receiver with an existing switch:
- Ensure the receiver is powered on.
- Press and hold the pairing button on the receiver (often a small button or LED indicator) until the indicator light starts blinking.
- Within a few seconds, press the 'ON' button on the new wireless switch you wish to pair.
- The receiver's indicator light should stop blinking, indicating successful pairing.
- Test the new switch to confirm control over the receiver.
This process allows for configurations such as:
- One switch controlling multiple receivers: Pair one switch to several receivers.
- Multiple switches controlling one receiver: Pair several switches to a single receiver (e.g., for 3-way or 4-way control).
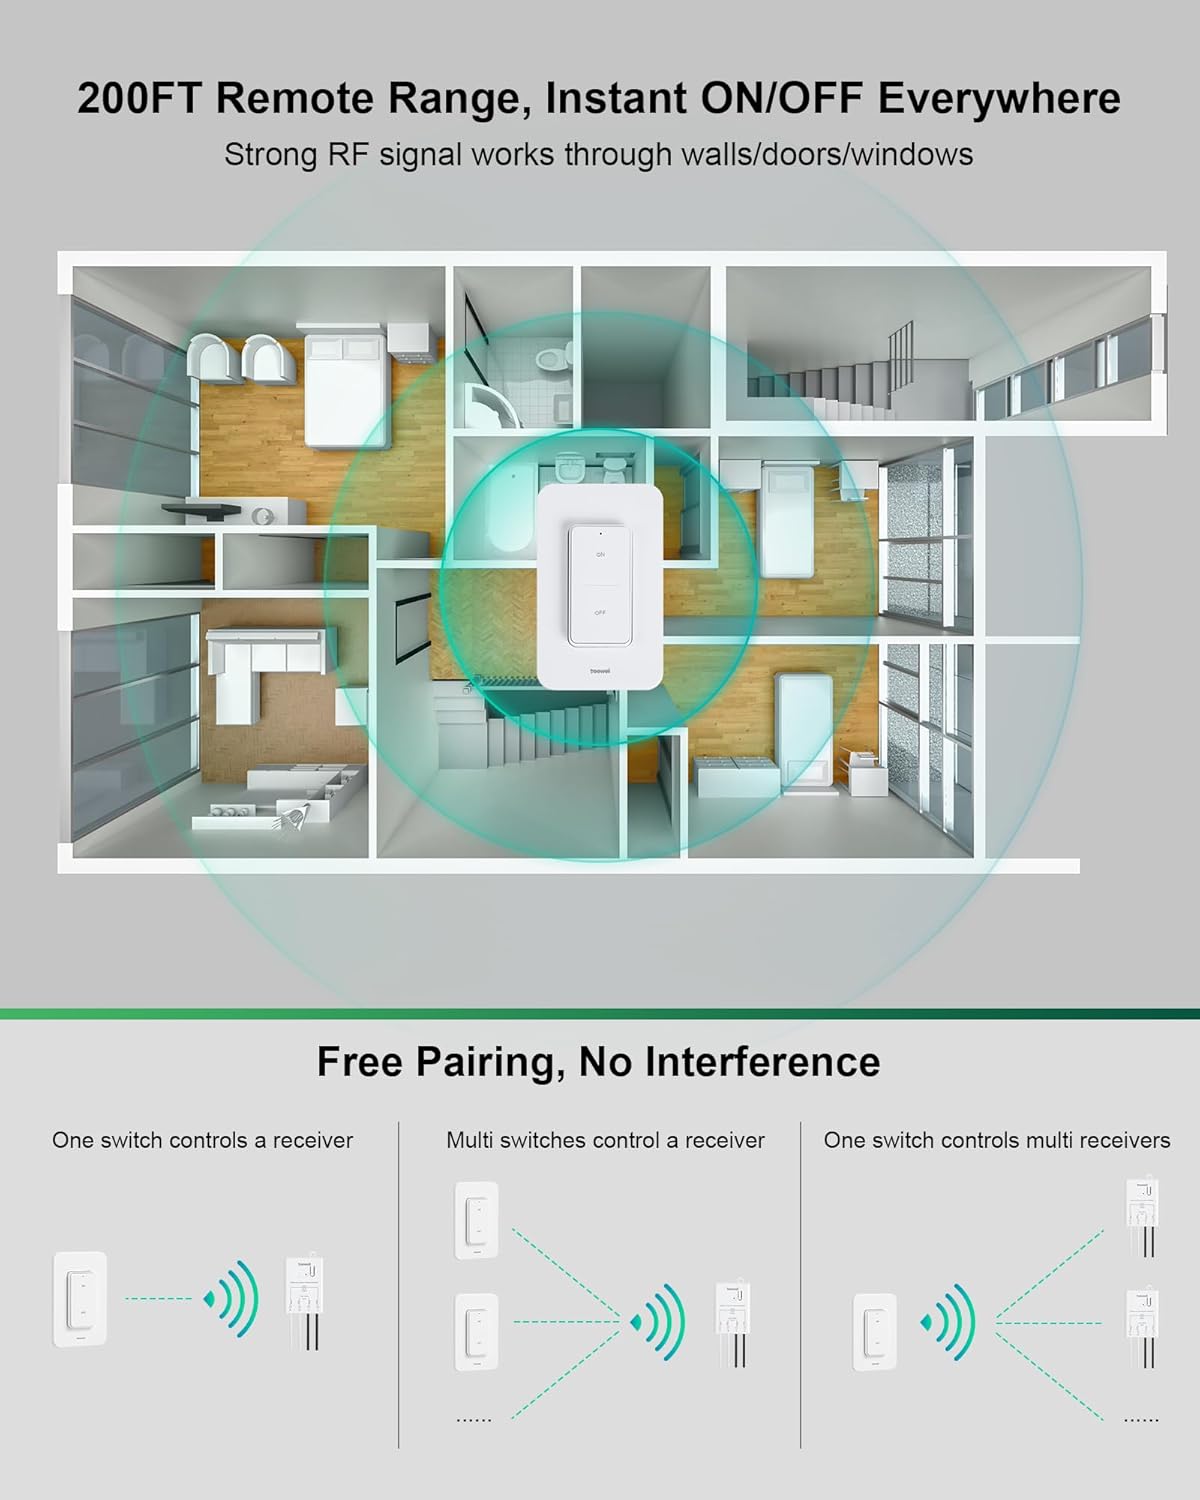
Diagram illustrating the 200FT remote RF range of the wireless switch, showing signal penetration through walls, doors, and windows within a multi-room house layout. Below, three diagrams demonstrate 'Free Pairing, No Interference' for one switch controlling one receiver, multiple switches controlling one receiver, and one switch controlling multiple receivers.

Collage of four images demonstrating various applications: adding a wall switch, relocating/replacing a wall switch, multi-way switches (e.g., staircase lighting), and controlling multiple lamps (e.g., kitchen island pendants).
Troubleshooting
| Problem | Possible Cause / Solution |
|---|---|
| Light does not turn ON/OFF |
|
| Reduced remote range |
|
| Interference with other devices | The system is designed for no interference. If issues occur, try re-pairing the switch and receiver. |
| Switch not responding | Replace the CR2032 battery in the wireless switch. |
Maintenance
- Cleaning: Wipe the switch and receiver surfaces with a soft, dry cloth. Do not use abrasive cleaners or solvents.
- Battery Replacement: The wireless switch uses a CR2032 lithium metal battery. To replace, carefully open the switch casing, remove the old battery, and insert a new one with the correct polarity.
- Environmental Conditions: Avoid exposing the device to extreme temperatures, humidity, or direct water contact.
Warranty and Support
For warranty information or technical support, please refer to the product packaging or contact TREEWELL customer service through the retailer where the product was purchased. Keep your purchase receipt as proof of purchase.