1. Introduction
Thank you for choosing the ELEGANT Semi-Frameless Sliding Shower Door. This manual provides essential information for the safe installation, operation, and maintenance of your new shower door. Please read all instructions carefully before beginning installation to ensure proper function and longevity of the product.

Image: The ELEGANT semi-frameless sliding shower door in a brushed nickel finish, installed in a contemporary bathroom setting.
2. Important Safety Information
WARNING: Failure to follow these instructions could result in injury or product damage.
- Always wear safety glasses during installation.
- Handle glass panels with extreme care. Tempered glass, while strong, can shatter if struck at the edges or corners.
- Ensure the installation surface (walls, floor) is structurally sound and level.
- Do not over-tighten screws, especially those securing glass components, as this can cause stress and breakage.
- Use appropriate anchors for your wall type (e.g., tile, drywall, concrete).
- It is recommended that two people install this product due to the weight and size of the glass panels.
- Keep all small parts out of reach of children.

Image: Illustration highlighting the 1/4 inch (6mm) ANSI Certified Tempered Glass, emphasizing its shatter-resistant properties for safety.
3. Package Contents
Please verify that all components are present and undamaged before beginning installation. If any parts are missing or damaged, contact ELEGANT customer service.
- Tempered Glass Panels (Fixed and Sliding)
- Top and Bottom Guide Rails
- Wall Profiles
- Roller Assemblies
- Door Handles / Towel Bar
- Bottom Guide Block
- Anti-Collision Buffers
- Sealing Strips and Gaskets
- Mounting Hardware (Screws, Anchors, Washers)
4. Tools Required for Installation
The following tools are generally required for a successful installation:
- Tape Measure
- Pencil
- Level
- Drill and Drill Bits (e.g., 1/4 inch diamond drill bit for tile, appropriate bits for studs)
- Screwdriver (Phillips head)
- Caulk Gun
- Silicone Sealant (mildew-resistant)
- Utility Knife
- Safety Glasses
- Gloves
5. Setup and Installation
Careful measurement and preparation are crucial for a successful installation. Please follow these steps sequentially.
5.1 Pre-Installation Checks
- Measure the width and height of your shower opening at the top, middle, and bottom. Ensure the measurements are within the product's adjustable range (58.5-60 inches wide, 72 inches high).
- Verify that the walls are plumb and the threshold is level. Any significant deviations may affect installation and door operation.
5.2 Wall Profile Installation
- Position the vertical wall profiles against the finished walls, ensuring they are plumb. Mark the drilling locations.
- Drill holes using the appropriate drill bit for your wall material. Insert wall anchors if necessary.
- Secure the wall profiles to the walls with screws.
5.3 Rail Installation and Width Adjustment
- Measure the distance between the installed wall profiles. Cut the top and bottom guide rails to fit this measurement, allowing for the specified adjustment range (up to 1.5 inches).
- Insert the top and bottom rails into the wall profiles.

Image: Illustration demonstrating the 1.5-inch width adjustment capability by cutting the top and bottom rail tracks to fit the shower opening.
5.4 Glass Panel Installation
- Attach the roller assemblies to the top edge of the sliding glass panel.
- Carefully lift and place the fixed glass panel into the bottom rail and secure it to the wall profile.
- Hang the sliding glass panel onto the top rail rollers and guide it into the bottom rail.
5.5 Handle and Anti-Collision Installation
- Install the aluminum alloy handle/towel bar onto the sliding glass panel. Ensure it is securely fastened but not overtightened.
- Attach the buffer anti-collision corners to the edges of the sliding door to protect the glass and wall during operation.
- Install the bottom guide block into the bottom rail to ensure smooth and stable sliding of the doors.

Image: Detail of the durable aluminum alloy handle, designed for easy opening and closing, also serving as a towel rack.

Image: A close-up view of the high-quality anti-crash angle buffers, designed to protect the wall from scratches and reduce impact during door movement.

Image: Detail of the bottom guide rail, designed to be flush with the surface, creating a leak-proof barrier and ensuring smooth door operation.
5.6 Sealing
- Apply a continuous bead of mildew-resistant silicone sealant along the exterior base of the shower door and where the wall profiles meet the walls.
- Allow the sealant to cure completely (typically 24-48 hours) before using the shower.
5.7 Reversible Installation
This shower door features a reversible design, allowing for either left-side or right-side opening depending on your bathroom layout and preference. The installation steps remain largely the same, simply orient the fixed and sliding panels accordingly.

Image: Visual representation of the reversible installation feature, illustrating both left-side and right-side opening configurations for the sliding shower door.
6. Operation
To open or close the ELEGANT sliding shower door, gently grasp the handle and slide the door along the top and bottom tracks. The rollers are designed for smooth, effortless movement. Avoid forcing the door or allowing it to slam against the wall profiles to prevent damage to the glass or hardware.
7. Maintenance and Cleaning
Regular cleaning will help maintain the appearance and functionality of your shower door.
7.1 Glass Cleaning
- Use a soft cloth or sponge with a mild, non-abrasive glass cleaner.
- Avoid cleaners containing harsh chemicals, abrasive particles, or scouring pads, as these can scratch the glass or damage protective coatings.
- For best results, wipe down the glass after each use to prevent water spot buildup.
7.2 Metal Frame Cleaning
- Clean the brushed nickel frame with a soft, damp cloth and a mild soap solution.
- Do not use abrasive cleaners, steel wool, or harsh chemicals, as these can damage the finish.
- Rinse thoroughly and dry with a soft cloth to prevent water spots.
7.3 General Maintenance
- Periodically check all screws and fasteners to ensure they are tight. Do not overtighten.
- Inspect sealing strips and gaskets for wear or damage. Replace if necessary to prevent leaks.
- Keep the top and bottom tracks free of debris to ensure smooth sliding.
8. Troubleshooting
Here are some common issues and their potential solutions:
| Problem | Possible Cause | Solution |
|---|---|---|
| Door does not slide smoothly | Debris in tracks, misaligned rollers, worn bottom guide. | Clean tracks thoroughly. Check roller alignment and adjust if needed. Inspect and replace bottom guide if worn. |
| Water leaks from the bottom or sides | Improper sealing, damaged sealing strips, misaligned door. | Reapply silicone sealant where needed. Replace damaged sealing strips. Ensure door is properly aligned and plumb. |
| Door feels loose or wobbly | Loose fasteners, improper installation of wall profiles. | Tighten all mounting screws (do not overtighten). Verify wall profiles are securely fastened and plumb. |
| Glass appears scratched after cleaning | Abrasive cleaner or cleaning tool used. | Always use soft cloths and non-abrasive cleaners. Avoid harsh chemicals. |
9. Product Specifications
- Brand: ELEGANT
- Model: Semi-Frameless Sliding Shower Door
- Dimensions: 58.5 - 60 in. W x 72 in. H
- Glass Thickness: 1/4 inch (6 mm)
- Glass Type: Clear Tempered Glass, ANSI Certified
- Frame Material: Aluminum
- Finish: Brushed Nickel
- Style: Modern
- Item Weight: Approximately 101.5 Pounds
- Assembly Required: Yes
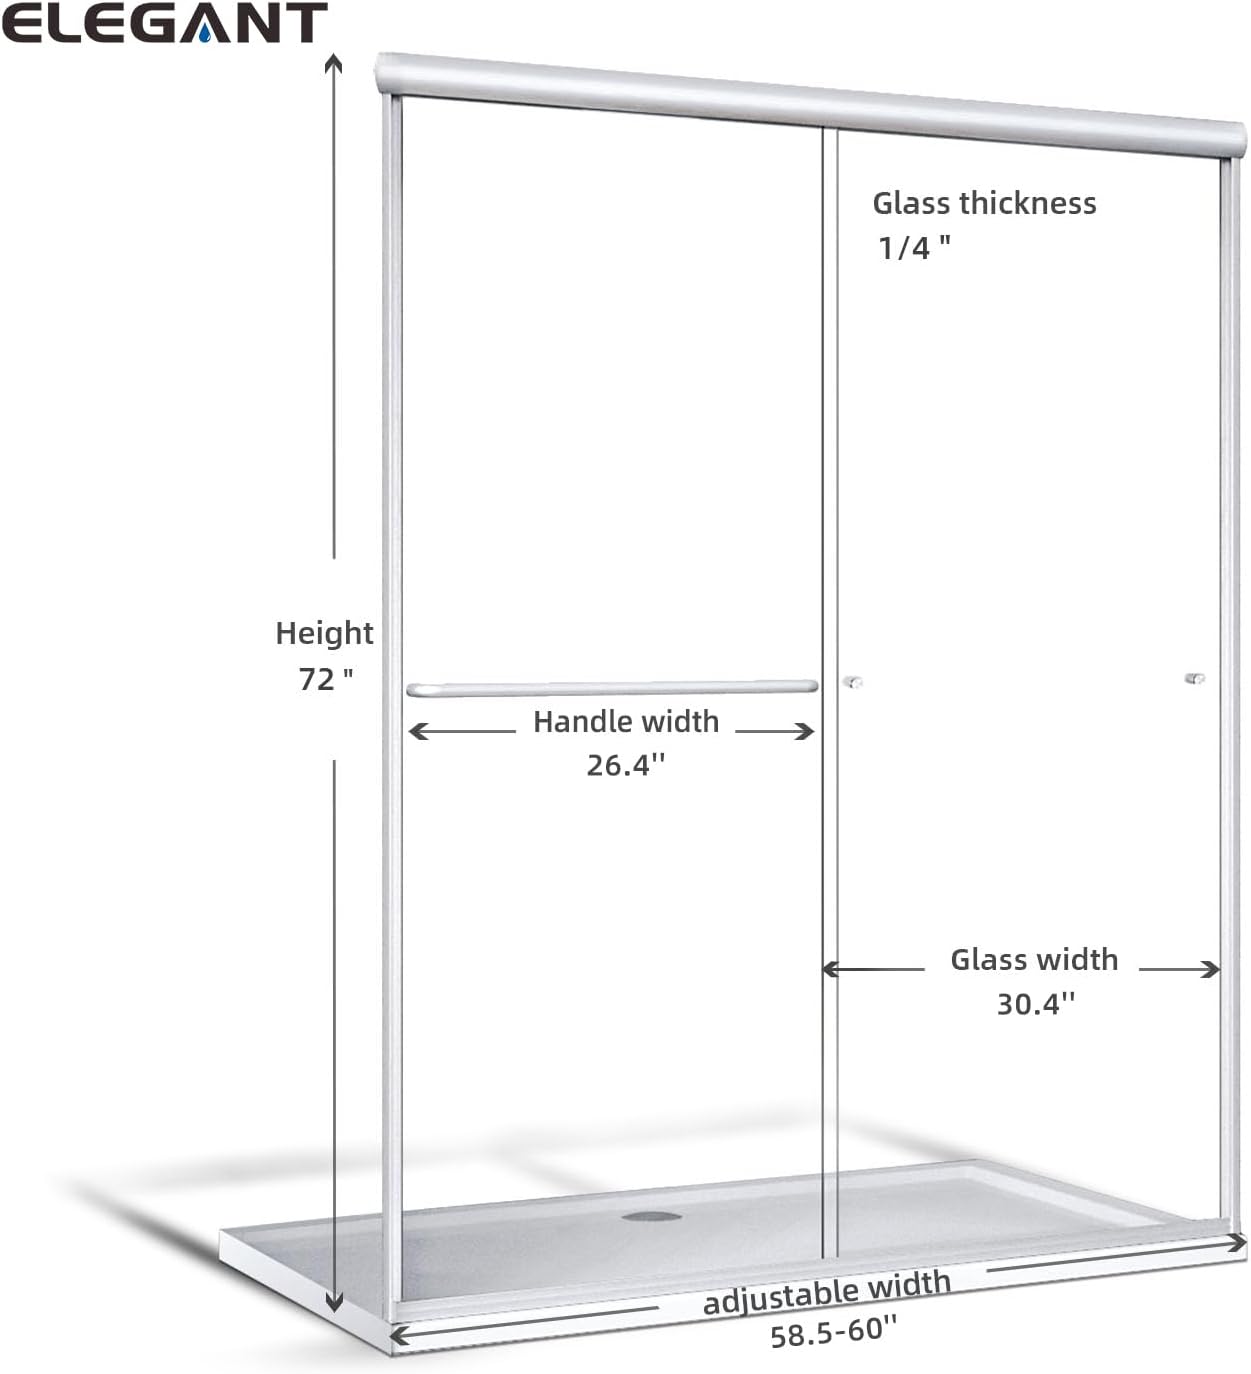
Image: Technical diagram illustrating the key dimensions of the shower door, including height, glass thickness, handle width, and adjustable width range.
10. Warranty and Customer Support
ELEGANT products are manufactured to high-quality standards and are backed by a manufacturer's warranty. For specific warranty details, claims, or technical assistance, please contact ELEGANT customer service directly. Keep your purchase receipt as proof of purchase.
For support, please visit the official ELEGANT store or contact their customer service department. Contact information can typically be found on the product packaging or the brand's official website.


