
1. Important Safety Instructions
Please read all instructions carefully before using the appliance and retain them for future reference. Incorrect operation can cause damage to the appliance and injury to the user.
- Ensure the voltage indicated on the appliance corresponds to your local mains voltage before connecting.
- Do not immerse the motor base, cord, or plug in water or any other liquid.
- Keep hands and utensils away from moving parts during operation to prevent injury.
- Unplug from the outlet when not in use, before assembling or disassembling parts, and before cleaning.
- This appliance is not intended for use by persons (including children) with reduced physical, sensory, or mental capabilities, or lack of experience and knowledge, unless they have been given supervision or instruction concerning use of the appliance by a person responsible for their safety.
- Do not operate any appliance with a damaged cord or plug, or after the appliance malfunctions or has been damaged in any manner.
- For household use only. Do not use outdoors.
- Always ensure the appliance is properly assembled before use.
2. Product Components
Familiarize yourself with the parts of your RAF R.2831 Electric Citrus Juicer:
- Motor Base (Main Unit)
- Juicing Screw (Auger)
- Filter/Strainer
- Juice Outlet with Anti-Drip Cap
- Pulp Outlet
- Feeding Tube/Hopper
- Pusher
- Juice Collection Cup
- Pulp Collection Cup
- Cleaning Brush

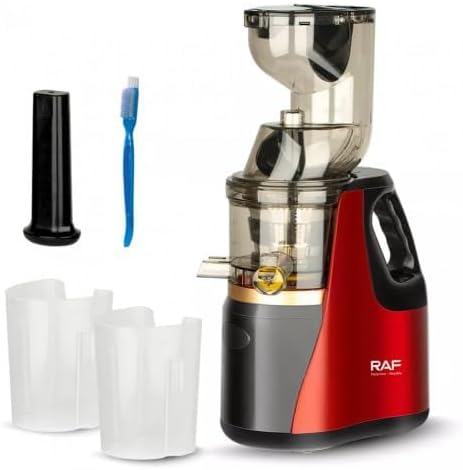
3. Setup
Follow these steps to assemble your juicer before first use:
- Place the motor base on a stable, flat, and dry surface.
- Align the juicing bowl with the motor base and rotate it clockwise until it locks into place.
- Insert the filter/strainer into the juicing bowl.
- Place the juicing screw (auger) into the center of the filter, pushing down and rotating slightly until it sits firmly.
- Attach the feeding tube/hopper assembly to the top of the juicing bowl, ensuring it aligns correctly and locks securely.
- Position the juice collection cup under the juice outlet and the pulp collection cup under the pulp outlet.
- Ensure the anti-drip cap on the juice outlet is closed if you wish to collect juice before dispensing.
4. Operating Instructions
4.1 Preparing Fruits
- Wash fruits thoroughly.
- For citrus fruits like oranges and lemons, peel the skin before juicing to avoid bitter taste from the rind.
- Remove any large seeds or pits from fruits.
- Cut fruits into pieces small enough to fit into the feeding tube.
4.2 Juicing Process
- Plug the power cord into a suitable electrical outlet (220V, 50Hz).
- Turn the juicer ON using the control knob.
- Slowly feed the prepared fruit pieces into the feeding tube.
- Use the pusher to gently guide the fruit down the feeding tube. Do not force the fruit.
- The juice will flow into the juice collection cup, and the pulp will be expelled into the pulp collection cup.
- Once juicing is complete, turn the juicer OFF and unplug it from the power outlet.
- Open the anti-drip cap to dispense the collected juice.
Note: The juicer is designed for intermittent use. If the motor overheats, it may automatically shut off. Allow it to cool down before resuming operation.
5. Cleaning and Maintenance
Proper cleaning ensures the longevity and hygiene of your juicer.
5.1 Disassembly for Cleaning
- Ensure the juicer is turned OFF and unplugged.
- Remove the juice and pulp collection cups.
- Remove the feeding tube/hopper assembly by rotating it counter-clockwise.
- Lift out the juicing screw and then the filter/strainer.
- Remove the juicing bowl from the motor base.
5.2 Cleaning Instructions
- Hand Wash Only: All detachable parts (juicing screw, filter, juicing bowl, feeding tube, cups, pusher) should be washed by hand using warm, soapy water.
- Use the provided cleaning brush to remove pulp residue from the filter and other intricate parts.
- Rinse all parts thoroughly under running water.
- Wipe the motor base with a damp cloth. Never immerse the motor base in water.
- Dry all parts completely before reassembling or storing.
5.3 Storage
Store the assembled or disassembled juicer in a clean, dry place away from direct sunlight and heat.
6. Troubleshooting
If you encounter issues with your juicer, refer to the following common problems and solutions:
| Problem | Possible Cause | Solution |
|---|---|---|
| Juicer does not turn on. | Not plugged in; power outlet faulty; appliance not assembled correctly; motor overheating. | Check power connection; try a different outlet; ensure all parts are locked in place; allow motor to cool down. |
| Low juice yield or excessive pulp in juice. | Fruit not properly prepared (e.g., unpeeled citrus); filter clogged; too much fruit fed at once. | Peel citrus fruits; clean the filter; feed fruit slowly and in smaller pieces. |
| Motor stops during operation. | Overload protection activated due to too much fruit or hard ingredients; motor overheating. | Turn off, unplug, clear any blockages, and allow to cool for 15-30 minutes before restarting. |
| Loud noise or vibration. | Parts not assembled correctly; foreign object inside. | Disassemble and reassemble all parts, ensuring they are securely locked. Check for and remove any foreign objects. |
If the problem persists after trying these solutions, please contact customer support.
7. Specifications
| Brand | RAF |
| Model Number | R.2831 |
| Power | 150 Watts |
| Voltage | 220 Volts |
| Frequency | 50 Hz |
| Color | Red |
| Material | Stainless Steel |
| Special Feature | Portable |
| Product Dimensions (D x W x H) | 30 cm x 30 cm x 40 cm |
| Item Weight | 1 Kilogram |
| Recommended Uses | Lemon, Orange |
| Care Instructions | Hand Wash Only |
| Control Type | Knob |
| Power Source | Corded Electric |

8. Warranty and Support
Your RAF R.2831 Electric Citrus Juicer comes with an International Warranty.
For warranty claims, technical support, or any inquiries regarding your product, please refer to the contact information provided on your purchase receipt or visit the official RAF website.
Please have your model number (R.2831) and proof of purchase ready when contacting support.