1. Introduction
Thank you for choosing the GRACEALL Portable Electric Infrared Hot Plate. This appliance is designed to provide efficient and versatile cooking solutions for your home, apartment, RV, or outdoor activities. With its powerful 3500W heating element and user-friendly controls, you can enjoy a wide range of cooking possibilities. Please read this manual carefully before operation to ensure safe and optimal performance.

Image: The GRACEALL Portable Electric Infrared Hot Plate, showcasing its sleek design and intuitive control layout.
2. Important Safety Instructions
When using electrical appliances, basic safety precautions should always be followed to reduce the risk of fire, electric shock, and injury to persons, including the following:
- Read all instructions before using the appliance.
- Do not touch hot surfaces. Use handles or knobs.
- To protect against electrical shock, do not immerse cord, plugs, or the appliance in water or other liquid.
- Close supervision is necessary when any appliance is used by or near children.
- Unplug from outlet when not in use and before cleaning. Allow to cool before putting on or taking off parts.
- Do not operate any appliance with a damaged cord or plug or after the appliance malfunctions or has been damaged in any manner.
- The use of accessory attachments not recommended by the appliance manufacturer may cause injuries.
- Do not use outdoors.
- Do not let cord hang over edge of table or counter, or touch hot surfaces.
- Do not place on or near a hot gas or electric burner, or in a heated oven.
- Extreme caution must be used when moving an appliance containing hot oil or other hot liquids.
- Always attach plug to appliance first, then plug cord into the wall outlet. To disconnect, turn any control to “off,” then remove plug from wall outlet.
- Do not use appliance for other than intended use.
- The 220V hot plates for cooking are equipped with overheat protection and automatic shut-off, ensuring kitchen safety.

Image: Universal warning symbols for electrical appliances, highlighting potential hazards.
3. Product Features
- High Power Output: 3500W for rapid heating and efficient cooking.
- Versatile Control: Features both sensitive touch controls and a precise rotary knob for easy power and temperature adjustments.
- Adjustable Power Levels: Offers 12 wattage levels ranging from 200W to 3500W for diverse cooking needs.
- Integrated Timer: A 3-hour timer (1 to 180 minutes) for precise cooking duration.
- Preset Cooking Modes: Includes 4 convenient modes: Fry, BBQ, Soup, and Power, each with adjustable default wattages.
- Large Heating Zone: An 18 cm heating zone ensures even heat distribution for consistent cooking results.
- Durable Surface: Made with microcrystalline ceramic glass, designed to withstand high temperatures, resist cracking, and be explosion-proof.
- Wide Cookware Compatibility: Works with all flat-bottom cookware, including stainless steel, glass, enamel, aluminum, cast iron, copper, ceramic, and moka pots.
- Efficient Cooling System: Equipped with a robust cooling fan to dissipate heat effectively and prolong appliance life.
- Portable Design: Compact and lightweight with a carrying handle, making it ideal for various locations.
- Easy to Clean: The smooth glass panel and brushed stainless steel body simplify cleaning.
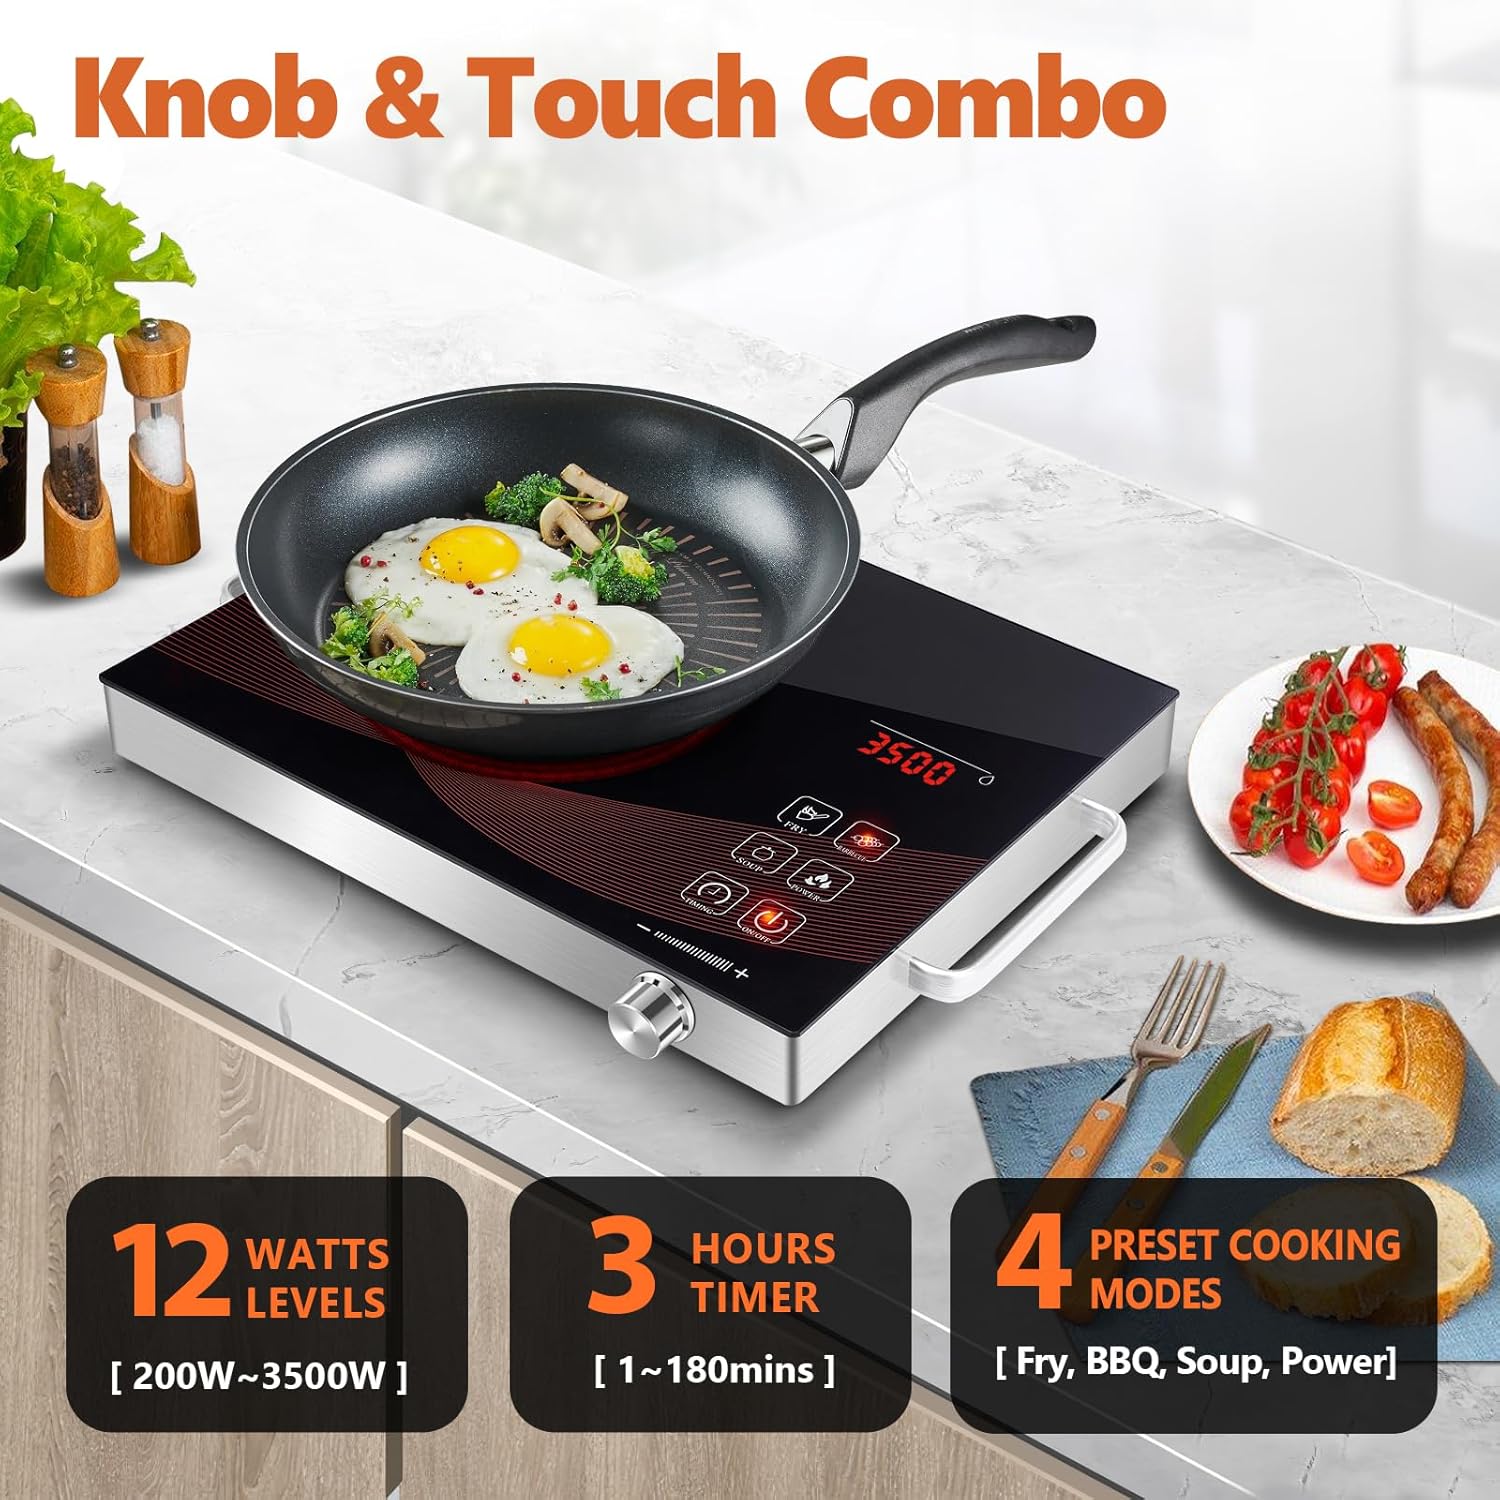
Image: Overview of the control panel, highlighting the knob and touch interface, power levels, timer, and cooking modes.

Image: Close-up of key features including rapid heating, cooling system, and control responsiveness.
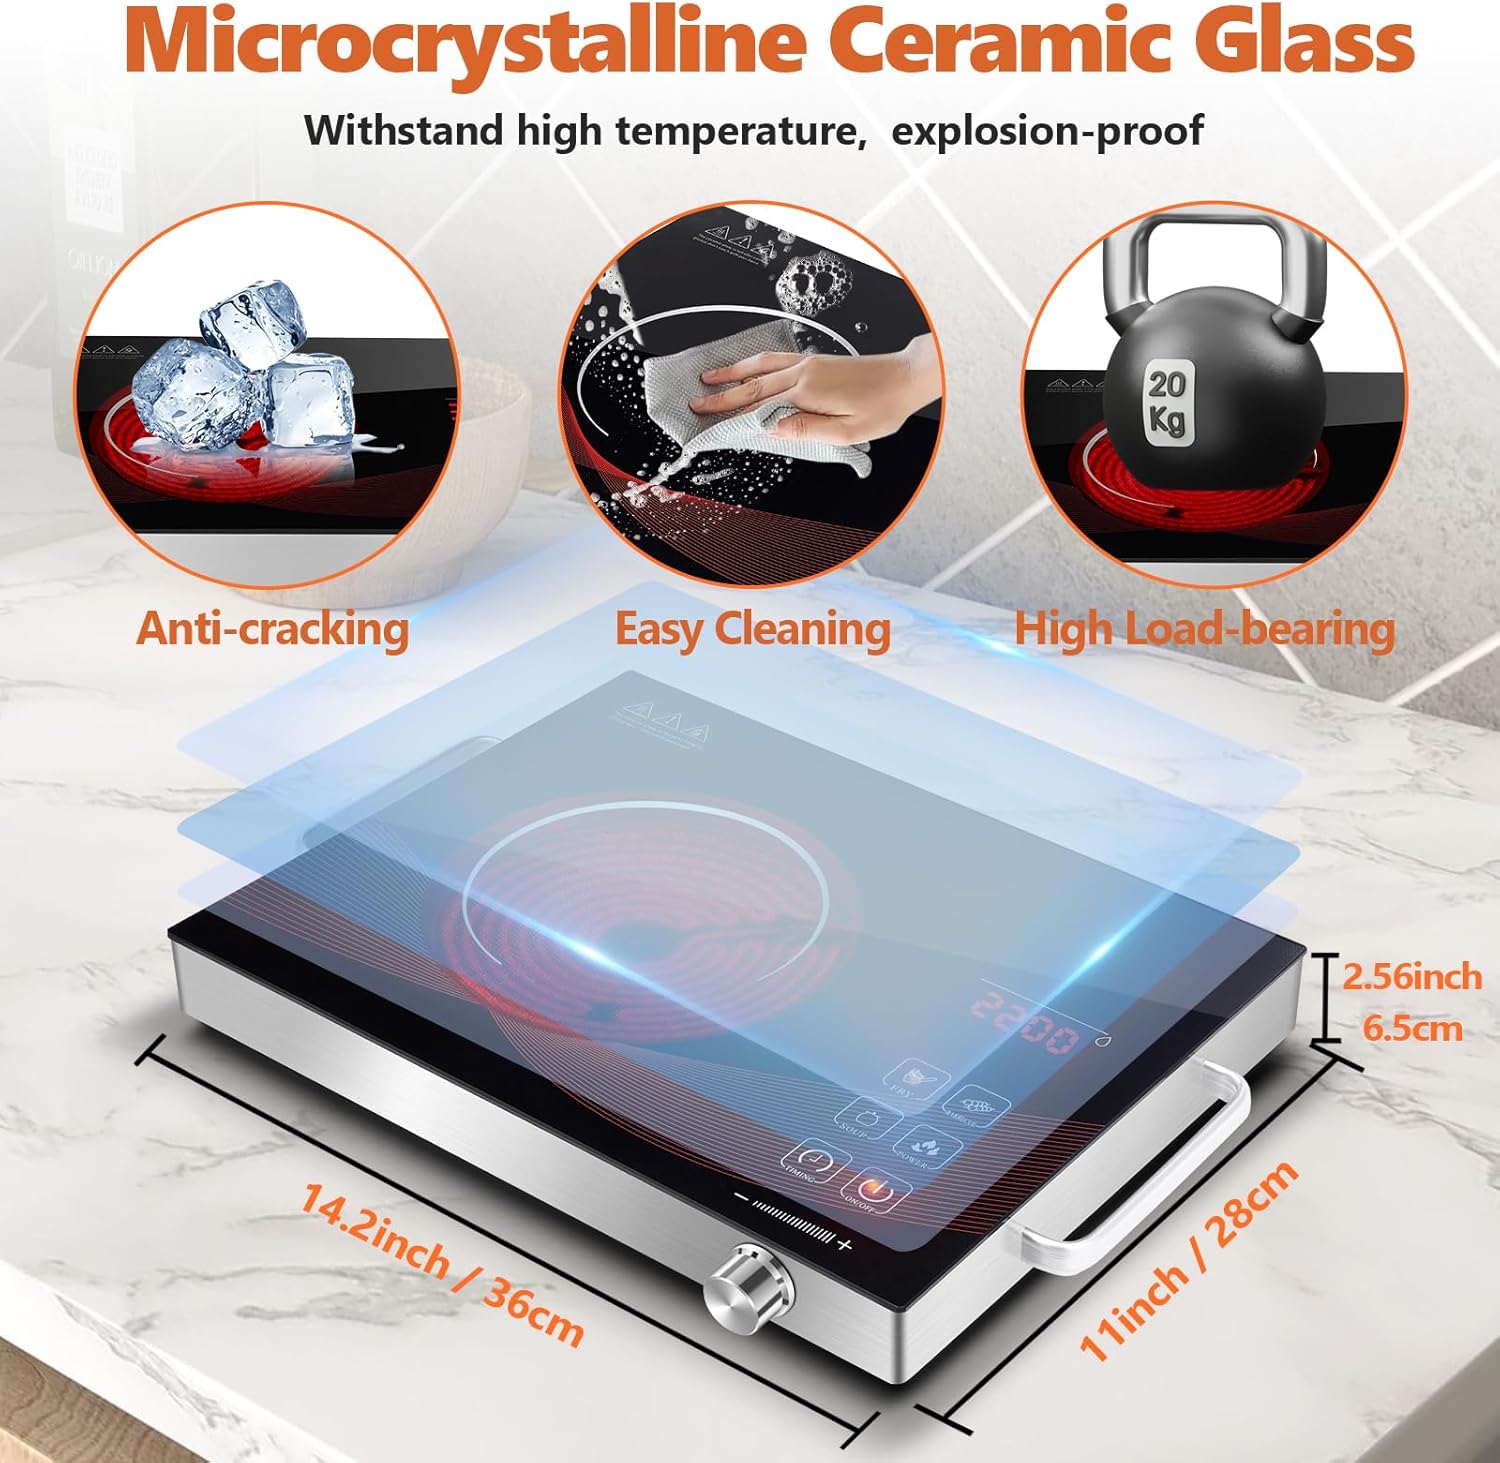
Image: Illustration of the durable ceramic glass surface and the compact dimensions of the hot plate.

Image: Visual guide to the wide range of cookware types compatible with the infrared hot plate.
4. Setup
- Unpacking: Carefully remove the hot plate and all packaging materials from the box. Retain packaging for future storage or transport if needed.
- Inspection: Inspect the appliance for any signs of damage. Do not use if the unit or power cord is damaged.
- Placement: Place the hot plate on a stable, flat, heat-resistant surface. Ensure there is adequate ventilation around the unit (at least 10 cm clearance from walls or other objects). Do not place on tablecloths or other flammable materials.
- Power Connection: Ensure your power outlet matches the voltage requirements of the appliance (220V AC). Plug the power cord firmly into a grounded electrical outlet.

Image: The hot plate being carried, emphasizing its portable design and ease of placement.
5. Operating Instructions
Basic Operation
- Power On: Place your cookware (with contents) on the center of the heating zone. Press the ON/OFF button to turn on the hot plate. The LED display will illuminate.
- Adjusting Power/Temperature:
- Use the rotary KNOB: Turn clockwise to increase power/temperature, counter-clockwise to decrease. The display will show the current wattage.
- Use Touch Controls: Some models may have dedicated '+' and '-' touch buttons for fine adjustments.
- Using Preset Modes: Press the desired preset mode button (e.g., FRY, BARBECUE, SOUP, POWER). The hot plate will automatically set to the default wattage for that mode. You can then adjust the wattage using the knob if needed.
- Setting the Timer: Press the TIMER button. Use the knob to set the desired cooking time (from 1 to 180 minutes). The hot plate will automatically shut off once the timer expires.
- Power Off: Press the ON/OFF button to turn off the hot plate. The heating element will cool down, and the display will turn off.

Image: A clear diagram of the control panel, indicating the function of each button and the rotary knob.

Image: Examples of the hot plate in action, showcasing its versatility for different cooking styles and environments.
6. Maintenance and Cleaning
Proper maintenance ensures the longevity and optimal performance of your hot plate.
- Before Cleaning: Always unplug the hot plate from the power outlet and allow it to cool completely before cleaning.
- Cleaning the Surface: Wipe the ceramic glass surface with a soft, damp cloth and a mild detergent. For stubborn stains, use a non-abrasive cleaner specifically designed for ceramic cooktops. Do not use abrasive pads, harsh chemicals, or steel wool, as these can scratch the surface.
- Cleaning the Body: Wipe the brushed stainless steel body with a soft, damp cloth. Dry thoroughly.
- Cooling Fan: Periodically check the air vents for dust or debris. Use a soft brush or a vacuum cleaner with a brush attachment to gently clean the vents. Do not insert any objects into the fan opening.
- Storage: Store the hot plate in a cool, dry place when not in use. Ensure the power cord is neatly wrapped and not kinked.
- Do Not Immerse: Never immerse the hot plate, cord, or plug in water or any other liquid.

Image: The hot plate being cleaned, illustrating the ease of maintenance for its smooth surface.
7. Troubleshooting
If you encounter issues with your hot plate, please refer to the table below for common problems and their solutions.
| Problem | Possible Cause | Solution |
|---|---|---|
| Hot plate does not turn on. | Not plugged in; power outage; faulty outlet; unit malfunction. | Ensure the power cord is securely plugged into a working outlet. Check your circuit breaker. Try a different outlet. If the issue persists, contact customer support. |
| Hot plate heats slowly or not at all. | Incorrect power setting; cookware not flat-bottomed; cookware too small/large; overheat protection activated. | Increase the power setting. Ensure cookware has a flat bottom and is within the recommended size for the heating zone. Allow the unit to cool if it has been running for a long time. |
| Display shows an error code. | Internal malfunction; sensor error. | Unplug the unit for 5 minutes, then plug it back in. If the error persists, note the error code and contact customer support. |
| Fan continues to run after turning off. | Normal cooling process. | This is normal. The fan will continue to run for a short period to cool down internal components before automatically shutting off. |
8. Specifications
| Specification | Detail |
|---|---|
| Brand | GRACEALL |
| Model Number | RR-912 |
| Color | Rr-912-black |
| Product Dimensions (L x W x H) | 36 x 28 x 6.5 cm (14.2 x 11 x 2.56 inches) |
| Item Weight | 2.59 Kilograms |
| Power | 3500 Watts |
| Voltage | 220 Volts (AC) |
| Material | Ceramic Glass |
| Heating Elements | 1 |
| Control Type | Knob and Touch |
| Burner Type | Radiant |
| Automatic Shut-off Function | Yes |
9. Warranty and Support
GRACEALL products are manufactured to high-quality standards. While specific warranty details may vary by region or retailer, generally, this product is covered by a standard manufacturer's warranty against defects in materials and workmanship from the date of purchase. Please retain your proof of purchase for warranty claims.
For technical support, troubleshooting assistance, or warranty inquiries, please contact GRACEALL customer service through the retailer where you purchased the product or visit the official GRACEALL website for contact information.
Please note that spare parts availability information is not provided at this time.