1. Introduction
The Shearwater Peregrine Dive Computer Console is designed to provide essential dive information in a clear, accessible format. This manual will guide you through the setup, operation, and maintenance of your device, ensuring safe and effective use.
Please read this manual thoroughly before your first dive with the Peregrine Console.
2. Package Contents
Upon opening your Shearwater Peregrine Dive Computer Console package, please verify that all components are present:
- Shearwater Peregrine Dive Computer (integrated into console boot)
- Integrated Northern Compass
- Integrated PSI Submersible Pressure Gauge (SPG)
- 32-inch High-Pressure (HP) Hose
- Nylon Lanyard with Quick Disconnect (QD) Side Release Buckle
- USB Charging Cable
- Clip
If any items are missing or damaged, please contact Shearwater Research customer support immediately.
3. Setup
3.1 Initial Charging
Before first use, fully charge the Peregrine Dive Computer. The device is equipped with a rechargeable Li-ion battery.
- Locate the charging port on the side of the Peregrine computer.
- Connect the provided USB charging cable to the computer and a compatible USB power source.
- The screen will display a 'Charging' indicator. A full charge can provide up to 30 hours of dive time.
- Once fully charged, disconnect the cable.

Image: Peregrine Dive Computer Console connected to its USB charging cable, showing the 'Charging' status on the display.

Image: Side view of the Peregrine Console, highlighting the charging port and the connected USB cable.
3.2 HP Hose Connection
The 32-inch HP hose connects the console to your first stage regulator, providing pressure data to the integrated SPG.
- Ensure the HP hose O-rings are in good condition.
- Carefully screw one end of the HP hose into the console's pressure port. Do not overtighten.
- Screw the other end of the HP hose into an available high-pressure port on your first stage regulator.
- Once connected, slowly open your cylinder valve and check for any leaks at the connections.
3.3 Initial Settings
Power on the Peregrine by pressing the designated button (refer to the device for button labels, typically 'Menu' or 'Function'). Navigate through the initial setup menu to configure basic settings:
- Units: Select Imperial (feet/PSI) or Metric (meters/bar).
- Time/Date: Set current time and date.
- Gas Settings: Configure your primary breathing gas (Air or Nitrox). The Peregrine supports up to 3 Open Circuit (OC) gases.
4. Operating the Peregrine Dive Computer Console
4.1 Display Overview
The Peregrine features a vibrant 2.2-inch full-color LCD screen (320x240 QVGA resolution) for clear readability. Key information displayed includes:
- Current Depth: Your present depth underwater.
- Dive Time: Elapsed time of the current dive.
- No Decompression Limit (NDL): Remaining time before mandatory decompression stops are required.
- Safety Stop: Indication and countdown for mandatory safety stops.
- Gas Type: Currently selected breathing gas (e.g., Air, Nitrox).
- Maximum Depth: The deepest point reached during the current dive.
- Temperature: Water temperature.
- Battery Status: Remaining battery life.

Image: Front view of the Peregrine Console showing a typical dive screen with depth, NDL, safety stop, and gas information.
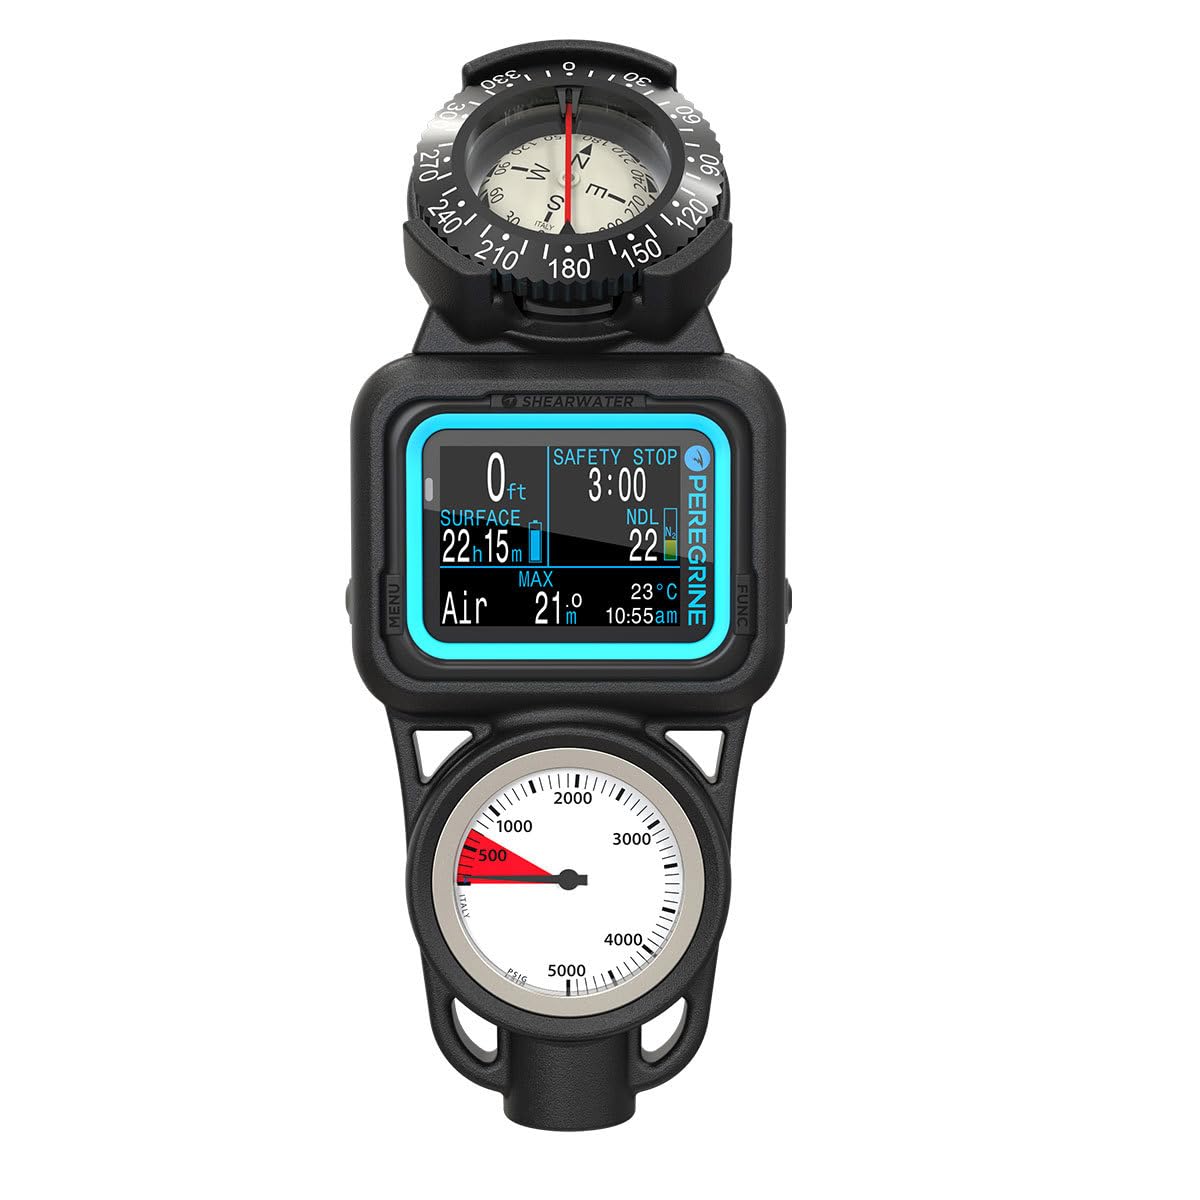
Image: Front view of the Peregrine Console displaying dive information, potentially in metric units, with a clear view of the compass and pressure gauge.
4.2 Button Functions
The Peregrine typically features two primary buttons, often labeled 'Menu' and 'Function', located on the sides of the computer. Their functions vary depending on the context:
- Short Press: Navigates through data screens or menu options.
- Long Press: Enters/exits menus, confirms selections, or activates specific functions.
Refer to the on-screen prompts for specific button actions in different modes.
4.3 Dive Modes and Gas Switching
The Peregrine supports both Air and Nitrox diving. You can configure up to 3 Open Circuit (OC) gases. The device allows for seamless switching between different gas mixtures during your dive, enhancing safety and extending bottom times.
- Air Mode: For diving with standard air (21% Oxygen).
- Nitrox Mode: For diving with enriched air nitrox (up to 40% Oxygen).
- Gas Switching: Access the gas menu during a dive to switch to a pre-configured gas. The Peregrine features a 'no-lockout' design, allowing dive plan changes at any time.
4.4 Compass and Pressure Gauge
The console integrates a Northern Compass and a PSI SPG for essential navigation and gas monitoring.
- Compass: Use the compass for underwater navigation. Ensure it is held level for accurate readings.
- Pressure Gauge (SPG): The analog SPG provides a direct reading of your cylinder pressure. Monitor this regularly to manage your gas supply. The red zone typically indicates low pressure.
4.5 Dive Logging
The Peregrine automatically logs your dives, storing approximately 200 hours of dive logs at a 10-second recording rate. These logs can be reviewed on the device or downloaded to a computer via the Shearwater Cloud application for detailed analysis and tracking of your dive profiles.
5. Maintenance
5.1 Post-Dive Care
- Rinse: After each dive, thoroughly rinse the entire console with fresh water to remove salt, sand, and other debris. Operate the buttons while rinsing to flush out any trapped particles.
- Dry: Allow the console to air dry completely in a shaded, well-ventilated area before storage. Avoid direct sunlight.
- Inspect: Regularly inspect the HP hose, O-rings, and the console boot for any signs of wear, cracks, or damage. Replace worn components as necessary.
5.2 Battery Care
- Charging: Charge the battery regularly, especially if the device will be stored for an extended period. Avoid completely draining the battery.
- Storage: For long-term storage, charge the battery to approximately 50-70% and store the device in a cool, dry place.
5.3 Storage
Store the Peregrine Dive Computer Console in a protective case or bag to prevent physical damage. Keep it away from extreme temperatures, direct sunlight, and chemicals.
6. Troubleshooting
This section addresses common issues you might encounter with your Peregrine Dive Computer Console.
| Problem | Possible Cause | Solution |
|---|---|---|
| Device does not power on. | Low or depleted battery. | Connect to charger and allow sufficient charging time. |
| Display is dim or unreadable. | Low battery; screen brightness setting. | Charge the device. Adjust screen brightness in settings. |
| Inaccurate depth or pressure readings. | Sensor obstruction; HP hose leak; device malfunction. | Check for debris around sensors. Inspect HP hose connections for leaks. If issues persist, contact support. |
| Compass not functioning correctly. | Magnetic interference; not held level. | Move away from metal objects. Ensure the console is held level during use. |
For issues not listed here or if solutions do not resolve the problem, please contact Shearwater Research customer support.
7. Specifications
| Feature | Detail |
|---|---|
| Model Number | 16100 |
| Product Dimensions (L x W x H) | 15 x 15 x 2 inches |
| Item Weight | 1.8 Pounds |
| Material | Metal, Nylon, Rubber |
| Display | 2.2" Full-Color LCD, 320x240 QVGA Resolution |
| Battery Type | Rechargeable Lithium-Ion |
| Battery Life (Dive Time) | Up to 30 hours per charge |
| Maximum Operating Depth | 394 feet (120 meters) |
| Gas Support | Air, Nitrox (up to 3 OC gases) |
| Dive Log Storage | Approx. 200 hours (10-second recording rate) |
| UPC | 628242090988 |
8. Warranty and Support
For detailed warranty information, please refer to the warranty card included with your product or visit the official Shearwater Research website. Keep your proof of purchase for warranty claims.
If you require technical assistance, have questions about your Peregrine Dive Computer Console, or need to report a defect, please contact Shearwater Research customer support:
- Website: www.shearwater.com/support/ (Example link, actual link may vary)
- Email: Refer to the website for contact details.
- Phone: Refer to the website for contact details.
When contacting support, please have your product model number (16100) and serial number ready.


