
DEWIN DEW132
DEWIN Mini Table Saw S3 User Manual
Model: DEW132
1. Introduction
This user manual provides essential information for the safe and effective operation of your DEWIN Mini Table Saw S3. Please read this manual thoroughly before use and retain it for future reference. This mini table saw is designed for precision cutting in DIY projects, model making, and various craft activities.
2. Important Safety Instructions
Always follow basic safety precautions to reduce the risk of fire, electric shock, and personal injury.
- Read all instructions: Familiarize yourself with the tool's operation and safety features.
- Wear appropriate safety gear: Always use safety glasses, hearing protection, and a dust mask.
- Keep work area clean: Cluttered areas invite accidents.
- Avoid dangerous environments: Do not use power tools in damp or wet locations, or expose them to rain.
- Keep children away: All visitors should be kept at a safe distance from the work area.
- Secure workpiece: Always clamp or otherwise secure the workpiece to prevent movement during cutting.
- Use the correct blade: Ensure the saw blade is appropriate for the material being cut and is installed correctly. The teeth should face towards the operator when the power switch is on your right.
- Unplug before adjusting: Always disconnect the saw from the power supply before making any adjustments, changing accessories, or storing the tool.
- Maintain tools with care: Keep cutting tools sharp and clean for better and safer performance.
- Use the safety bezel: The transparent acrylic guard prevents accidental contact with the saw blade while maintaining visibility.
- Dust extraction: Connect a vacuum hose to the dust port for a cleaner work environment and improved visibility.

Image: The DEWIN Mini Table Saw showing the transparent safety bezel over the blade and the vacuum hose connection point.
3. Product Components
Familiarize yourself with the parts of your DEWIN Mini Table Saw S3.

Image: Labeled diagram of the DEWIN Mini Table Saw highlighting key components such as the aluminum alloy countertop, safety bezel, saw blade, switch, non-slip feet, vents, chip discharge port, and power socket.
- Aluminum Alloy Countertop: Durable and wear-resistant work surface with laser-engraved scales.
- Safety Bezel: Transparent acrylic guard for blade protection.
- Saw Blade: Interchangeable blade for various materials.
- Switch: Power on/off control.
- Aluminum Alloy Backer: Provides support for the workpiece.
- Aluminum Alloy Angle Pusher: For precise angle cuts (up to 45 degrees).
- Non-slip Feet: Ensures stability during operation.
- Vents: For motor cooling.
- Chip Discharge Port: Connects to a vacuum hose for dust collection.
- Power Socket (24V): Input for the power supply.

Image: The DEWIN Mini Table Saw along with its included accessories, such as Allen wrenches, saw blade, power adapter, power cord, brush, and various guides.
4. Setup and Assembly
Follow these steps to set up your mini table saw for first use.
- Unpack: Carefully remove all components from the packaging. Verify that all parts listed in the "Product Components" section are present.
- Blade Installation:
- Ensure the saw is unplugged.
- Carefully position the saw blade onto the shaft. The teeth of the blade should face towards you when the power switch is on your right.
- Tighten the bolt firmly to secure the blade onto the shaft.

Image: A close-up view of the saw blade being installed, showing the orientation of the teeth.
- Attach Safety Bezel: Secure the transparent acrylic safety bezel over the saw blade using the provided fasteners. Ensure it does not obstruct blade movement.
- Install Guides: Attach the aluminum alloy backer and angle pusher as needed for your specific cutting task. These can be adjusted using the wing nuts.
- Connect Power: Plug the 24V power adapter into the power socket on the saw, then plug the adapter into a suitable electrical outlet.
- Dust Collection (Optional but Recommended): Connect a vacuum hose to the chip discharge port for effective dust extraction.

Image: A view of the mini table saw with a vacuum hose connected to its dust port, illustrating the dust collection feature.
5. Operating Instructions
5.1 General Operation
- Ensure the saw is on a stable, level surface.
- Verify the blade is securely installed and the safety bezel is in place.
- Adjust the aluminum alloy backer and angle pusher for the desired cut dimensions and angles. The laser-engraved scales provide precise measurements.
- Connect the power supply.
- Turn on the saw using the power switch.
- Allow the blade to reach full speed before beginning the cut.
- Feed the workpiece slowly and steadily into the blade. Do not force the material.
- After cutting, turn off the saw and wait for the blade to stop completely before removing the workpiece or making adjustments.
5.2 Speed Control
The DEWIN Mini Table Saw S3 features a 96W power supply with seven adjustable speed settings, allowing you to fine-tune the blade speed for different materials and cutting requirements. The speed control is typically located on the power pack.

Image: The DEWIN Mini Table Saw highlighting its 96W high-power 7-gear speed control power supply, capable of meeting various cutting requirements.
5.3 Material Compatibility
This mini table saw is versatile and can cut a variety of materials with the appropriate blade. Compatible materials include:
- PCBs (Printed Circuit Boards)
- Wood (e.g., small sticks, thin boards, balsa wood)
- Acrylic
- Copper
- Aluminum
- Stainless Steel
- Iron
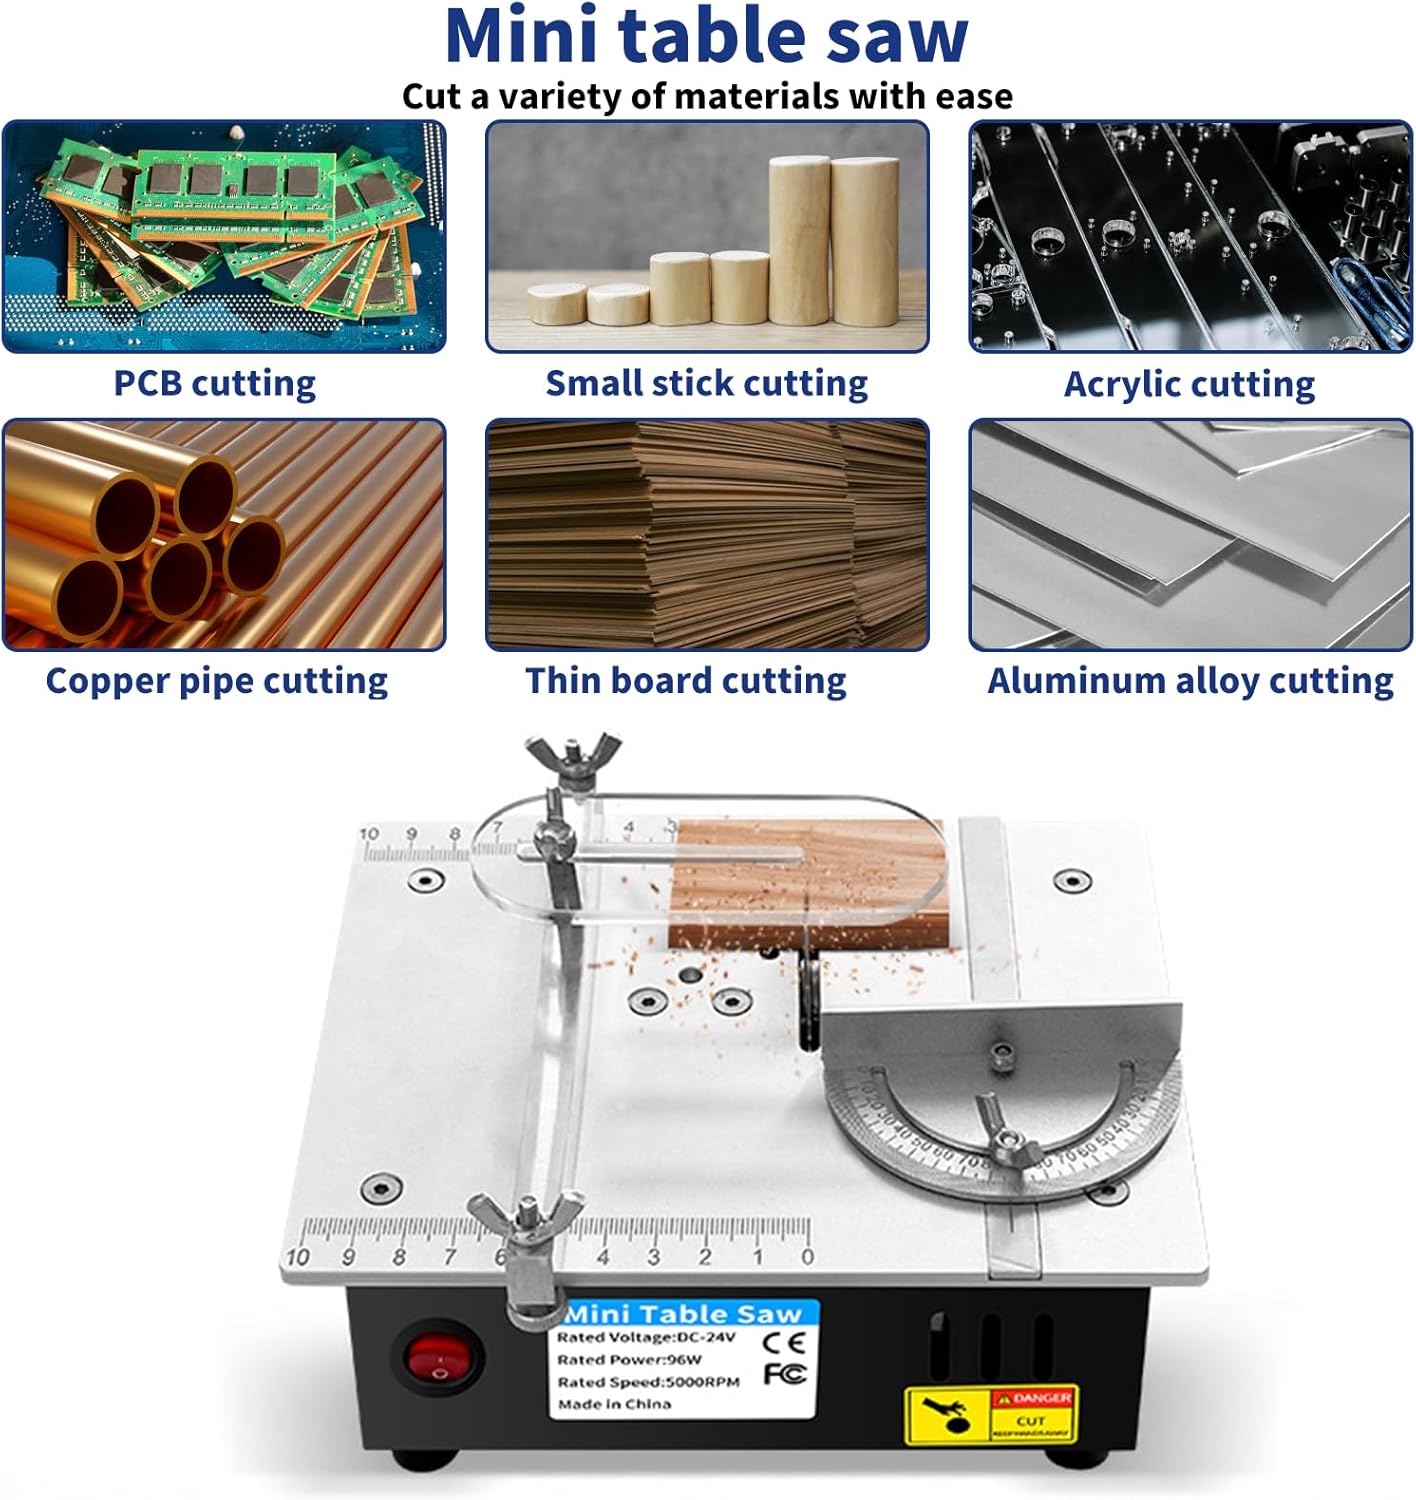
Image: A collage demonstrating the DEWIN Mini Table Saw's capability to cut various materials, including PCBs, small wood sticks, acrylic, copper pipes, thin boards, and aluminum alloy.

Image: Another collage showing the mini table saw's versatility in cutting different materials like PCBs, copper pipes, wood, and cardboard.
6. Maintenance
Regular maintenance ensures the longevity and optimal performance of your mini table saw.
- Cleaning: After each use, unplug the saw and use the provided brush or compressed air to remove dust and debris from the blade area, motor vents, and chip discharge port.
- Blade Inspection: Regularly inspect the saw blade for sharpness, damage, or excessive wear. Replace dull or damaged blades promptly.
- Lubrication: Apply a small amount of machine oil to moving parts as needed to ensure smooth operation.
- Storage: Store the saw in a clean, dry place, away from moisture and direct sunlight.
7. Troubleshooting
This section addresses common issues you might encounter.
| Problem | Possible Cause | Solution |
|---|---|---|
| Saw does not turn on. | No power supply; loose connection; faulty switch. | Check power cord and adapter connection. Ensure outlet is functional. Inspect switch for damage. |
| Blade wobbles or cuts unevenly. | Blade not installed correctly; loose blade bolt; bent blade. | Unplug saw. Re-install blade, ensuring it's seated properly and the bolt is tightened firmly. Replace bent blade. |
| Saw bogs down during cutting. | Dull blade; incorrect speed setting; forcing material too quickly. | Replace or sharpen blade. Adjust speed to a higher setting for harder materials. Feed material slowly and steadily. |
| Excessive dust. | Vacuum hose not connected or clogged; dust port blocked. | Connect vacuum hose securely. Clear any blockages from the hose and dust port. |
8. Technical Specifications
| Feature | Specification |
|---|---|
| Brand | DEWIN |
| Model Number | DEW132 |
| Material | Aluminum alloy + cold rolled steel |
| Rated Power | 96W |
| Rated Voltage | DC 24V, 10A |
| Rated Rotation Speed | 5000 RPM |
| Applicable Saw Blade Diameter | <63mm |
| Applicable Saw Blade Thickness | <1.5mm |
| Applicable Saw Blade Bore | 16mm |
| Product Dimensions (L x W x H) | 180mm x 140mm x 80mm (7.09"L x 5.51"W x 3.15"H) |
| Item Weight | 1.7 Kilograms (3.74 pounds) |
| Power Source | Corded Electric |
| Cutting Angle | 45 Degrees (adjustable with angle pusher) |

Image: The DEWIN Mini Table Saw with its key dimensions and a table summarizing its specifications, including material, rated power, voltage, rotation speed, and applicable saw blade details.
9. Warranty and Support
The DEWIN Mini Table Saw S3 comes with a limited warranty. For specific warranty terms and conditions, please refer to the documentation included with your purchase or contact DEWIN customer support.
For technical support, troubleshooting assistance, or parts inquiries, please contact DEWIN customer service through the retailer where the product was purchased or visit the official DEWIN website.
Ask a question about this manual
Ask about setup, troubleshooting, compatibility, parts, safety, or missing instructions. Manuals+ will review the question and use this page’s manual context to help answer it.