1. Introduction
The REOLINK Go PT Ultra is a state-of-the-art 4K LTE cellular security camera designed for outdoor use in areas without Wi-Fi or power access. Powered by a solar panel, it offers continuous surveillance with advanced features like 360° pan and tilt, smart detection for people, vehicles, and pets, and vivid color night vision. This manual provides detailed instructions for setting up, operating, and maintaining your camera to ensure optimal performance.
2. What's in the Box

Image: All components included in the Reolink Go PT Ultra package.
- Reolink Go PT Ultra Camera x1
- Reolink 6W Solar Panel (4m Solar Cable) x1
- Mounting Template x1
- Surveillance Sticker x1
- Quick Start Guide x1
- Reset Needle x1
- Pack of Screws x1
- USB-C Cable x1
- SIM Card x1
- 32GB SD Card x1
- Outdoor Security Mount x1
- Mounting Hole Template x1
3. Product Overview

Image: The Reolink Go PT Ultra camera and solar panel.
The Reolink Go PT Ultra is a compact yet powerful security camera. It features a 4K lens for high-resolution video, infrared LEDs for night vision, and a built-in microphone and speaker for two-way audio. The camera is designed with a pan-and-tilt mechanism allowing for a wide field of view. It connects to the internet via a 4G LTE cellular network, making it ideal for remote locations. The included solar panel ensures continuous power by recharging the camera's internal battery.
4. Setup
4.1 Initial Activation & SIM Card Installation
Activate SIM Card: Download the Reolink App from the App Store or Google Play. Log in or create an account. Tap the '+' icon in the top right corner to scan your SIM card and follow the in-app guidance for activation and data refill. The included Reolink SIM card supports major US carriers (AT&T, Verizon, T-Mobile) and automatically selects the strongest signal. For more details, visit https://tpro.lxustudio.cn/yazi/.

Image: Easy setup process for the Reolink Go PT Ultra camera.
Insert SIM Card: Carefully insert the activated nano SIM card into the designated slot on the camera. Ensure it is correctly oriented.
Power On: Turn on the camera using the power switch.
Scan QR Code: Use the Reolink App to scan the QR code on the camera to add it to your account and complete the initial setup.
4.2 Physical Installation
Choose a location for your camera that provides optimal coverage and receives ample direct sunlight for the solar panel. The camera is designed for outdoor use and can be mounted on walls or poles using the included mounting accessories.

Image: Example of the camera and solar panel mounted outdoors.
- Use the mounting template to mark drill holes.
- Secure the camera mount and solar panel mount using the provided screws.
- Attach the camera to its mount and connect the solar panel cable to the camera.
- Ensure the solar panel is positioned to receive maximum sunlight throughout the day.
5. Operating Your Camera
5.1 Live View and Pan & Tilt Control
Access the live view of your camera through the Reolink App. The camera supports 355° pan and 140° tilt, allowing you to remotely adjust the viewing angle. You can set up to 32 preset points and one guard point to quickly monitor specific areas of interest.
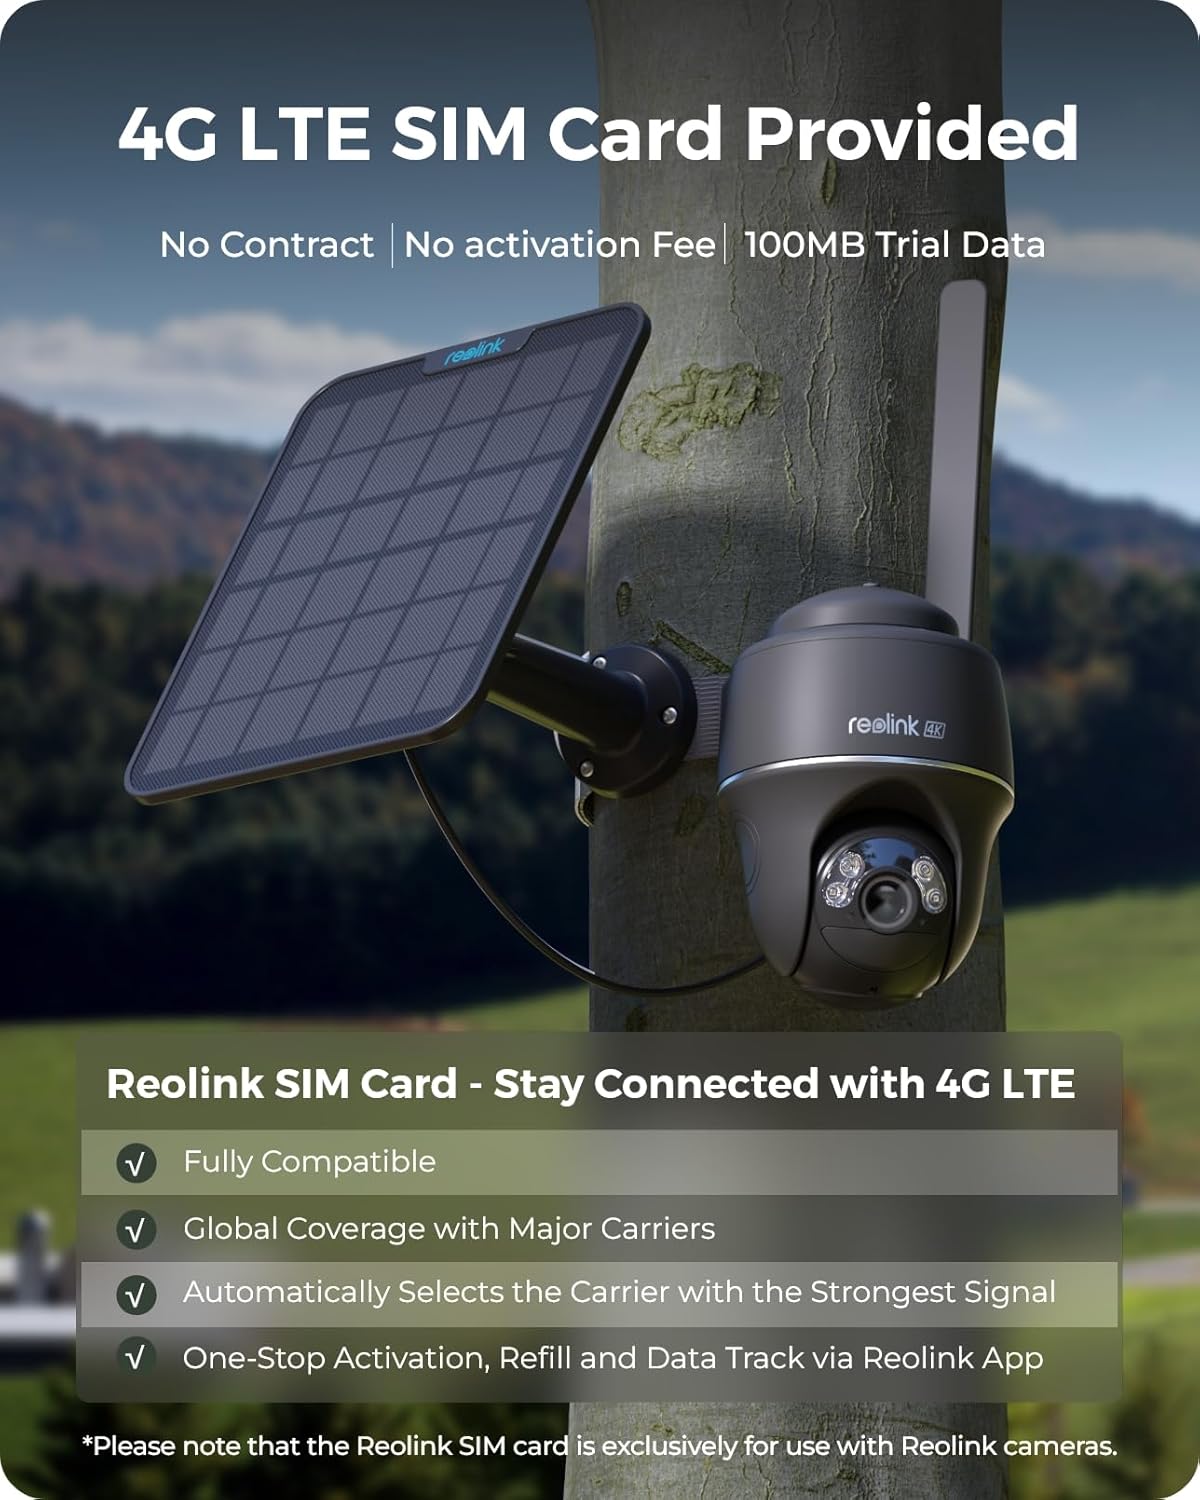
Image: The camera offers a 360° view with pan and tilt capabilities.
5.2 Smart Detection and Alerts
The camera features advanced detection technologies that can distinguish between people, vehicles, and pets. This minimizes false alarms and ensures you receive relevant notifications. Customize motion zones to focus on critical areas.

Image: Smart detection capabilities identifying people, vehicles, and pets.
5.3 Color Night Vision
Even in low-light conditions, the camera provides clear and detailed color night vision, ensuring comprehensive surveillance around the clock.
5.4 Two-Way Audio
Communicate directly with visitors or deter intruders using the built-in microphone and speaker accessible through the Reolink App.
5.5 Multi-Platform Access
Monitor your property from anywhere using the Reolink App on your smartphone (iOS/Android) or desktop client (Windows/Mac).

Image: Access your camera feed from various devices.
6. Storage Options
The Reolink Go PT Ultra offers flexible storage solutions for your recordings:
- MicroSD Card: A 32GB microSD card is included for local storage. The camera supports up to 128GB microSD cards.
- Reolink Cloud: Enjoy 7-day rolling free video history with Reolink Cloud storage. Additional cloud plans are available for extended storage.
- FTP Server: For advanced users, the camera supports saving recordings to an FTP server.
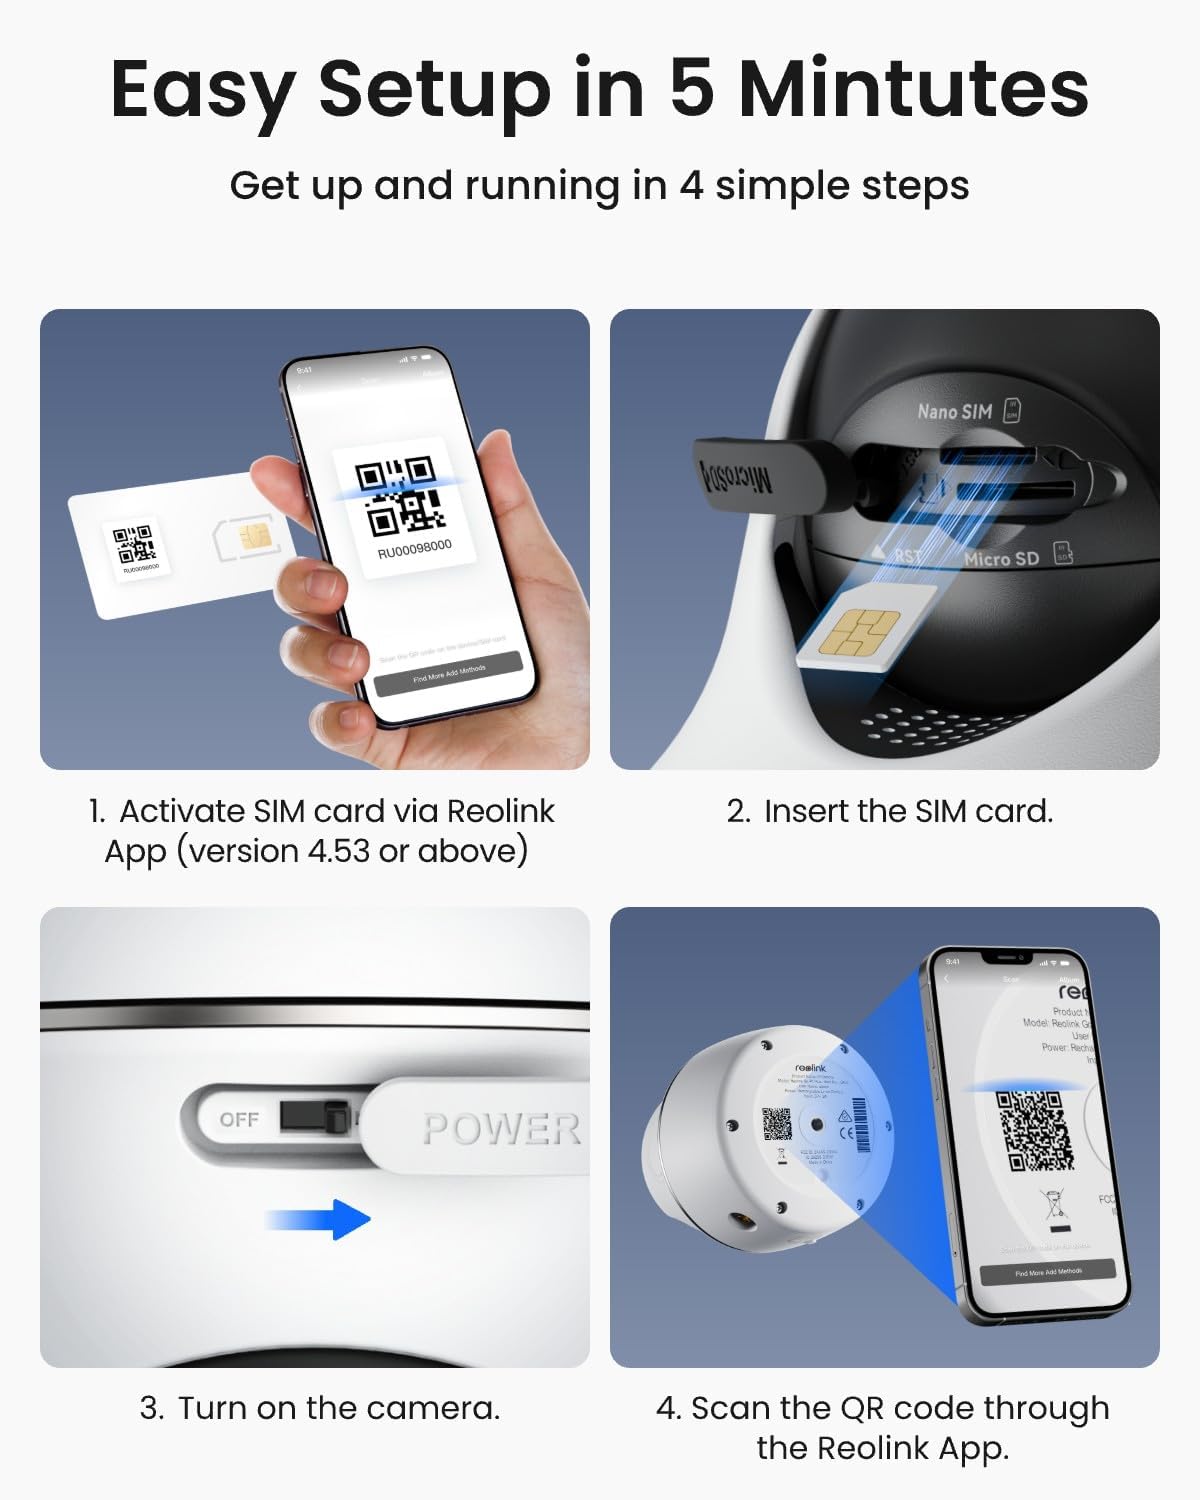
Image: Secure and flexible storage options.
7. Maintenance
- Clean the Solar Panel: Regularly wipe the solar panel surface with a soft, damp cloth to remove dust, dirt, or debris that may reduce charging efficiency.
- Check Battery Level: Monitor the battery status via the Reolink App to ensure it's adequately charged, especially during prolonged cloudy periods.
- Firmware Updates: Keep your camera's firmware updated through the Reolink App to ensure optimal performance, security, and access to new features.
- Lens Cleaning: Gently clean the camera lens with a microfiber cloth to maintain clear image quality.
8. Troubleshooting
- Camera Not Connecting:
- Ensure the SIM card is properly inserted and activated with sufficient data.
- Check cellular signal strength in the camera's location via the app.
- Restart the camera by turning it off and on.
- Battery Not Charging:
- Verify the solar panel is clean and receiving direct sunlight.
- Ensure the solar panel cable is securely connected to the camera.
- Check the working temperature range (14° to 131° F).
- Frequent False Alarms:
- Adjust motion sensitivity settings in the Reolink App.
- Configure motion detection zones to exclude areas with irrelevant movement (e.g., swaying trees).
- Ensure smart detection (person/vehicle/pet) is enabled.
- Poor Video Quality:
- Check the cellular signal strength; a weak signal can affect streaming quality.
- Ensure the camera lens is clean and free from obstructions.
- Switch between low and high-quality streaming options in the app.
9. Specifications
| Feature | Detail |
|---|---|
| Model Name | Reolink Go PT Ultra+Solar Panel 2 |
| Video Capture Resolution | 4K (8 MP Effective Still Resolution) |
| Connectivity Technology | 4G LTE Cellular |
| Power Source | Solar Powered (1 Lithium Ion battery included) |
| Pan & Tilt | 355° Pan, 140° Tilt |
| Night Vision Range | 10 Meters (Color Night Vision) |
| Indoor/Outdoor Usage | Outdoor (IP65 International Protection Rating) |
| Storage | MicroSD Card (up to 128GB, 32GB included), Cloud, FTP |
| Dimensions (L x W x H) | 9.45 x 7.87 x 7.87 inches |
| Item Weight | 3.83 pounds |
| Operating Temperature | 14° to 131° F |
10. Warranty and Support
- 30-Day Money Back Guarantee: Reolink offers a 30-day money-back guarantee and free returns.
- 2-Year Limited Warranty: Your Reolink Go PT Ultra camera is covered by a 2-year limited warranty.
- 24/7 Online Support: Access 24/7 online support for any queries or issues.
- User Guide (PDF): A detailed PDF user guide is available for download at https://manuals.plus/m/74674a2f8087460dfc5da1c5f360dbbe31fba17bf26a0277db444c5aae0200b2.
- Transparency Verification: Each item has a unique code that can be verified using the Transparency app for authenticity.


