1. Introduction
This manual provides essential information for the installation, operation, and maintenance of your ZEBRONICS Iceberg Premium Gaming Chassis. Please read these instructions carefully before beginning the assembly process to ensure proper functionality and safety. This chassis is designed to house mATX and Mini ITX motherboards, offering a blend of aesthetic appeal and efficient cooling for your gaming setup.
2. Safety Information
- Always disconnect the power supply from the wall outlet before installing or removing any components inside the chassis.
- Handle tempered glass panels with care. Avoid impacts or sharp objects that could cause breakage.
- Wear anti-static wrist straps to prevent electrostatic discharge (ESD) damage to sensitive electronic components.
- Keep small parts and screws away from children.
- Ensure proper ventilation around the chassis to prevent overheating.
3. Package Contents
Verify that all items are present in the package:
- ZEBRONICS Iceberg Premium Gaming Chassis - 1 unit
- Accessory kit (screws, standoffs, cable ties)
- User Manual (this document)
4. Product Overview and Features
The ZEBRONICS Iceberg chassis is designed for optimal performance and aesthetics. Key features include:
- Glass-finish Outlook: Features sleek tempered glass wrap-around front and side panels for an enhanced visual appeal.
- Motherboard Compatibility: Supports mATX and Mini ITX motherboards.
- Sufficient Ventilation: Equipped with 5 pre-installed 120mm multicolor LED ring fans (one at the rear, two at the bottom, and two at the top) for effective cooling.
- Multi-connectivity: Front panel includes 1x USB 3.0 port, 2x USB 2.0 ports, and dedicated mic and headphone ports. The rear panel offers 4 expansion slots.
- Component Accommodation: Supports graphics cards up to 255mm in length and CPU coolers up to 165mm in height. Power supply unit (PSU) installs at the bottom.
- Optimal Cooling System: Designed to guarantee superior airflow and enhance frame rates during prolonged gaming sessions.
- Magnetic Dust Filters: Includes a magnetic dust filter at the top and a detachable dust filter at the bottom for easy maintenance.
- Effective Cable Management: Features a design that simplifies organizing internal cables.

Image: Front view of the ZEBRONICS Iceberg Premium Gaming Chassis in white, showcasing its tempered glass panels and internal LED fans.
Video: An overview of the ZEBRONICS Iceberg Premium Gaming Chassis, highlighting its design and features.
5. Installation Guide
Follow these steps to install your components into the ZEBRONICS Iceberg chassis:
5.1. Preparing the Chassis
- Carefully remove the tempered glass side panel by unscrewing the thumb screws and sliding it off. Place it on a soft, flat surface to prevent scratches.
- Identify the pre-installed standoffs for your motherboard size (mATX or Mini ITX). Adjust or install additional standoffs from the accessory kit if necessary.
5.2. Motherboard Installation
- Install your motherboard's I/O shield into the chassis's rear opening.
- Carefully align your mATX or Mini ITX motherboard with the standoffs and I/O shield.
- Secure the motherboard with the provided screws. Do not overtighten.

Image: The interior of the chassis, indicating support for mATX and Mini ITX motherboard form factors.
5.3. Power Supply Unit (PSU) Installation
- Position your PSU at the bottom rear of the chassis.
- Secure the PSU to the chassis using the screws provided with your power supply.
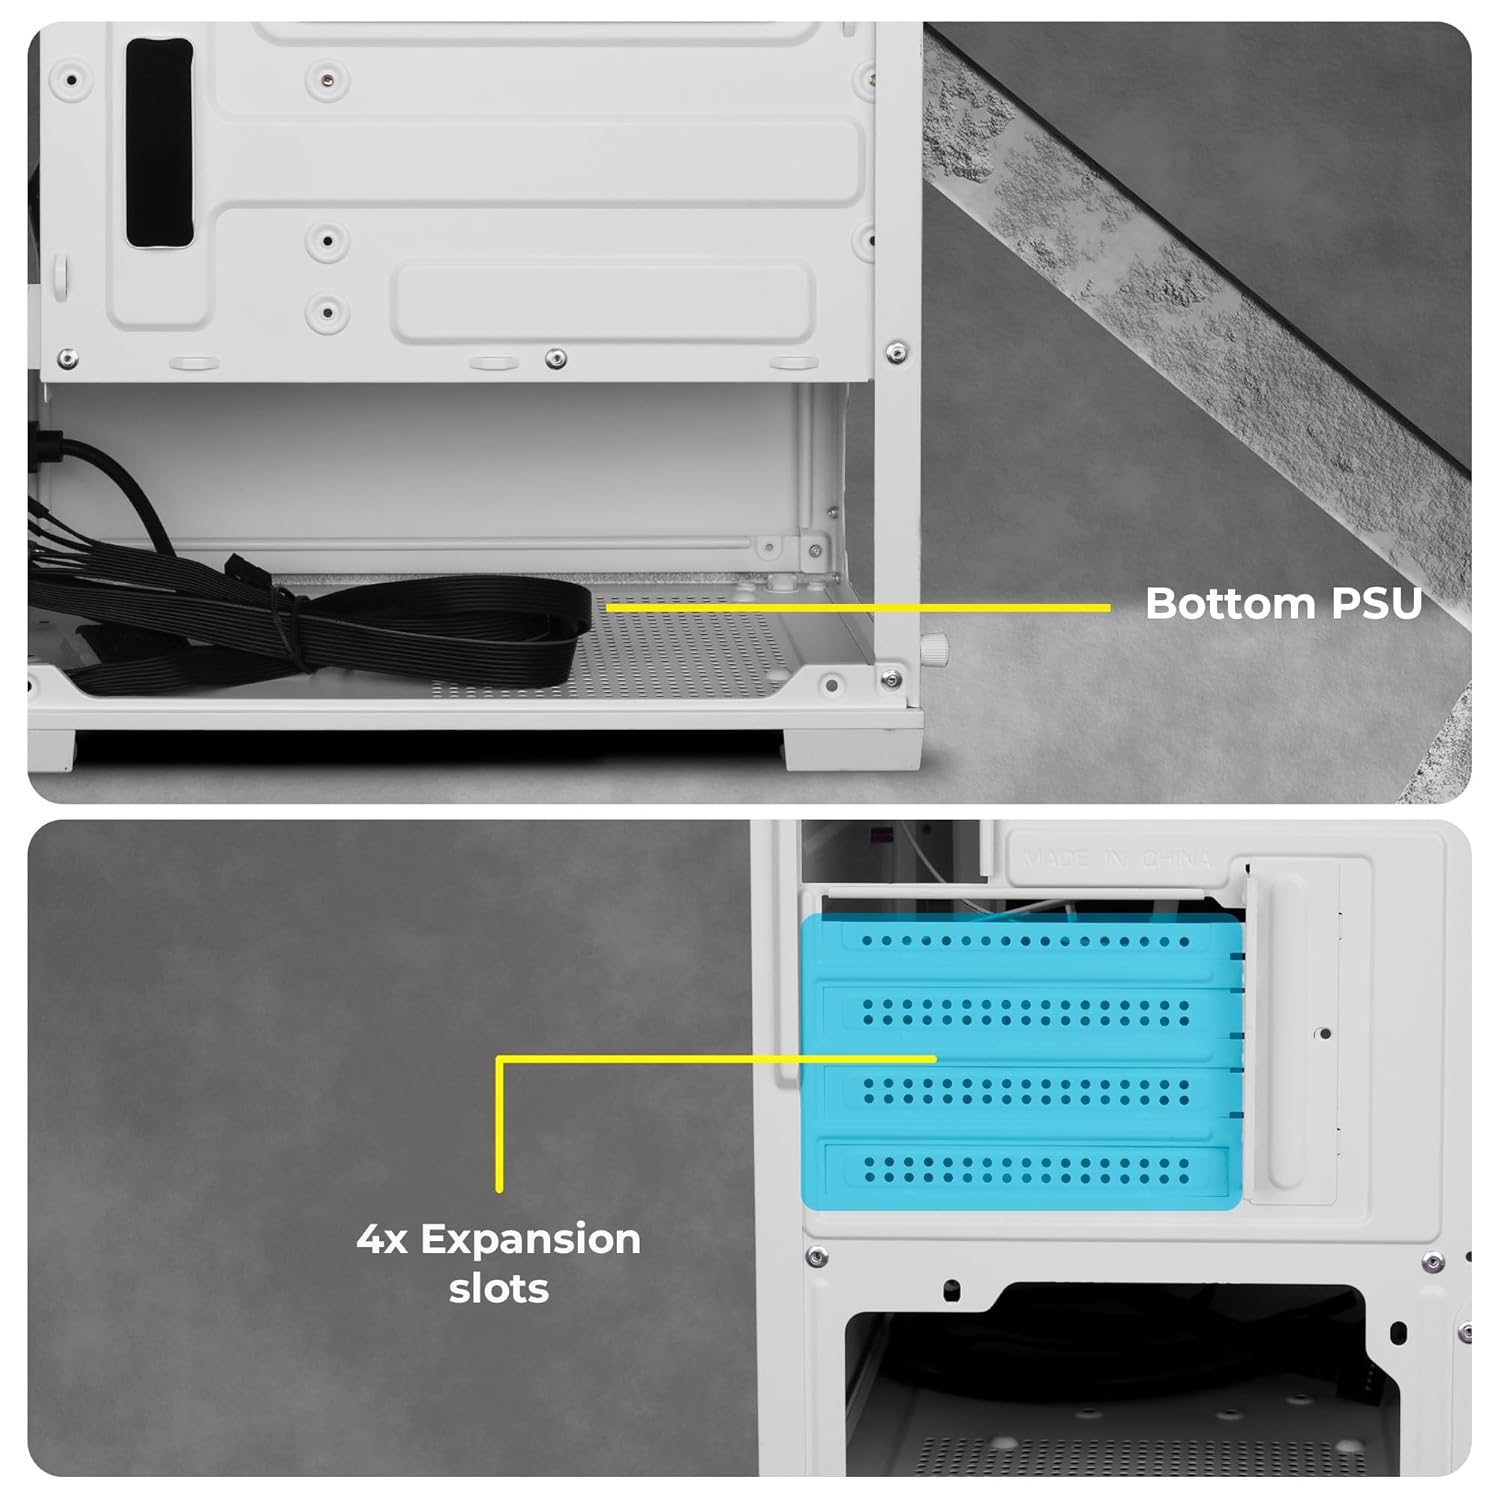
Image: View of the chassis interior showing the designated area for bottom-mounted PSU and the four expansion slots.
5.4. Storage Drive Installation
The chassis provides mounting options for 2.5-inch SSDs and 3.5-inch HDDs. Refer to the chassis interior for specific drive bay locations and secure drives with appropriate screws.
5.5. Graphics Card (GPU) and Expansion Card Installation
- Remove the necessary expansion slot covers at the rear of the chassis.
- Insert your graphics card or other expansion cards into the appropriate PCIe slots on your motherboard.
- Secure the cards with screws. Note that the chassis accommodates GPUs up to 255mm in length.
5.6. Cable Management
Utilize the cable routing cutouts and tie-down points behind the motherboard tray to organize cables. This improves airflow and gives a cleaner look to your build.
6. Operating Instructions
6.1. Front Panel Connectivity
The front panel provides convenient access to essential ports:
- Power Button: To turn the system on/off.
- RGB LED Control Switch: To cycle through various lighting modes for the pre-installed fans.
- LED Indicators: For power and HDD activity.
- Audio Ports: Dedicated ports for microphone and headphones.
- USB 2.0 Ports: Two ports for connecting peripherals.
- USB 3.0 Port: One high-speed port for data transfer.

Image: Close-up view of the front panel showing the power button, RGB control switch, LED indicators, audio jacks, and USB ports.
6.2. Fan Operation and RGB Control
The chassis comes with 5 pre-installed 120mm multicolor LED ring fans. These fans provide effective cooling and aesthetic lighting. Use the dedicated RGB LED Control Switch on the front panel to change the lighting effects of the fans. Connect the fan power cables to your motherboard or power supply as per your system's requirements.

Image: The chassis interior with the multicolor LED ring fans illuminated, showcasing various lighting effects.

Image: A detailed view highlighting the five pre-installed 120mm multicolor LED ring fans located at the top and rear of the chassis.
7. Maintenance
Regular maintenance helps ensure optimal performance and longevity of your chassis.
7.1. Dust Filter Cleaning
The chassis features a top magnetic dust filter and a detachable bottom dust filter. Regularly remove and clean these filters to prevent dust buildup, which can impede airflow and affect cooling performance.

Image: Close-up of the top magnetic dust filter, designed for easy removal and cleaning.
7.2. General Cleaning
Use a soft, dry cloth to wipe down the exterior surfaces of the chassis. For tempered glass panels, use a glass cleaner and a microfiber cloth. Avoid abrasive cleaners or solvents.
8. Troubleshooting
- System not powering on: Ensure all power cables (24-pin ATX, 8-pin CPU, GPU, etc.) are securely connected to the motherboard and components. Verify the PSU switch is in the 'ON' position. Check front panel power button connections to the motherboard.
- Fans not spinning or RGB not working: Confirm that the fan power cables are correctly connected to the motherboard or fan controller. Ensure the RGB control switch is functioning. If individual fans are not working, check their specific connections.
- Overheating issues: Ensure all fans are spinning correctly and oriented for optimal airflow (e.g., bottom fans as intake, top/rear as exhaust). Clean dust filters regularly. Verify CPU cooler and GPU cooler are properly installed.
- Difficulty with cable management: Due to the compact nature of the chassis, careful planning is required. Utilize all available tie-down points and route cables behind the motherboard tray where possible.
- Front panel ports not working: Check that the front panel header cables (USB 3.0, USB 2.0, Audio) are correctly connected to the corresponding pins on your motherboard.
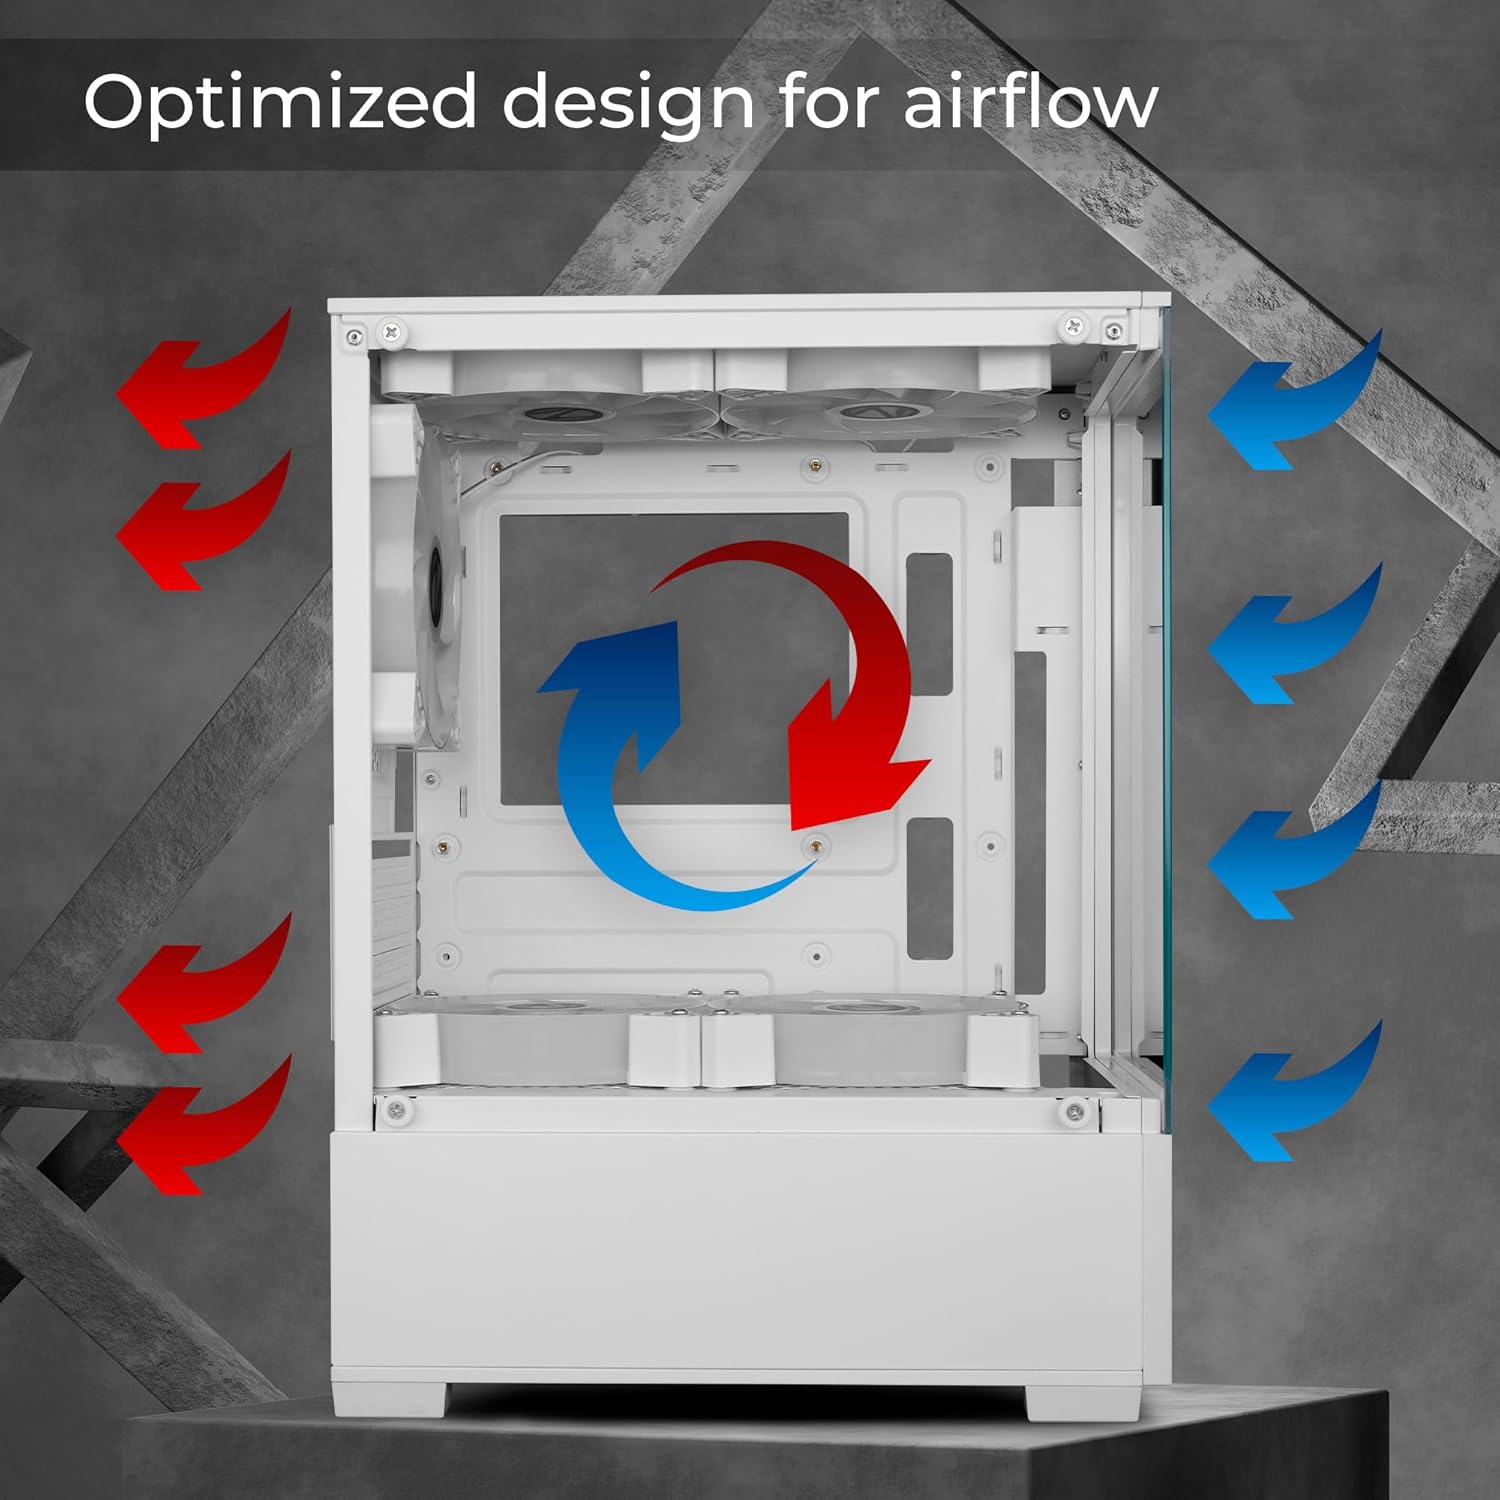
Image: Diagram illustrating the optimized airflow design within the chassis, with red arrows indicating exhaust and blue arrows indicating intake.
9. Technical Specifications
| Feature | Specification |
|---|---|
| Brand | ZEBRONICS |
| Model Number | Zeb-Iceberg |
| Motherboard Compatibility | Micro ATX, Mini ITX |
| Case Type | Mid Tower |
| Material | Tempered Glass |
| Pre-installed Fans | 5 x 120mm Multicolor LED Ring Fans (2 Top, 2 Bottom, 1 Rear) |
| GPU Length Support | Up to 255mm |
| CPU Cooler Height Support | Up to 165mm |
| Front I/O Ports | 1x USB 3.0, 2x USB 2.0, Mic, Headphone, RGB Control Switch, Power Button |
| Expansion Slots | 4 |
| Product Dimensions (LxWxH) | 24.5 x 34.7 x 43.5 cm |
| Item Weight | 3.2 kg |
10. Warranty Information
Your ZEBRONICS Iceberg Premium Gaming Chassis comes with a standard manufacturer's warranty. Please refer to the warranty card included with your product or visit the official ZEBRONICS website for detailed terms and conditions regarding warranty coverage and duration.
11. Support
For technical assistance, product inquiries, or support, please contact ZEBRONICS customer service. Contact details can typically be found on the official ZEBRONICS website or on the product packaging.
ZEBRONICS INDIA PRIVATE LIMITED
13/7, Smith Road, Royapettah, Chennai-600002


