
1. Introduction
Thank you for choosing the PowMr 25A MPPT Solar Charge Controller. This device is designed to efficiently manage power flow from your solar panels to your battery bank, ensuring optimal charging and extending battery life. It features advanced Maximum Power Point Tracking (MPPT) technology for high efficiency and supports various 12V and 24V battery types, including lead-acid (sealed, gel, flooded) and lithium (LiFePO4, lithium-ion). This manual provides detailed instructions for installation, operation, maintenance, and troubleshooting.

Figure 1: PowMr 25A MPPT Solar Charge Controller
2. Safety Instructions
Please read all instructions and warnings in this manual carefully before installation and operation. Failure to follow these instructions may result in electric shock, fire, or severe injury.
- Ensure all wiring is correctly polarized and securely connected to prevent damage to the controller or batteries.
- Always disconnect the solar panels and battery before performing any maintenance or wiring changes.
- Install the controller in a well-ventilated area, away from flammable materials and direct sunlight.
- Do not disassemble or attempt to repair the controller yourself. Contact qualified personnel for service.
- Use appropriate circuit breakers and fuses for both PV input and battery connections to protect against overcurrent and short circuits.
- This controller is designed for specific battery types. Ensure your battery type is compatible and set correctly in the controller.
- Keep children away from the solar power system components.

Figure 2: Intelligent Protection Features (Over-discharging, Overcharging, Overload, Short Circuit, Reverse Current, Temperature Compensation, Reverse Polarity)
3. Product Overview
3.1 Key Features
- Advanced MPPT Technology: Up to 99% tracking efficiency and 98% peak conversion efficiency.
- Wide Battery Compatibility: Supports 12V/24V lead-acid (sealed, gel, flooded) and lithium (LiFePO4, lithium-ion) batteries.
- 3-Stage Charging: Bulk, Boost, and Float charging for lead-acid batteries; Bulk and Boost for lithium batteries.
- Comprehensive Protections: Short Circuit, Overcurrent, Reverse Polarity, Over-discharge, Overcharge, Overload, Reverse Current, Temperature Compensation.
- Detailed LCD Screen: Provides real-time system data and error codes.
- User-Friendly Interface: Four buttons for easy navigation and settings adjustment.
3.2 Components Included
- PowMr 25A MPPT Solar Charge Controller
- User Manual (this document)
4. Setup and Installation
4.1 Before Installation
- Choose a suitable mounting location: The controller should be mounted vertically on a non-flammable surface, in a cool, dry, and well-ventilated area, away from direct sunlight.
- Ensure adequate clearance: Allow sufficient space around the controller for air circulation and heat dissipation.
- Prepare necessary tools: Wire strippers, screwdrivers, multimeter, circuit breakers/fuses, and appropriate gauge wiring.
4.2 Wiring Diagram and Connection Steps
Follow the connection sequence carefully to avoid damage. Connect the system in the order of 1. Battery, 2. Load, and 3. PV array. Disconnect in the reverse order.

Figure 3: 2-Step Easy Connection Diagram
- Connect the Battery: Connect the battery to the controller's battery terminals. Ensure correct polarity (+ to + and - to -). The controller will automatically detect the battery voltage (12V or 24V). Ensure the battery breaker is open before connecting.
- Connect the Load (Optional): If you are connecting a DC load directly to the controller, connect it to the load terminals. Ensure correct polarity.
- Connect the Solar Panels (PV Array): Connect the solar panels to the controller's PV terminals. Ensure correct polarity. The controller will begin charging the battery. Ensure the PV breaker is open before connecting.
- Close Breakers: Once all connections are secure, close the battery breaker first, then the PV breaker. The controller will power on and begin operation.
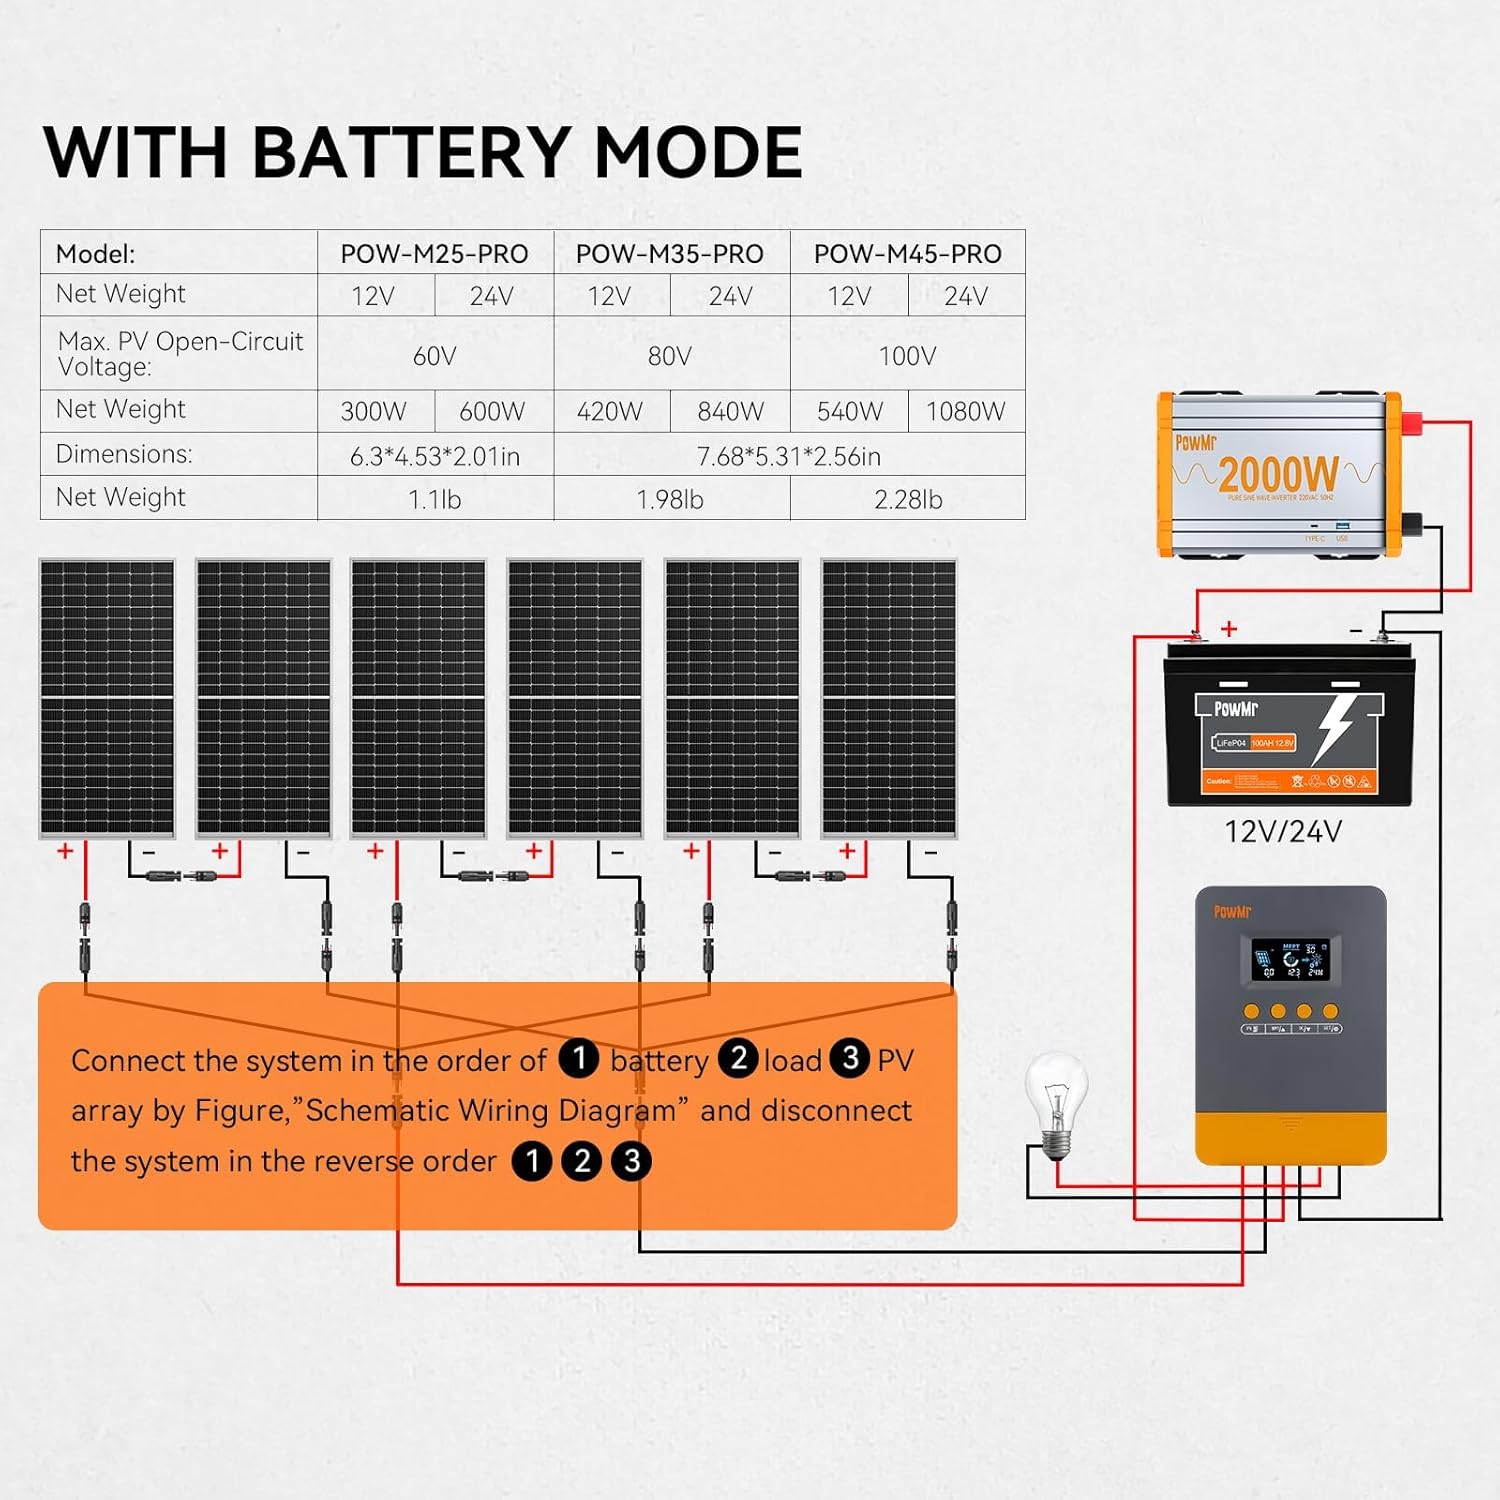
Figure 4: Schematic Wiring Diagram with Battery Mode
5. Operating Instructions
5.1 LCD Display Overview
The controller features a backlit LCD screen that displays real-time operating data and system status. The four buttons below the screen allow for navigation and setting adjustments.

Figure 5: Backlight LCD Screen and Buttons
5.2 Battery Type Settings
The controller supports various battery types. To select or customize battery parameters:
- Long press the BAT/▲ key to enter the setting program.
- Use the BAT/▲ and DC/▼ keys to toggle through the battery type options.
- Press the SET/⚙ key to save and confirm your selection.
- If you select "User-defined battery type" (USE), you can proceed to set specific battery parameters like absorption voltage, float voltage, and low voltage cutoff.

Figure 6: Compatible Battery Types and Setting Sequence
5.3 Load Work Modes
The controller offers multiple load work modes for managing the connected DC load:
- 00H (Load Turn OFF): The load output is always off.
- 24H (Load always Turn ON): The load output is always on, as long as battery voltage is above low voltage cutoff.
- 01H~23H (Time control): The load output is controlled by a timer, turning on for a specified duration (1 to 23 hours) after sunset.

Figure 7: Multiple Load Work Modes
5.4 How to Calibrate Battery Voltage
When there is a discrepancy between the battery voltage monitored by the controller and the value measured by a multimeter, you can calibrate the battery voltage using this setting.
- Long press the BAT/▲ key to enter the setting program.
- Navigate to the battery voltage calibration setting.
- Use the BAT/▲ and DC/▼ keys to adjust the value size to match your multimeter reading.
- Press the SET/⚙ key to save and confirm.

Figure 8: Battery Voltage Calibration Screen
6. Maintenance
Regular maintenance ensures the longevity and optimal performance of your solar charge controller.
- Check Connections: Periodically inspect all wiring connections to ensure they are tight and free from corrosion. Loose connections can cause overheating and poor performance.
- Clean the Controller: Keep the controller clean and free from dust and debris. Use a dry cloth to wipe the surface. Do not use liquid cleaners.
- Inspect for Damage: Check for any physical damage to the casing, wires, or terminals.
- Ventilation: Ensure that the ventilation openings are not blocked to allow for proper heat dissipation.
- Battery Health: Monitor your battery's health and electrolyte levels (for flooded batteries) as per the battery manufacturer's recommendations.
7. Troubleshooting
The LCD screen can display various fault codes to help diagnose issues. Refer to the table below for common fault codes and their solutions.

Figure 9: Working Mode and Troubleshooting Guide
| Fault Code | Cause | Solution |
|---|---|---|
| 18 | Input photovoltaic voltage too low | Increase the number of solar panels or connect them in series to raise the photovoltaic input voltage. |
| 60 | Overtemperature protection | Allow the equipment to cool to below the recovery temperature to resume normal charging and discharging. |
| 63 | Battery voltage too high | Measure to confirm if battery voltage exceeds rated voltage and disconnect photovoltaic array circuit breaker. |
| 65 | Battery voltage too low | Charge the battery until voltage exceeds the undervoltage recovery point. Refer to "5.2 Battery Type Settings" for specific details. |
| 71 | Input photovoltaic voltage too high | Reduce the number of photovoltaic arrays connected to the controller to lower photovoltaic input, or adjust series and parallel connections to reduce voltage or current values. |
| 72 | Overdischarging current | Reduce output terminal load to ensure total load is within rated limits of the controller and battery. |
| 73 | Overcharging current | Reduce the number of solar panels or adjust their configuration to lower the charging current. |
8. Specifications
Technical specifications for the PowMr 25A MPPT Solar Charge Controller.
| Parameter | 12V System | 24V System | |
|---|---|---|---|
| Max PV Input Power | 300W | 600W | |
| Max. PV Open-Circuit Voltage | <60V | ||
| Rated Charge Current | 25A | ||
| Battery Voltage | 12V/24V Auto | ||
| Tracking Efficiency | Up to 99% | ||
| Peak Conversion Efficiency | Up to 98% | ||
| Dimensions (L x W x H) | 6.3 x 4.53 x 2.01 inches | ||
| Item Weight | 1.1 pounds | ||
| Manufacturer | PowMr | ||
| Country of Origin | China | ||
9. Warranty and Support
PowMr is committed to providing high-quality products and excellent customer service.
9.1 Product Warranty
Please refer to the warranty information provided with your purchase documentation or visit the official PowMr website for details regarding the product warranty period and terms.
9.2 Customer Support
For technical assistance, troubleshooting, or any inquiries regarding your PowMr 25A MPPT Solar Charge Controller, please contact PowMr customer service. Fast service support and detailed wiring instructions are available.
You can typically find contact information on the official PowMr website or through your purchase platform.