
1. Introduction
Thank you for choosing the Bear Double Bottle Warmer and Sterilizer. This appliance is designed to safely and efficiently warm baby bottles, sterilize feeding accessories, and heat baby food. Please read this manual thoroughly before use to ensure proper operation and maintenance.
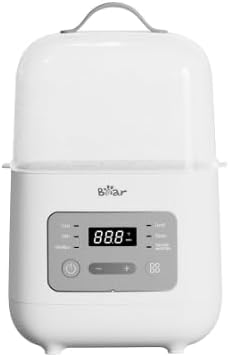
Image 1: The Bear Double Bottle Warmer and Sterilizer, featuring a white body, a clear lid, and a digital control panel with a display and buttons.
2. Important Safety Information
- Read all instructions before using the appliance.
- Do not immerse the appliance, cord, or plug in water or other liquids.
- Close supervision is necessary when any appliance is used by or near children.
- Unplug from outlet when not in use and before cleaning. Allow to cool before putting on or taking off parts.
- Do not operate any appliance with a damaged cord or plug, or after the appliance malfunctions or has been damaged in any manner.
- Use only attachments recommended by the manufacturer.
- Do not use outdoors.
- Do not let cord hang over edge of table or counter, or touch hot surfaces.
- Do not place on or near a hot gas or electric burner, or in a heated oven.
- Extreme caution must be used when moving an appliance containing hot liquids.
- Always attach plug to appliance first, then plug cord into the wall outlet. To disconnect, turn any control to 'off', then remove plug from wall outlet.
- Do not use appliance for other than intended use.
- This appliance has a polarized plug (one blade is wider than the other). To reduce the risk of electric shock, this plug is intended to fit into a polarized outlet only one way. If the plug does not fit fully into the outlet, reverse the plug. If it still does not fit, contact a qualified electrician. Do not attempt to modify the plug in any way.
3. Product Overview and Components
The Bear Double Bottle Warmer and Sterilizer consists of the following main components:
- Main Unit: The base housing the heating element and control panel.
- Control Panel: Features an LCD digital display and intuitive buttons for mode selection and temperature adjustment.
- Heating Chamber: Designed to accommodate two baby bottles simultaneously.
- Lid: A clear cover to retain heat and steam during operation.
- Bottle Basket/Lifter: For safe placement and removal of bottles and accessories.
4. Setup
- Unpack all components and remove any packaging materials.
- Wipe the main unit with a damp cloth. Wash the lid and bottle basket with warm soapy water, rinse thoroughly, and dry.
- Place the appliance on a stable, flat, heat-resistant surface, away from children.
- Ensure the power cord is securely plugged into a grounded electrical outlet.
5. Operating Instructions
The appliance offers multiple functions for various needs. Always ensure the appropriate amount of water is added to the heating chamber before starting any function.
5.1 Quick Warming
This mode rapidly heats milk to body temperature (approximately 37°C / 98.6°F) in 3 to 7 minutes, depending on milk volume and initial temperature.
- Place the bottle(s) with milk into the heating chamber using the bottle basket.
- Add water to the heating chamber, ensuring the water level is below the bottle opening but covers the milk level.
- Place the lid on the appliance.
- Select the 'Quick Warm' function on the control panel. The digital display will show the target temperature.
- The appliance will automatically shut off once the target temperature is reached. Carefully remove the bottle(s) using the basket.
5.2 24-Hour Keep Warm
This function maintains milk at a desired temperature for up to 24 hours, ideal for night feedings.
- Place the bottle(s) with milk into the heating chamber.
- Add water to the heating chamber as described in Quick Warming.
- Place the lid on the appliance.
- Select the 'Keep Warm' function. Adjust the target temperature using the '+' and '-' buttons if necessary.
- The appliance will maintain the set temperature. Always check milk temperature before feeding.
5.3 Steaming/Sterilization
Utilizes high-temperature steam to sterilize bottles, nipples, and other small feeding accessories, ensuring optimal hygiene.
- Place clean, disassembled bottles and accessories into the heating chamber, ensuring they are arranged to allow steam circulation.
- Add approximately 100-120ml of distilled water to the heating chamber.
- Place the lid on the appliance.
- Select the 'Sterilize' function.
- The appliance will generate steam to sterilize the items. Once complete, it will automatically shut off. Allow items to cool before handling.
5.4 Food Heating
Gently heats baby food jars or containers.
- Place the baby food jar or container (ensure it is heat-safe) into the heating chamber.
- Add water to the heating chamber, ensuring the water level is below the rim of the food container.
- Place the lid on the appliance.
- Select the 'Food Heat' function. Adjust the desired temperature if needed.
- Stir the food occasionally during heating and always check the temperature before feeding.
5.5 Defrosting
Safely thaws frozen breast milk or baby food.
- Place the frozen milk bag or food container into the heating chamber.
- Add water to the heating chamber as appropriate for the container size.
- Place the lid on the appliance.
- Select the 'Defrost' function.
- Monitor the defrosting process. Once thawed, proceed with warming if necessary.
5.6 Constant Warming
This function provides a consistent, gentle warming for milk or food over a longer period.
- Place the bottle(s) or food container into the heating chamber.
- Add water to the heating chamber.
- Place the lid on the appliance.
- Select the 'Constant Warm' function. Set the desired temperature.
- The appliance will maintain the set temperature. Always check the temperature of contents before feeding.
6. Maintenance
6.1 Cleaning
- Always unplug the appliance and allow it to cool completely before cleaning.
- Wipe the exterior of the main unit with a damp cloth. Do not immerse the main unit in water.
- Wash the lid and bottle basket with warm, soapy water. Rinse thoroughly and dry.
- To clean the heating chamber, use a soft brush or sponge with warm, soapy water. Rinse carefully, avoiding getting water into the electrical components.
6.2 Descaling
Mineral deposits (limescale) may build up in the heating chamber over time, especially in areas with hard water. Descale regularly to ensure efficient operation.
- Mix 50ml of white vinegar with 100ml of cold water.
- Pour the solution into the heating chamber.
- Allow the solution to soak for 30 minutes to 1 hour, or until the limescale dissolves. For stubborn deposits, you may run the 'Sterilize' cycle with the solution.
- Pour out the solution and rinse the heating chamber thoroughly with clean water several times.
7. Troubleshooting
- Appliance not turning on: Ensure the power cord is securely plugged into a working outlet. Check if the power button has been pressed.
- Milk not warming sufficiently: Verify that the correct function and temperature are selected. Ensure enough water is in the heating chamber. The warming time depends on the initial temperature and volume of the milk.
- Sterilization not effective: Ensure the correct amount of water is used for sterilization (100-120ml). Make sure items are arranged to allow steam to circulate.
- Limescale buildup: Refer to the 'Descaling' section in Maintenance.
- Error message on display: Refer to the product's specific error code guide (if available in packaging) or contact customer support.
8. Specifications
| Model Number | NNQ-E03P8 |
| Manufacturer | Bear Electric Appliance Co.,Ltd |
| Composition | Polypropylene |
| Dimensions (L x W x H) | 16 x 25.5 x 22.2 cm |
| Weight | 990 grams |
| Batteries Required | No |


