1. Introduction
This manual provides comprehensive instructions for the safe and efficient operation of your NANKADF EPS3205 DC Power Supply. Please read this manual thoroughly before using the device and retain it for future reference. This power supply is designed for laboratory, educational, and general electronic repair applications, offering precise voltage and current control with additional features like memory storage and USB charging ports.
2. Safety Instructions
- Always connect the power supply to a grounded outlet.
- Do not operate the device in wet or damp conditions.
- Ensure proper ventilation to prevent overheating. Do not block the ventilation openings.
- Before making any connections or disconnections, ensure the power supply is turned off and disconnected from the mains.
- Do not attempt to repair or modify the unit yourself. Refer all servicing to qualified personnel.
- Verify the input voltage switch setting matches your local mains voltage before connecting the power cord.
- Avoid short-circuiting the output terminals for extended periods, even with protection features enabled.
3. Product Overview
The NANKADF EPS3205 DC Power Supply features a compact design with a clear 4-digit LED display and intuitive controls.
Front Panel Features
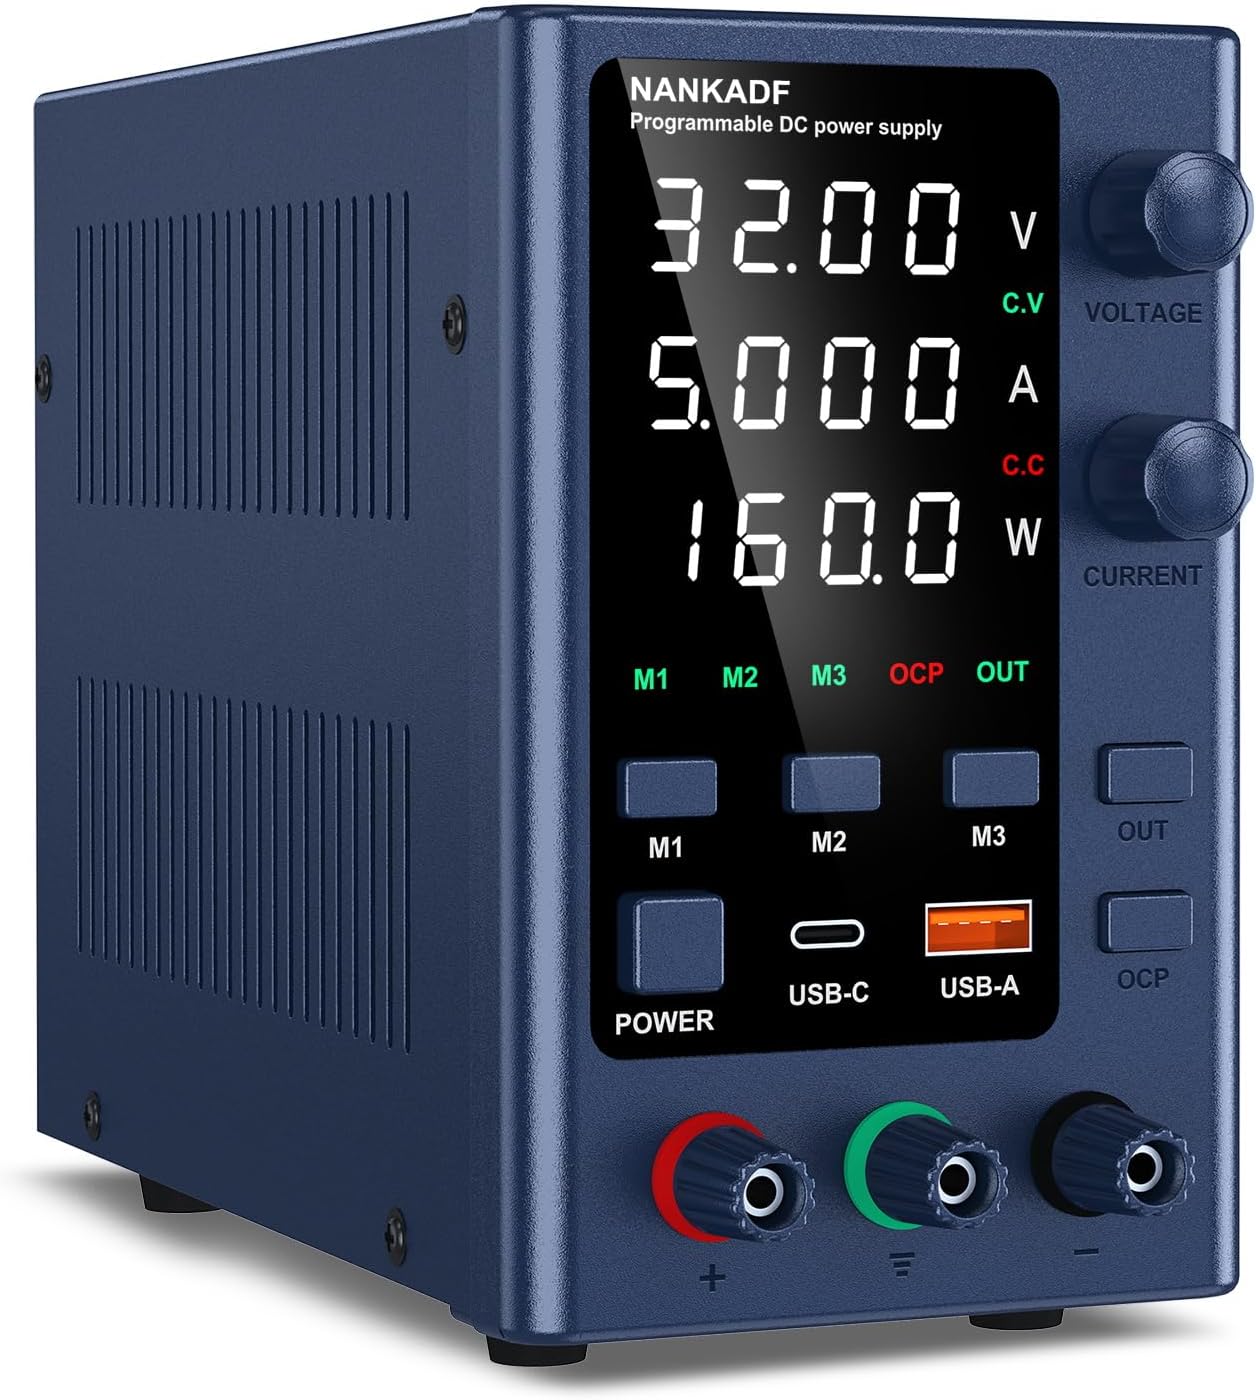
Image: Front view of the NANKADF EPS3205 DC Power Supply. This image displays the main 4-digit LED screen showing voltage, current, and power, along with the voltage and current adjustment knobs, memory buttons (M1-M3), power button, USB-C and USB-A fast charging ports, output enable/disable button (OUT), and Over Current Protection (OCP) button. The red and green output terminals are visible at the bottom.
- 4-Digit LED Display: Shows real-time output Voltage (V), Current (A), and Power (W) with high precision (0.01V / 0.001A resolution).
- Voltage Knob: Adjusts the output voltage.
- Current Knob: Adjusts the output current limit.
- M1-M3 Buttons: Memory storage and recall for preset voltage/current values.
- POWER Button: Turns the unit on/off.
- USB-C & USB-A Ports: Fast charging interfaces for external devices (up to 18W).
- OUT Button: Enables or disables the main DC output.
- OCP Button: Activates or deactivates Over Current Protection.
- Output Terminals: Red (+) and Green (-) terminals for connecting loads.
Rear Panel Features

Image: Rear view of the NANKADF EPS3205 DC Power Supply. This image highlights the input power socket, the fan for cooling, and the crucial input voltage selector switch (115V/230V) with an integrated fuse box.
- AC Power Input: Socket for connecting the AC power cord.
- Input Voltage Switch: Selector for 115V or 230V mains voltage.
- Cooling Fan: Provides active cooling for internal components.
- Fuse Box: Contains the protective fuse for the unit.
4. Setup
- Unpacking: Carefully remove the power supply from its packaging. Verify all components listed in the packing list are present.
- Placement: Place the unit on a stable, level surface with adequate ventilation around all sides, especially the rear fan and side vents.
- Input Voltage Selection: Before connecting the AC power cord, check the input voltage switch on the rear panel. Ensure it is set to match your local mains voltage (e.g., 115V for North America, 230V for Europe).
Image: Input voltage selector switch. This image shows the rear panel with the 115V/230V switch and the fuse box. It is crucial to set this switch correctly according to your region's power supply.
- Power Connection: Connect the provided AC power cord to the power input socket on the rear panel, then plug the other end into a grounded wall outlet.
- Initial Power On: Press the POWER button on the front panel. The display should illuminate, showing the default voltage and current settings.
5. Operating Instructions
5.1 Basic Operation
- Power On/Off: Press the POWER button to turn the unit on or off.
- Output Enable/Disable: Press the OUT button to enable or disable the DC output. When the output is enabled, the 'OUT' indicator on the display will light up. Always disable the output before connecting or disconnecting a load.
5.2 Voltage and Current Adjustment (Encoder Knob)
The power supply uses an encoder knob for precise adjustment of voltage and current.

Image: Digital encoder adjustment knob. This diagram shows how to use the encoder knob to adjust voltage and current. Pressing the knob cycles through digit positions for fine adjustment, while rotating the knob changes the value of the selected digit.
- Select Parameter: Briefly press the VOLTAGE knob to select the voltage parameter for adjustment. The active digit on the display will blink. Similarly, press the CURRENT knob to select the current parameter.
- Change Digit Position: While a parameter is selected, press the corresponding knob again to cycle through the digit positions (e.g., units, tenths, hundredths).
- Adjust Value: Rotate the knob clockwise to increase the value of the selected digit, and counter-clockwise to decrease it.
- Confirm Setting: Stop rotating and pressing the knob for a few seconds, or press the knob until no digit is blinking, to confirm the setting.
5.3 Memory Storage and Recall
The unit allows you to store and recall three sets of frequently used voltage and current settings.
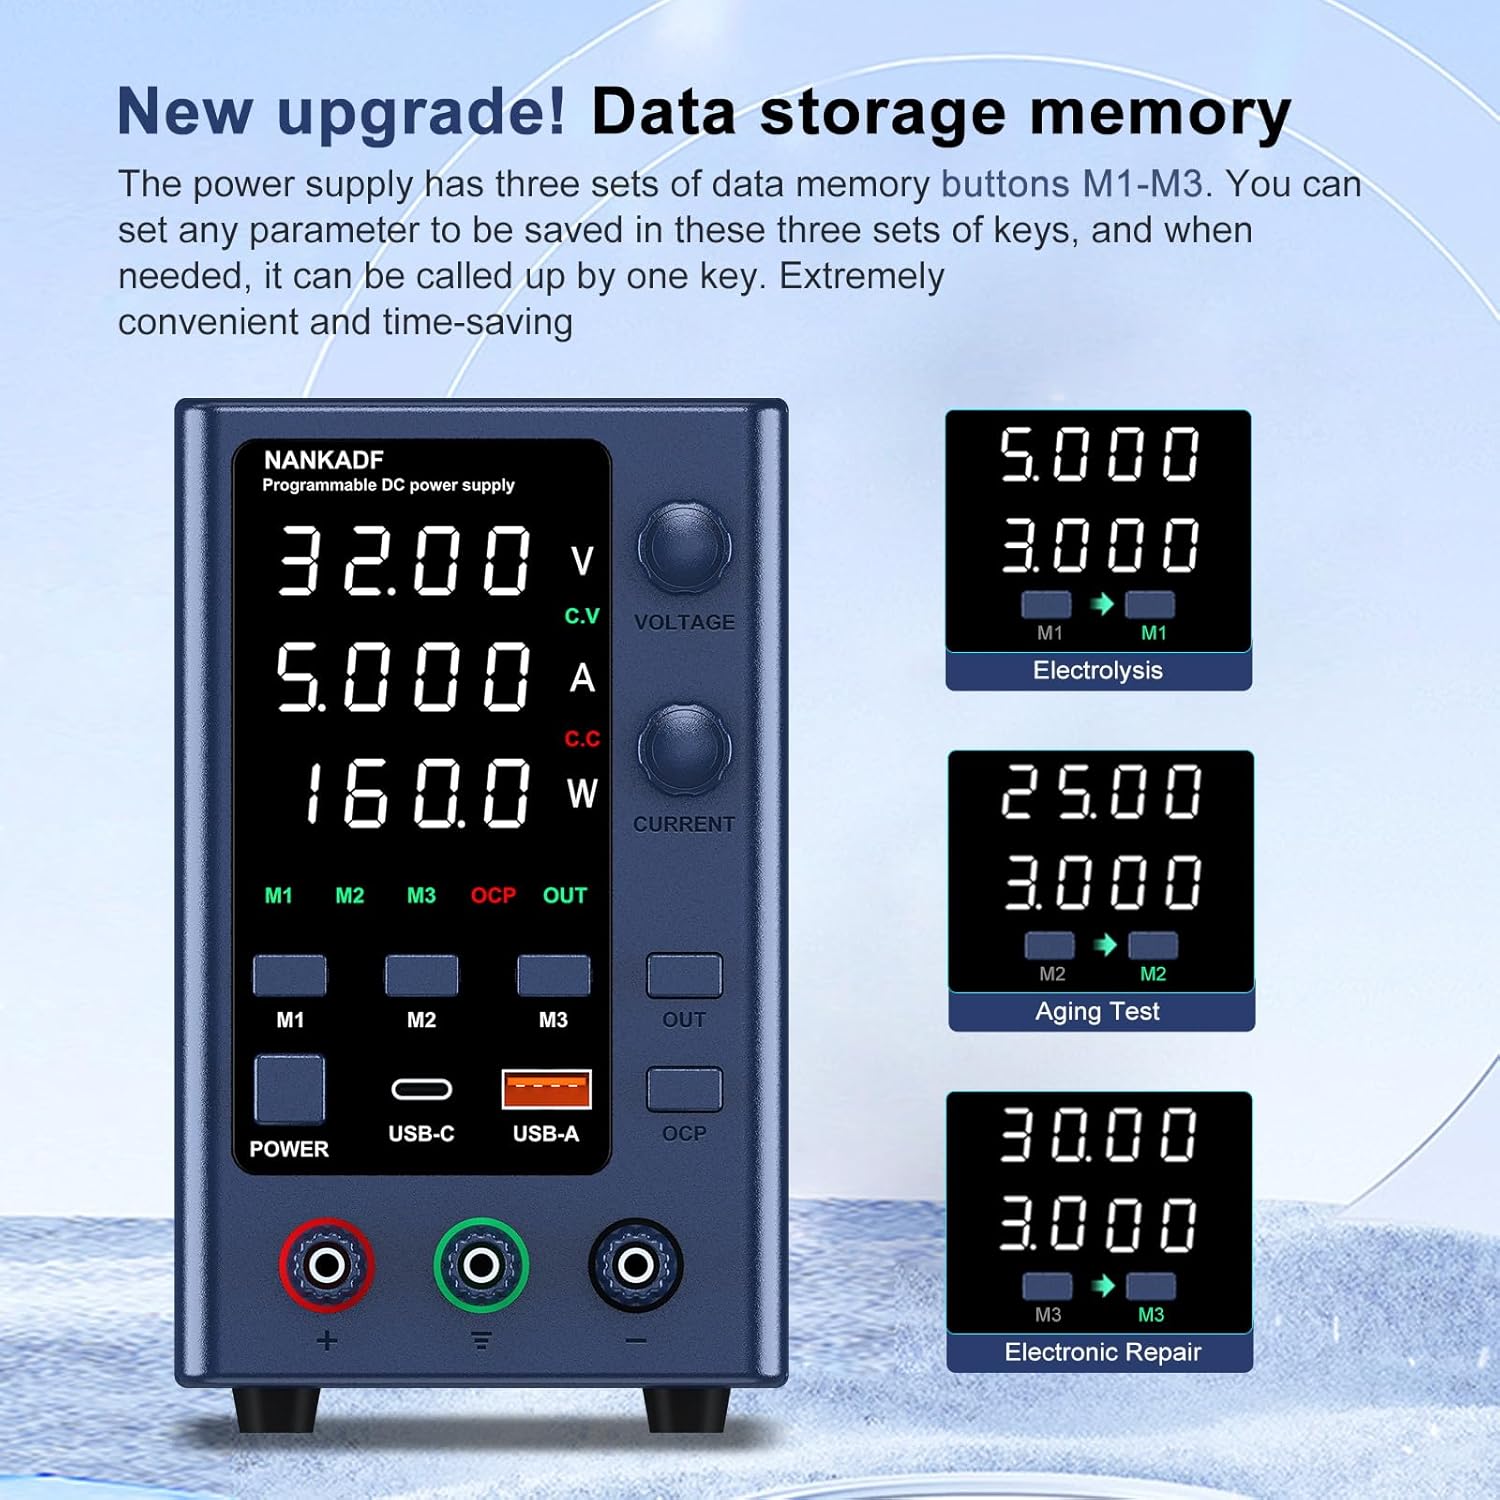
Image: Data storage memory. This image illustrates the M1, M2, and M3 memory buttons and how they can be used to store and recall specific voltage and current settings for different applications like 'Electrolysis', 'Aging Test', and 'Electronic Repair'.
- Store Settings: Adjust the voltage and current to your desired values. Long-press one of the M1, M2, or M3 buttons until the display indicates that the settings have been saved (e.g., 'M1' blinks).
- Recall Settings: Briefly press the M1, M2, or M3 button corresponding to the desired stored setting. The power supply will automatically load the saved voltage and current values.
5.4 USB-A and Type-C Fast Charging Ports
The power supply includes dedicated USB-A and Type-C ports for charging compatible electronic devices.

Image: USB-A & Type-C charging ports. This image demonstrates the use of the USB-A and USB-C ports for fast charging electronic devices, indicating a charging power of up to 18W and QC3.0 compatibility.
- These ports provide up to 18W of power and are compatible with various fast charging protocols.
- Simply connect your device to the appropriate USB-A or Type-C port using a compatible cable.
- These ports operate independently of the main DC output.
6. Protection Features
The NANKADF EPS3205 is equipped with multiple safety features to protect both the device and the connected load.

Image: Protection features. This image points out the encoder adjustment, the output enable/disable button, and the short circuit protection alarm, indicating key operational and safety elements of the power supply.
- Over Current Protection (OCP): When activated via the OCP button, the power supply will automatically disconnect the output and trigger an alarm if the external load draws current exceeding the set limit. This protects the external circuit from damage.
- Short Circuit Protection: The unit is designed to protect against damage from accidental short circuits at the output terminals.
- Over Voltage Protection (OVP): Limits the output voltage to prevent damage to sensitive loads.
- Over Temperature Protection (OTP): If the internal temperature exceeds a safe limit, the unit will shut down to prevent damage.
7. Specifications
Detailed technical specifications for the NANKADF EPS3205 DC Power Supply.

Image: Product Size. This image provides the dimensions of the NANKADF EPS3205 DC Power Supply, showing its length (7.48in), width (3.54in), and height (5.7in), along with its weight (2.53 lb).
| Feature | Specification |
|---|---|
| Model Name | EPS3205 |
| Output Voltage | 0-32V DC |
| Output Current | 0-5A |
| Output Power | 160W |
| Voltage Display Resolution | 0.01V |
| Current Display Resolution | 0.001A |
| Display Type | 4-digit LED |
| Input Voltage | 115V/230V AC (Switchable) |
| USB-A Output | 18W Fast Charge |
| USB-C Output | 18W Fast Charge |
| Cooling Method | Fan |
| Weight | 1.2 kg (2.65 lbs) |
| Dimensions (L x W x H) | 19 x 9 x 14.5 cm (7.48 x 3.54 x 5.7 inches) |
| Compatible Devices | Personal computer, camera, laptop, printer, monitor |
8. Maintenance
- Cleaning: Disconnect the power supply from the mains before cleaning. Use a soft, dry cloth to wipe the exterior. Do not use abrasive cleaners or solvents.
- Ventilation: Regularly check that the ventilation openings are clear of dust and debris to ensure proper airflow.
- Fuse Replacement: If the unit fails to power on, the fuse may need replacement. Disconnect the power cord, open the fuse box on the rear panel, and replace the fuse with one of the same type and rating.
- Storage: When not in use for extended periods, store the power supply in a cool, dry place, away from direct sunlight and excessive dust.
9. Troubleshooting
| Problem | Possible Cause | Solution |
|---|---|---|
| No power/Display off | Power cord not connected; Input voltage switch incorrect; Blown fuse. | Check power cord connection; Verify input voltage switch setting; Replace fuse. |
| No output voltage/current | Output disabled; OCP activated; Overload/Short circuit. | Press the OUT button; Check OCP setting and connected load; Reduce load or clear short circuit. |
| Output fluctuates | Unstable input power; Loose connections; Faulty load. | Ensure stable AC input; Check all connections; Test with a different load. |
| Unit overheats | Blocked ventilation; Excessive load. | Clear ventilation openings; Reduce load or operating time. |
| USB ports not charging | Incompatible device/cable; Device fully charged. | Use compatible USB cable and device; Check device charging status. |
10. Warranty and Support
NANKADF provides technical support for this product. If you encounter any issues or have questions not covered in this manual, please contact NANKADF customer support. Refer to your purchase documentation for specific warranty terms and contact information.
Contact information for support is typically found on the product packaging, official website, or through your retailer.


