1. Safety Information
Please read and understand all instructions before assembly and use. Keep this manual for future reference.
- Anti-Tipping Device: Ensure the cabinet is securely mounted to the wall using the provided anti-tipping device to prevent tipping and potential injuries. This is crucial for stability, especially in households with children or pets.
- Weight Capacity: Do not overload shelves or the top surface. Distribute weight evenly.
- Assembly: Assemble on a soft, clean surface to prevent scratches. Two people are recommended for assembly.
- Placement: Place the cabinet on a level surface. Avoid placing it in direct sunlight or near heat sources to prevent material damage.

Figure 1: Illustration of anti-tipping device installation for enhanced safety.
2. Product Overview
The HOMEFORT Shoe Storage Cabinet is designed to organize footwear efficiently while complementing your home decor. This freestanding unit features two flip-down drawers and an open bottom shelf, providing versatile storage options.
Key Features:
- Space-Saving Design: Slim profile (30" W x 9.45" D x 43.3" H) ideal for entryways, hallways, or small spaces.
- Two Flip Drawers: Each drawer contains two layers of storage racks, accommodating approximately 4-5 pairs of shoes per layer.
- Adjustable Dividers: Internal panels are removable and adjustable to two positions, allowing storage for various footwear types, including high heels and boots.
- Durable Construction: Made from 15mm thick engineered wood with solid wood legs for stability.
- Spacious Countertop: Provides additional space for decorative items, keys, or small essentials.
- Farmhouse Style: Rustic brown finish with clean lines enhances visual appeal.

Figure 2: Front view of the HOMEFORT Shoe Storage Cabinet, highlighting its design and dimensions.

Figure 3: Detailed dimensions of the shoe cabinet for planning placement.
3. Assembly Instructions
Assembly is straightforward with clearly labeled parts and illustrated instructions. It is recommended to have two people for easier assembly.
Tools Required:
- Phillips Head Screwdriver
- Hammer (for dowels)
Assembly Steps:
- Prepare Components: Unpack all parts and hardware. Verify all components are present against the parts list in your package.
- Assemble Side Panels: Attach the side panels to the base and top panels using the provided screws and wooden dowels. Ensure all connections are secure.
- Install Legs: Secure the wooden legs to the bottom panel using the metal mounting plates and screws.
- Construct Flip Drawers: Assemble the individual flip drawers by attaching the front panel, side supports, and internal shoe racks. Ensure the mechanism allows for smooth opening and closing.
- Insert Drawers: Carefully slide the assembled flip drawers into the main cabinet frame.
- Attach Back Panel: Secure the back panel to the cabinet using small nails or screws to enhance stability.
- Install Anti-Tipping Device: Attach the anti-tipping device to the top rear of the cabinet and securely fasten it to a wall stud. This step is critical for safety.
Video 1: A seller-provided video demonstrating the assembly process for a shoe storage cabinet with flip drawers. While the exact model may vary, the assembly principles are similar.

Figure 4: Details of the cabinet's features, including metal handles for drawers and the top fence.
4. Operation
The HOMEFORT Shoe Storage Cabinet is designed for ease of use and efficient organization.
Using the Flip Drawers:
- Opening: Gently pull the handle on each drawer to flip it open. The drawers are designed to tilt forward, providing easy access to your shoes.
- Closing: Push the drawer back into the cabinet until it is flush with the front surface.
- Adjusting Shelves: The internal dividers within each flip drawer can be removed or adjusted to two different positions to accommodate various shoe heights, such as high heels or boots. Simply unclip or unscrew the divider and reposition it as needed.
Utilizing Storage Areas:
- Top Countertop: Use the flat top surface for placing keys, mail, small plants, or decorative items. The raised edge helps prevent items from falling.
- Bottom Open Shelf: The open shelf at the bottom is suitable for frequently used shoes or larger items that may not fit in the flip drawers.
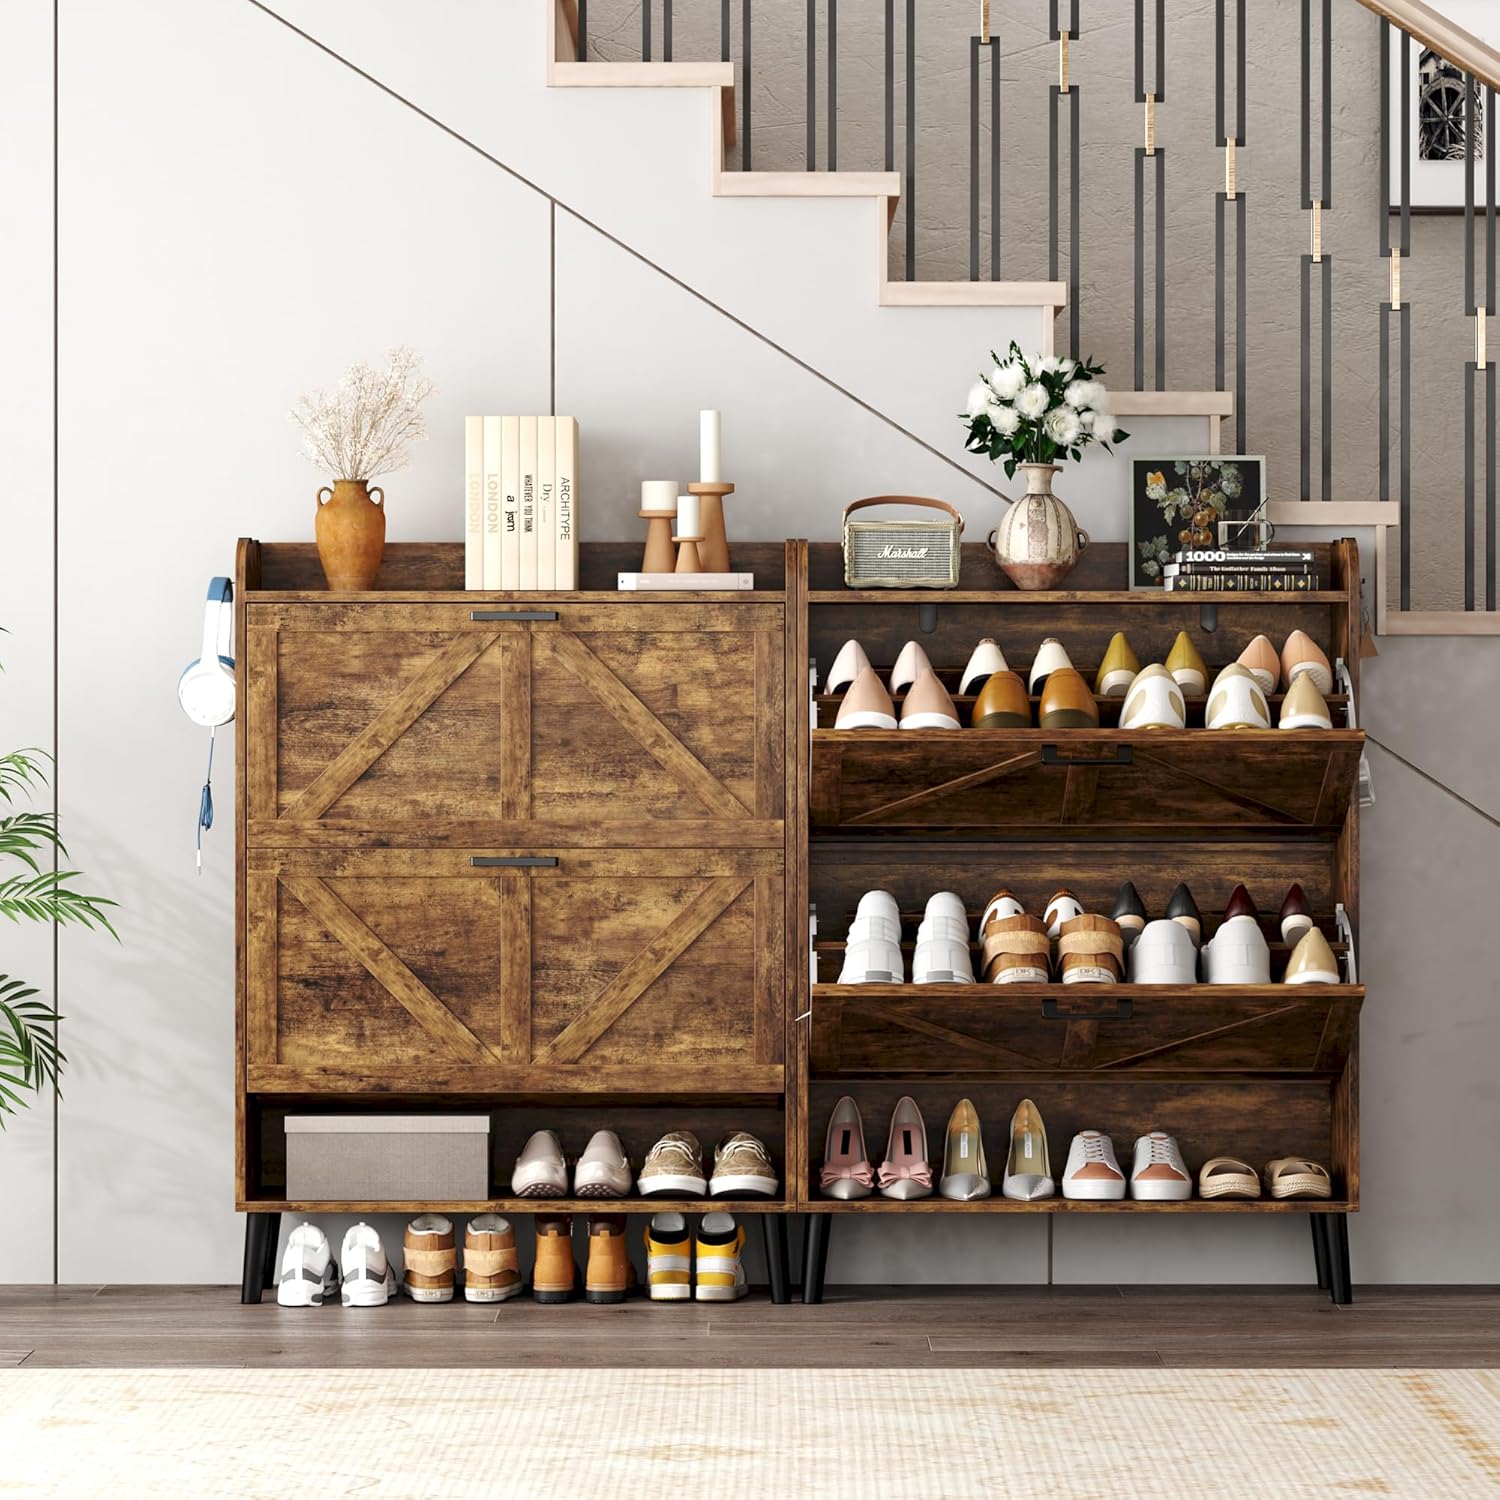
Figure 5: The shoe cabinet with drawers open, demonstrating storage capacity.

Figure 6: Examples of flexible storage space for different shoe types.
5. Maintenance
Proper care and maintenance will ensure the longevity and appearance of your HOMEFORT Shoe Storage Cabinet.
- Cleaning: Wipe surfaces with a soft, damp cloth. Avoid harsh chemicals or abrasive cleaners, which can damage the finish.
- Spills: Clean up spills immediately to prevent moisture damage to the engineered wood.
- Fasteners: Periodically check all screws and connections to ensure they remain tight. Retighten if necessary.
- Environmental Conditions: Maintain a stable room temperature and humidity. Extreme fluctuations can cause wood materials to warp or crack.
6. Troubleshooting
Refer to this section for common issues and their solutions.
Common Issues:
- Cabinet is Wobbly:
- Ensure all assembly screws are tightened.
- Verify the cabinet is placed on a level surface.
- Confirm the anti-tipping device is correctly installed and secured to the wall.
- Shoes Do Not Fit in Drawers:
- Adjust the internal dividers to a lower position or remove them entirely for taller footwear like boots or high heels.
- Utilize the open bottom shelf for larger shoe sizes or bulkier items.
- Drawers are Stiff or Do Not Open/Close Smoothly:
- Check for any obstructions within the drawer mechanism.
- Ensure the drawer components were assembled correctly and are not misaligned.
- Verify all screws on the drawer mechanism are securely fastened.
7. Specifications
| Brand | HOMEFORT |
| Model Number | PG-02SC005A |
| Colour | Rustic Brown |
| Product Dimensions | 24D x 76.2W x 110H Centimetres (9.45" D x 30" W x 43.3" H) |
| Material | Engineered Wood |
| Special Features | Adjustable, Anti-Tipping, Freestanding, Removable Shelf |
| Item Weight | 17.8 kg (39.16 lbs) |
| Mounting Type | Floor Mount (with wall-mounting anti-tipping device) |
8. Warranty and Support
For warranty information, missing parts, or any product-related inquiries, please contact HOMEFORT customer support directly. Refer to your purchase documentation for specific contact details and warranty terms.
You can also visit the official HOMEFORT store for additional product information and support: HOMEFORT Store


