HOCO QS2
Hoco QS2 Portable Smart Air Pump & Emergency Start-Up Power Bank User Manual
Model: QS2
1. Introduction
Thank you for choosing the Hoco QS2 Portable Smart Air Pump & Emergency Start-Up Power Bank. This device is a multi-functional tool designed to provide reliable assistance in various situations, including jump-starting vehicles, inflating tires, and charging electronic devices. Please read this manual thoroughly before use to ensure proper operation and to maximize the lifespan of your device.
2. Safety Precautions
Always observe the following safety guidelines to prevent injury or damage to the device and property.
- Do not expose the device to extreme temperatures, direct sunlight, or fire.
- Keep out of reach of children.
- Do not disassemble, modify, or attempt to repair the device yourself. Contact qualified service personnel.
- Ensure proper ventilation during operation, especially when using the air pump or jump start function.
- Avoid short-circuiting the output terminals.
- Do not use the jump starter if the battery clamps or cables are damaged.
- When jump-starting, ensure the vehicle's ignition is off and all accessories are unplugged.
- Do not over-inflate tires. Always refer to the recommended tire pressure for your vehicle.
- If the device becomes excessively hot during use, discontinue operation immediately.
3. Package Contents
Please check the box for the following items:
- 1 x Hoco QS2 8000 mAh Portable Smart Air Pump Emergency Start-Up Power Bank
- 1 x Jump Start Cables (Red and Black Clamps)
- 1 x Air Hose with Valve Connector
- Various Nozzle Adapters (e.g., for bicycles, balls)
- 1 x USB Type-C Charging Cable

Figure 1: Hoco QS2 and its complete set of accessories.
4. Product Components
Familiarize yourself with the different parts of your Hoco QS2 device.
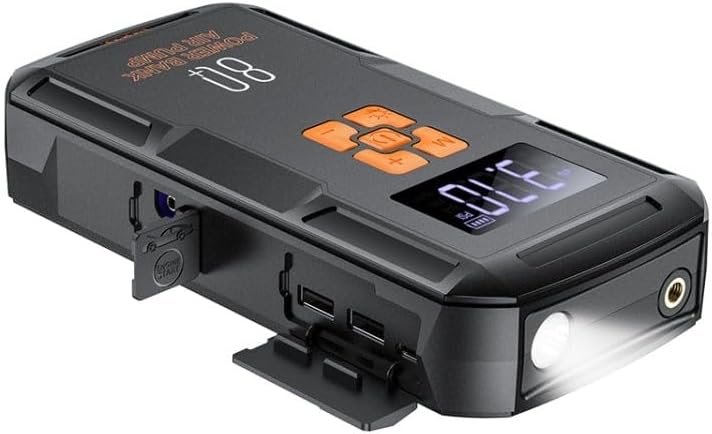
Figure 2: Overview of the Hoco QS2 device.
- Digital Display: Shows current pressure, battery level, and selected mode.
- Control Buttons: Power, Mode selection, Increase/Decrease pressure.
- Air Hose Port: Connects the inflation hose.
- Jump Start Port: Connects the jump start cables.
- USB Output Ports (2x): For charging external devices (5V/2.4A).
- Type-C Input Port: For charging the Hoco QS2 itself (5V/2.4A).
- LED Flashlight: Provides illumination.
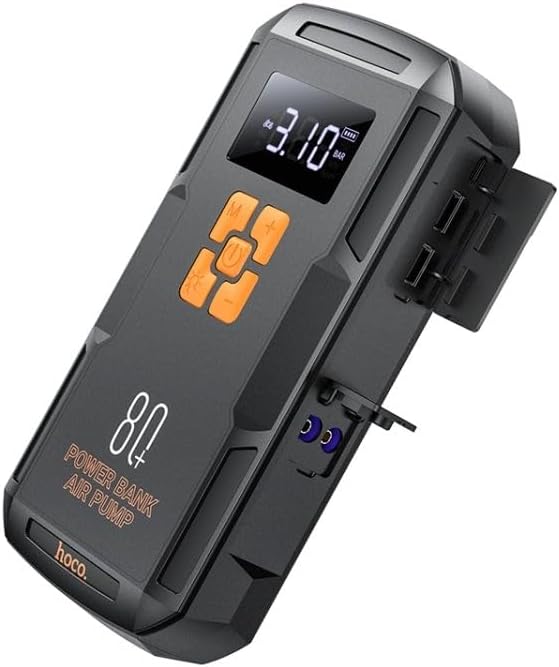
Figure 3: Side view of the Hoco QS2 with ports visible.
5. Setup and Charging
5.1 Charging the Hoco QS2
Before first use, fully charge the Hoco QS2. It is recommended to keep the device charged above 50% for optimal performance, especially for jump-starting.
- Connect the provided USB Type-C charging cable to the Type-C input port on the Hoco QS2.
- Connect the other end of the USB cable to a 5V/2.4A USB wall adapter (not included) or a compatible USB port.
- The digital display will indicate the charging status and battery level.
- Charging time may vary depending on the power source.
6. Operating Instructions
6.1 Jump Start Function
The Hoco QS2 can jump-start vehicles with up to 4.0L gasoline or 2.0L diesel engines.
- Ensure the Hoco QS2 is sufficiently charged (at least 75% battery recommended).
- Turn off the vehicle's ignition and all electrical accessories.
- Connect the red (+) clamp of the jump start cable to the positive (+) terminal of the vehicle's battery.
- Connect the black (-) clamp to the negative (-) terminal of the vehicle's battery or a solid, unpainted metal part of the engine block (ground point).
- Insert the blue connector of the jump start cable into the jump start port on the Hoco QS2.
- Once connected, the Hoco QS2 will automatically enter jump start mode.
- Start the vehicle's engine. If it doesn't start immediately, wait 30 seconds before trying again. Do not crank for more than 3 seconds per attempt.
- Once the vehicle starts, immediately disconnect the jump start cable from the Hoco QS2, then remove the black (-) clamp, followed by the red (+) clamp from the vehicle battery.
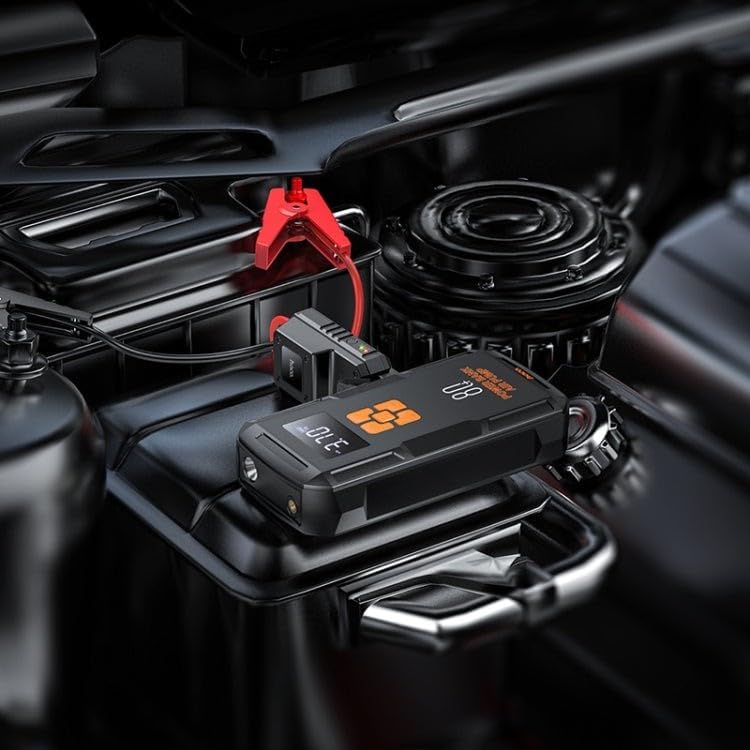
Figure 4: Using the Hoco QS2 for jump-starting a vehicle.
6.2 Tire Inflation Function (Air Pump)
The Hoco QS2 can inflate tires up to 10.3 bar (150 PSI) and features multiple inflation modes.
- Connect the air hose to the air hose port on the Hoco QS2.
- Attach the other end of the air hose to the tire valve. Ensure a secure connection to prevent air leakage. Use appropriate nozzle adapters for other inflatables (e.g., bicycle tires, sports balls).
- Press the Power button to turn on the device. The display will show the current tire pressure.
- Press the 'M' (Mode) button to cycle through the inflation modes: Car, Motorcycle, Bicycle, Basketball. Each mode has a default pressure setting, which can be adjusted.
- Use the '+' and '-' buttons to set your desired target pressure.
- Press the Power button again to start inflation. The pump will automatically stop once the target pressure is reached.
- Disconnect the air hose from the tire valve and the device.

Figure 5: Inflating a car tire with the Hoco QS2.
6.3 Power Bank Function
The Hoco QS2 can charge your electronic devices via its dual USB output ports.
- Connect your device's USB charging cable to one of the USB output ports on the Hoco QS2.
- Connect the other end of the cable to your electronic device (e.g., smartphone, tablet).
- The Hoco QS2 will automatically begin charging your device.
- The digital display will show the remaining battery level of the power bank.
6.4 LED Flashlight Function
The integrated LED flashlight provides illumination for various situations.
- To turn on the flashlight, press and hold the 'Light' button (usually indicated by a light bulb icon).
- Press the 'Light' button again to cycle through different light modes (e.g., steady on, SOS signal, strobe).
- Press and hold the 'Light' button again to turn off the flashlight.
7. Maintenance and Storage
- Clean the device with a soft, dry cloth. Do not use harsh chemicals or abrasive cleaners.
- Store the Hoco QS2 in a cool, dry place, away from direct sunlight and moisture.
- For long-term storage, charge the device every 3-6 months to maintain battery health.
- Ensure all ports are covered when not in use to prevent dust and debris from entering.
8. Troubleshooting
| Problem | Possible Cause | Solution |
|---|---|---|
| Device does not turn on. | Low battery. | Charge the device fully. |
| Vehicle does not jump start. | Incorrect cable connection; Device battery too low; Vehicle battery severely discharged. | Ensure correct polarity (+ to +, - to -). Charge the Hoco QS2. Allow more time for the vehicle battery to receive a charge, or seek professional assistance if the battery is completely dead. |
| Air pump not inflating or inflating slowly. | Air hose not securely connected; Nozzle adapter not suitable; Device battery low. | Check all connections for leaks. Use the correct adapter. Charge the device. |
| USB charging not working. | Device battery low; Cable faulty; Device not compatible. | Charge the Hoco QS2. Try a different USB cable. Ensure your device is compatible with 5V/2.4A charging. |
9. Technical Specifications
| Feature | Specification |
|---|---|
| Model Number | QS2 |
| Battery Capacity | 8000 mAh (29.6 Wh) |
| Type-C Input | 5V / 2.4A |
| USB Output 1/2 | 5V / 2.4A |
| Total USB Output | 5V / 2.4A |
| Jump Start Output | 12V (for vehicle emergency start) |
| Max Air Pressure | 10.3 bar / 150 PSI |
| Dimensions | Approx. 12 x 10 x 8 cm |
| Weight | Approx. 800 grams |
| Operating Temperature | Refer to product packaging for specific range. |
10. Warranty and Support
HOCO products are designed and manufactured to the highest quality standards. For warranty information and customer support, please refer to the warranty card included with your purchase or visit the official HOCO website. Keep your purchase receipt as proof of purchase for any warranty claims.
Related Documents - QS2
 |
QS2 Smart Glasses Camera User Manual User manual for the QS2 Smart Glasses Camera, detailing its features, operation, app integration, and specifications. |
 |
Allen 2-Bike Trunk Rack Safety Warnings and Instructions Important safety warnings and mounting instructions for the Allen 2-Bike Trunk Rack (Models 102DN, 102DB, QS2, S102, MT2). Learn how to safely transport bicycles. |
 |
Dwyer SMART AIR HOOD® SAH Series Quick Start Guide and Specifications Quick start guide and specifications for the Dwyer SMART AIR HOOD® (SAH) Balancing Instrument, detailing its features, app connectivity, and air flow balancing capabilities. |
 |
MasterPact NW Interlocking System Installation Manual This manual provides detailed instructions for installing the interlocking system for Schneider Electric's MasterPact NW circuit breakers, covering safety, tools, assembly procedures for interlock plates and cables, and testing. |
 |
OSSURET QS Series Snapdragon 6115 Car Multimedia Player User Manual Comprehensive user manual for the OSSURET QS Series car multimedia player featuring Snapdragon 6115, Android Auto, and Wireless Carplay. Includes setup, operation, features, and settings. |
 |
APsystems Microinverter Limited Warranty - Asia-Pacific This document outlines the APsystems Limited Warranty Policy for microinverters, ECUs, and accessories in the Asia-Pacific region (excluding Australia and New Zealand). It details warranty periods, connection requirements, service procedures, exclusions, transfer options, and extension plans, along with limitations of liability. |
Ask a question about this manual
Ask about setup, troubleshooting, compatibility, parts, safety, or missing instructions. Manuals+ will review the question and use this page’s manual context to help answer it.