1. Introduction
This manual provides detailed instructions for the installation, operation, and maintenance of your Ctronics 5MP Solar Security Camera. Please read this manual thoroughly before using the product to ensure proper function and safety. This camera is designed for outdoor surveillance, featuring a 5MP resolution, solar power, and advanced detection capabilities.

Figure 1.1: Ctronics 5MP Solar Security Camera with integrated solar panel and mounting bracket.
2. What's in the Box
Verify that all components are present in the package:
- Ctronics 5MP Solar Security Camera (1 unit)
- Mounting accessories (screws, wall plugs)
- User Manual (this document)
Note: Additional brackets for separate mounting of the solar panel may be required and are sold separately.
3. Key Features
3.1 Crystal Clear 5MP HD Vision
The camera provides a 2880x1620P resolution, offering superior clarity compared to standard 3MP models. It features full-color night vision up to 25 meters, ensuring detailed capture even in low-light conditions.

Figure 3.1: Visual representation of 5MP resolution and night vision capabilities.
3.2 Reliable 6W Solar Power
Equipped with a 6W high-efficiency solar panel for faster charging. The system supports dual panel connection (second panel sold separately) to double charging speed. The adjustable design maximizes sunlight exposure for consistent power.

Figure 3.2: Illustration of the 6W solar panel and its adjustable mounting.

Figure 3.3: Example of dual solar panel setup for maximum energy efficiency.
3.3 Seamless Access and Control
The camera offers full compatibility with both mobile devices (iOS/Android) and computers (Windows) via the Ctronics Pro app and HiP2P Client. Monitor footage, manage groups, and playback recordings effortlessly from any location.

Figure 3.4: Overview of multi-platform access and app functionalities.
3.4 Swift Detection with Customizable Alerts
Features a 0.2-second PIR sensor for immediate human movement detection. The built-in sound and light alarms act as deterrents, and alert tones can be customized. The system focuses on human detection to minimize false alarms.
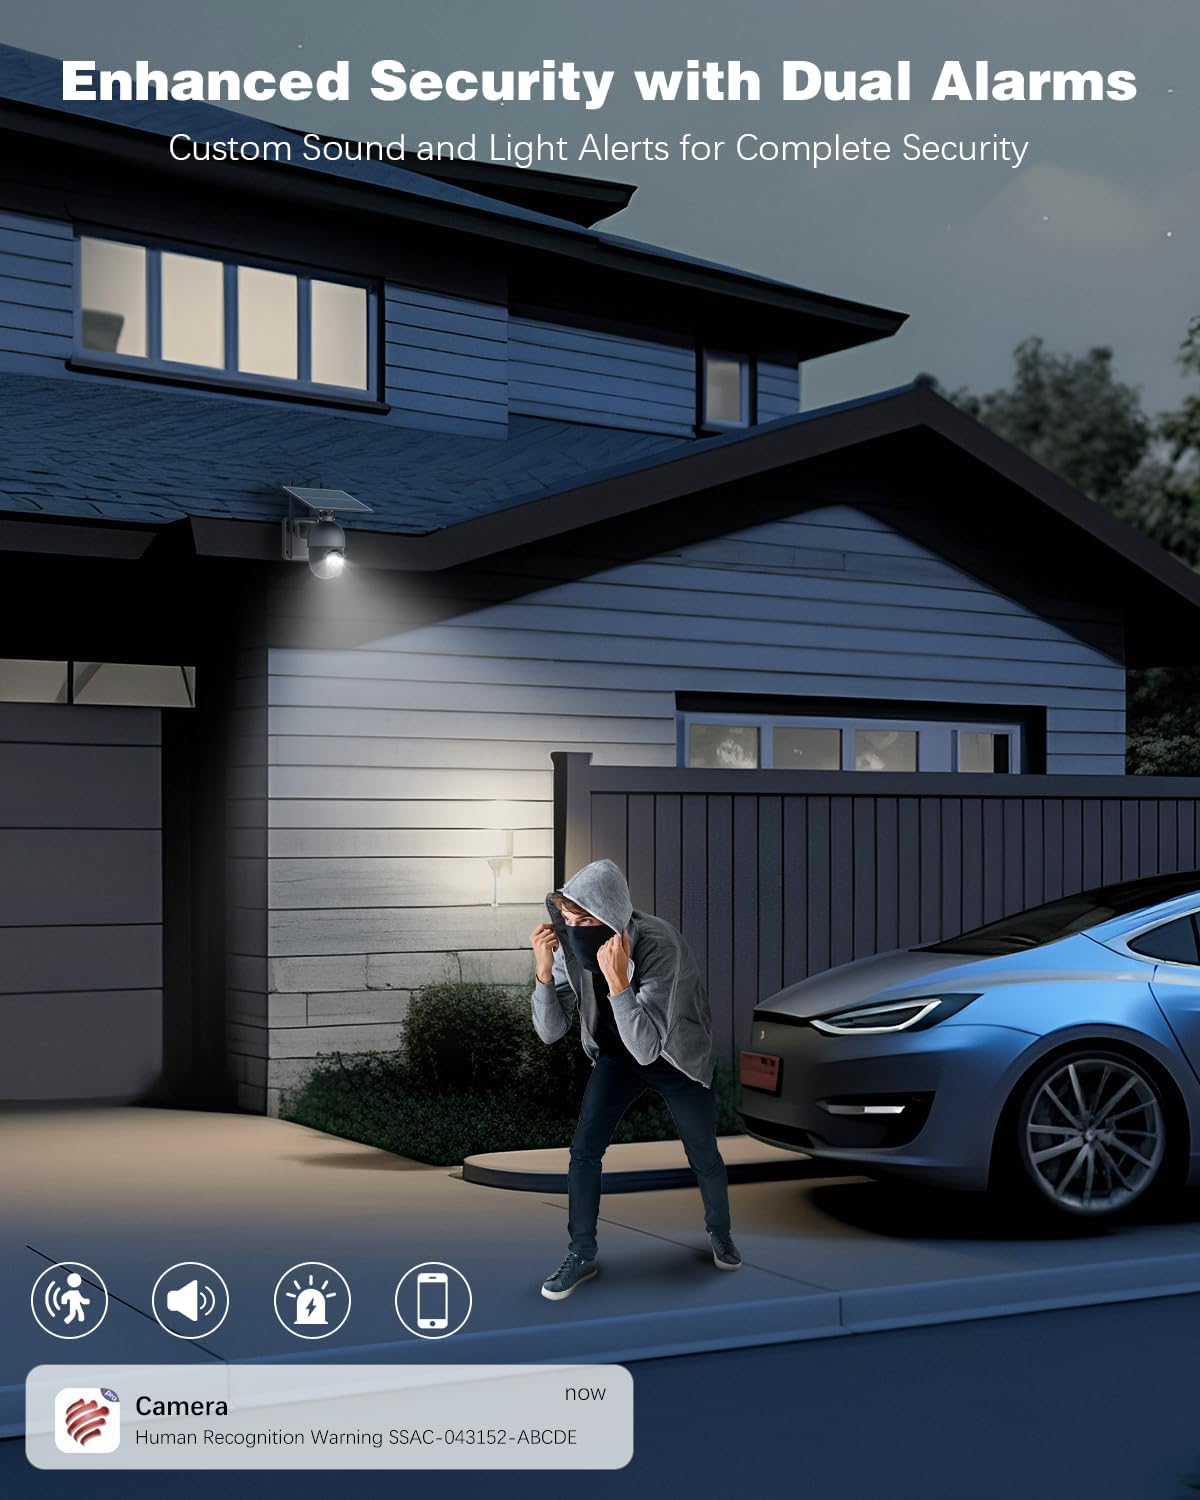
Figure 3.5: Demonstration of the sound and light alarm system.

Figure 3.6: Accurate human detection, minimizing false alerts from non-human subjects.
3.5 Secure and Versatile Storage
Supports flexible data storage options including local (Micro SD card up to 128GB), cloud storage, and FTP server uploads. This ensures critical footage is accessible for daily use or emergencies.

Figure 3.7: Overview of flexible data storage options.
4. Setup and Installation
4.1 Choosing an Installation Location
Select a location that provides optimal sunlight exposure for the solar panel throughout the day. Ensure the camera has a clear line of sight to the area you wish to monitor and is within Wi-Fi range. The camera is designed for outdoor use and is waterproof (IP66 rated).

Figure 4.1: Examples of flexible solar panel and camera installation locations.
4.2 Physical Installation
- Mounting the Bracket: Use the provided screws and wall plugs to securely attach the camera's mounting bracket to a wall or suitable surface. Ensure the bracket is firmly fixed to prevent movement.
- Attaching the Camera: Slide the camera onto the mounted bracket. Secure it in place according to the bracket design.
- Positioning the Solar Panel: Adjust the solar panel's angle to maximize direct sunlight exposure. The panel can be rotated 360 degrees for optimal charging.
- Connecting the Solar Panel: Connect the solar panel cable to the camera's power input port.
4.3 Initial Setup and App Connection
- Charge the Camera: Before first use, ensure the camera has sufficient charge from the solar panel or by connecting it to a 5V power adapter (not included).
- Download the App: Download the "Ctronics Pro" app from your mobile device's app store (iOS/Android) or the "HiP2P Client" for Windows.
- Register/Login: Open the app and register a new account or log in if you already have one.
- Add Device: Follow the in-app instructions to add your camera. This typically involves scanning a QR code on the camera or manually entering its ID.
- Connect to Wi-Fi: Configure the camera to connect to your home or office Wi-Fi network (2.4GHz only).
5. Operation
5.1 Live View and Playback
Once connected, you can access the live video feed from your camera through the Ctronics Pro app or HiP2P Client. Use the app interface to pan, tilt, and zoom (digital zoom) the camera. Recorded footage can be accessed and played back from the storage options configured (Micro SD, Cloud, FTP).
5.2 Motion Detection and Alerts
The camera utilizes PIR human detection to identify movement. When motion is detected, the camera can trigger a sound and light alarm, and send instant notifications to your connected device. You can customize alert sensitivity and alarm sounds within the app settings.
5.3 Two-Way Audio
The camera supports two-way audio communication, allowing you to listen in and speak through the camera using the app. This feature is useful for communicating with visitors or deterring intruders.
5.4 Storage Management
Manage your recorded videos and images through the app. You can view, download, or delete files. Ensure your Micro SD card has sufficient space or manage your cloud/FTP storage as needed.
6. Maintenance
6.1 Cleaning
Regularly clean the camera lens and solar panel with a soft, damp cloth to ensure optimal performance. Avoid using harsh chemicals or abrasive materials that could damage the surfaces.
6.2 Solar Panel Efficiency
Periodically check the solar panel for any obstructions (e.g., leaves, dirt) that might reduce its charging efficiency. Ensure it remains angled towards direct sunlight.
6.3 Firmware Updates
Check the Ctronics Pro app periodically for available firmware updates. Keeping your camera's firmware updated ensures optimal performance, security, and access to new features.
7. Troubleshooting
| Problem | Possible Cause | Solution |
|---|---|---|
| Camera not powering on. | Low battery; solar panel not charging. | Ensure solar panel is in direct sunlight. Charge the camera via a 5V adapter if possible. |
| Cannot connect to Wi-Fi. | Incorrect Wi-Fi password; camera too far from router; 5GHz network. | Verify password. Move camera closer to router. Ensure you are connecting to a 2.4GHz Wi-Fi network. |
| No motion detection alerts. | PIR sensitivity too low; detection zone not set; app notifications disabled. | Adjust PIR sensitivity in app. Check detection zone settings. Enable app notifications. |
| Poor image quality at night. | Lens obstruction; insufficient ambient light for color night vision. | Clean the lens. Ensure there are no obstructions. The camera will switch to black and white if light is too low. |
8. Specifications
| Feature | Detail |
|---|---|
| Model Name | CTIPC-S205MPS |
| Resolution | 5MP (2880x1620P) |
| Power Source | Solar Powered (6W Solar Panel) |
| Connectivity | Wi-Fi (2.4GHz) |
| Night Vision Range | Up to 30 meters (Color Night Vision up to 25 meters) |
| Detection | PIR Human Detection (0.2s response) |
| Storage Options | Micro SD (up to 128GB), Cloud, FTP |
| Audio | Two-Way Audio |
| Weather Resistance | IP66 Waterproof |
| Operating Voltage | 5 Volts |
| Dimensions (L x W x H) | 7.17 x 6.14 x 3.94 inches |
| Weight | 3.17 pounds |
9. Warranty and Support
Ctronics products come with a standard manufacturer's warranty. For specific warranty terms and conditions, please refer to the warranty card included with your product or visit the official Ctronics website. For technical support, troubleshooting assistance, or any inquiries regarding your product, please contact Ctronics customer service through their official channels.
You can often find support information on the Ctronics Store on Amazon.


