1. Introduction
The GeRRit SW-743A Electronic Refrigerant Leak Detector is designed for precise detection of halogen gas leaks in various refrigeration and air conditioning systems. This device offers high sensitivity and accuracy, making it an essential tool for HVAC technicians and DIY enthusiasts. It is compatible with common refrigerants such as R134a, R410a, and R22, suitable for both residential and commercial applications.
This manual provides comprehensive instructions for the proper setup, operation, maintenance, and troubleshooting of your SW-743A leak detector to ensure optimal performance and longevity.
2. Safety Information
Please read and understand all safety warnings and instructions before operating the device. Failure to do so may result in injury or damage to the product.
- Always operate the detector in a well-ventilated area.
- Do not expose the device to extreme temperatures, moisture, or direct sunlight.
- Keep the device away from flammable materials.
- Ensure batteries are inserted correctly and replace them when low to maintain accuracy.
- Do not attempt to repair or modify the device. Refer to qualified personnel for service.
- Avoid direct contact with refrigerants; use appropriate personal protective equipment.
3. Product Overview
The GeRRit SW-743A is a handheld electronic leak detector featuring a flexible probe for reaching confined spaces. It includes a digital display for readings and indicator lights for alarms.
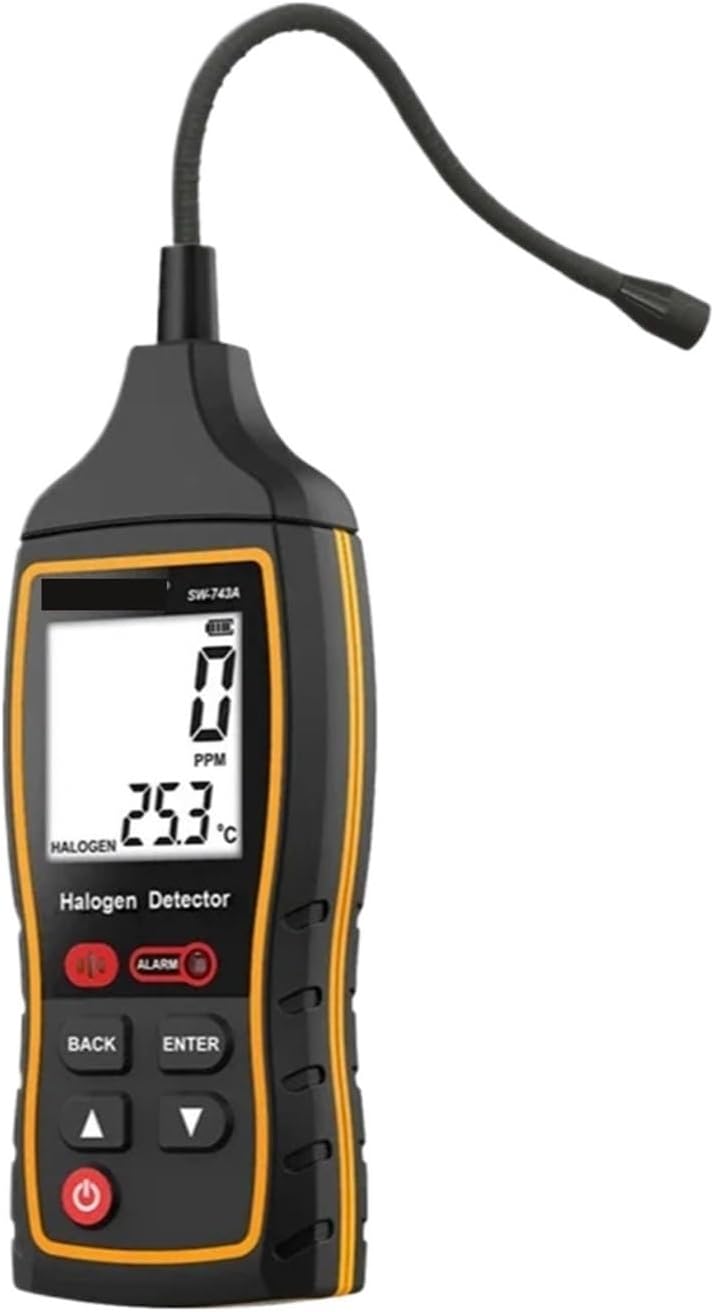
Figure 3.1: Front view of the GeRRit SW-743A Electronic Refrigerant Leak Detector, showing the digital display, control buttons, and flexible probe.

Figure 3.2: Side view of the GeRRit SW-743A, highlighting the flexible probe designed for accessing hard-to-reach areas during leak detection.
Key Components:
- Flexible Probe: Allows access to tight spaces for accurate leak detection.
- Sensor Tip: Detects halogen gases.
- Digital Display: Shows PPM (parts per million) readings and temperature.
- Control Buttons: Power, Back, Enter, Up/Down for navigation and settings.
- Alarm Indicator: Visual and audible alarm for leak detection.
4. Setup
Before first use, ensure the device is ready for operation.
- Battery Installation: Open the battery compartment (usually located on the back or bottom of the device). Insert the required batteries, ensuring correct polarity. Close the compartment securely.
- Power On: Press and hold the power button (⏻) until the display illuminates. The device will perform a brief self-test and warm-up period.
- Warm-up: Allow the detector to warm up for approximately 30-60 seconds in a clean, fresh air environment. This ensures accurate baseline calibration.
- Sensitivity Adjustment (if applicable): If your model allows, adjust the sensitivity setting using the Up/Down arrows and Enter button. Start with a medium sensitivity for general detection, and increase if needed for smaller leaks.
5. Operating Instructions
Follow these steps to effectively detect refrigerant leaks:
- Prepare the Area: Ensure the area around the suspected leak is as still as possible, minimizing air currents that could disperse refrigerant gas.
- Position the Probe: Slowly move the flexible probe tip (sensor) around the suspected leak points of the refrigeration or HVAC system. Keep the probe tip within 5-10 mm of the surface.
- Scan Method: Move the probe at a rate of approximately 1-2 inches per second. Pay close attention to joints, fittings, valves, and other potential leak sources.
- Detecting a Leak: When a halogen gas leak is detected, the device will trigger an audible alarm and a visual indicator (e.g., flashing light or change on the digital display). The display will show the detected PPM level.
- Pinpointing the Leak: Once an alarm is triggered, move the probe away from the area and then slowly approach it again to pinpoint the exact source of the leak. The alarm intensity or PPM reading will typically increase as you get closer to the leak source.
- Clearing the Sensor: After detecting a leak, move the probe to a fresh air environment to allow the sensor to clear before continuing detection.

Figure 5.1: Close-up view of the SW-743A's digital display, showing a detected PPM value and ambient temperature, along with the alarm indicator.
6. Maintenance
Proper maintenance ensures the longevity and accuracy of your leak detector.
- Cleaning: Wipe the device exterior with a soft, dry cloth. Do not use abrasive cleaners or solvents. Ensure the sensor tip is kept clean and free of debris.
- Sensor Care: The sensor is a delicate component. Avoid physical impact or contamination. If the sensor performance degrades, it may require replacement (refer to manufacturer guidelines or contact support).
- Battery Replacement: Replace batteries promptly when the low battery indicator appears on the display. Remove batteries if the device will not be used for an extended period to prevent leakage.
- Storage: Store the detector in a cool, dry place, away from direct sunlight and extreme temperatures. Keep it in its original packaging or a protective case to prevent damage.
7. Troubleshooting
If you encounter issues with your SW-743A, refer to the following table:
| Problem | Possible Cause | Solution |
|---|---|---|
| Device does not power on. | Dead or incorrectly installed batteries. | Check battery polarity; replace with fresh batteries. |
| No alarm when leak is suspected. | Low sensitivity setting; sensor contaminated; very small leak. | Increase sensitivity; clean sensor tip; move probe slower and closer to suspected area. |
| False alarms or erratic readings. | Sensor not cleared; interference from other gases; high humidity. | Move to fresh air to clear sensor; ensure no other gas sources are present; allow device to stabilize. |
| Display not working correctly. | Low battery; internal fault. | Replace batteries. If problem persists, contact customer support. |
8. Specifications
| Feature | Detail |
|---|---|
| Model Number | SW-743A |
| Brand | GeRRit |
| Product Dimensions (L x W x H) | 3 x 2 x 1 cm |
| Item Weight | 500 Grams |
| Detection Principle | Halogen gas detection |
| Compatible Refrigerants | R134a, R410a, R22, etc. |
| Power Source | Batteries (type not specified, typically AA or AAA) |
| Display | Digital (PPM, Temperature) |
| Alarm | Audible and Visual |
9. Warranty and Support
Specific warranty information is not provided in the product details. For warranty claims, technical support, or service inquiries, please contact the retailer or manufacturer directly. Keep your purchase receipt as proof of purchase.
For general inquiries, you may visit the GeRRit brand page on Amazon or contact their customer service channels if available.


