Introduction
The OLIGHT Perun 2 Mini is a compact and powerful LED headlamp designed for versatile lighting needs. It features a high output, long endurance, and a red light option, making it suitable for various activities from outdoor recreation to emergency signaling. This manual provides essential information for the safe and effective use of your Perun 2 Mini headlamp.
Product Overview
The Perun 2 Mini headlamp is engineered for powerful performance in a miniature form factor. It delivers a maximum output of 1,100 lumens and offers extended runtimes. The device includes both white and red LED lighting options, a comfortable headband, and a magnetic charging system.

Image: The Perun 2 Mini headlamp, emphasizing its lightweight design and powerful 1,100 lumen output, 10-day max runtime, 150-meter max throw, customized rechargeable battery, 1.5-meter drop test rating, and IPX8 waterproof rating.

Image: A hand holding the compact Perun 2 Mini headlamp, illustrating its minimal weight of 1.9 ounces (54 grams), suitable for jogging, camping, or hiking.
Setup
Attaching to Headband
- Locate the silicone holder on the headband.
- Align the body of the Perun 2 Mini with the holder.
- Gently push the headlamp into the silicone holder until it is securely seated. Ensure the light can be rotated within the holder for directional adjustment.
Battery Installation
- Unscrew the tail cap of the headlamp.
- Insert the customized rechargeable battery with the positive (+) end facing towards the head of the light.
- Screw the tail cap back on tightly to ensure water resistance and proper electrical contact.
Operating Instructions
Power On/Off
- To Turn On/Off: Single-click the side switch.
Changing Brightness Levels (White Light)
- When the light is on, press and hold the side switch to cycle through Low, Medium, and High modes. Release the switch to select the desired brightness.
- Turbo Mode: Double-click the side switch to activate Turbo mode. Double-click again to return to the previous mode.
- Moonlight Mode: When the light is off, press and hold the side switch for approximately one second to activate Moonlight mode.
Red Light Operation
- To Activate Red Light: When the light is off, triple-click the side switch.
- Red Blinking Mode: While in Red Light mode, press and hold the side switch to switch to Red Blinking mode.

Image: The Perun 2 Mini demonstrating its dual white and red light sources for various applications, including outdoor lighting, power outages, night running, and emergency signaling.
Charging
The Perun 2 Mini utilizes a magnetic charging system for convenience. Use the provided MCC 1A Magnetic Charging Cable.
- Connect the USB end of the charging cable to a power source (e.g., USB adapter, computer USB port).
- Attach the magnetic end of the cable to the tail cap of the headlamp. The magnetic connection will snap into place.
- The indicator on the charging cable will show red during charging and turn green when fully charged.
Battery Status Indicator
The headlamp features a tri-color power indicator to display the remaining battery level:
- Green: Battery > 60%
- Orange: Battery 60%–10%
- Red: Battery 10%–5%
- Flashing Red: Battery < 5%
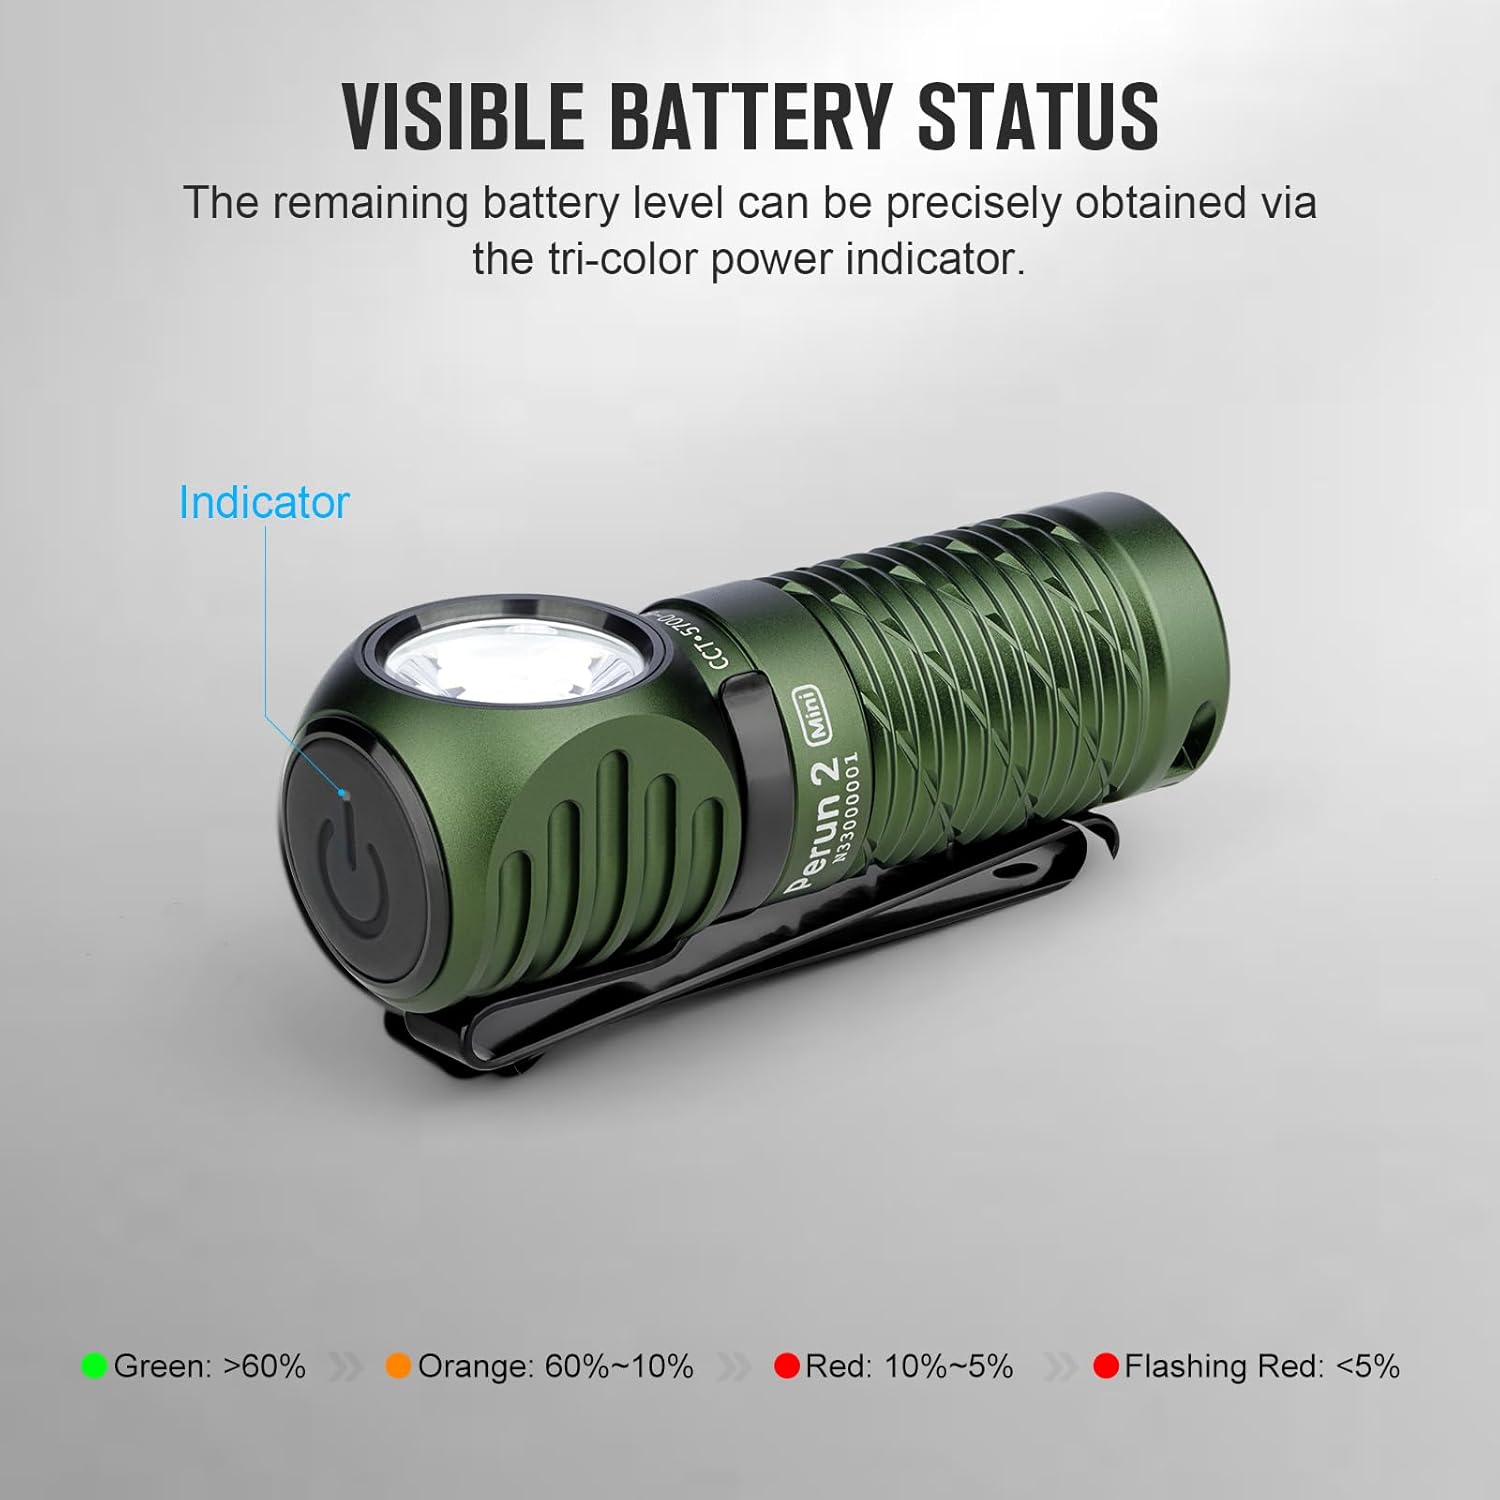
Image: A black Perun 2 Mini headlamp illustrating the tri-color battery status indicator on the side switch.

Image: A green Perun 2 Mini headlamp being charged with the MCC 1A Magnetic Charging Cable, demonstrating the simple magnetic attachment.
Features
- Powerful Performance: The Perun 2 Mini offers a maximum output of 1,100 lumens and an extended endurance of up to 10 days on its lowest setting, thanks to an 18% larger battery capacity compared to its predecessor.
- Red Light Option: In addition to high-performance white LED lighting, the integrated red LED can be used to preserve night vision or as an effective emergency warning signal.
- Upgraded Headband: The redesigned headband is more comfortable and lighter, featuring a reduced skin-to-head contact area for improved wearability.
- Multifunctional Use: The Perun 2 Mini can be worn as a headlamp for hands-free illumination, used as a handheld flashlight, or attached to backpacks and belts via its pocket clip. Its magnetic tail cap also allows it to function as a work light by attaching to iron surfaces.

Image: The Perun 2 Mini showcasing its versatility: worn as a headlamp, carried with its two-way pocket clip, and magnetically attached for hands-free work.
Specifications
| Feature | Detail |
|---|---|
| Brand | OLIGHT |
| Model | Perun 2 Mini |
| Light Source Type | LED |
| White Brightness (Max) | 1100 Lumens |
| Luminous Flux | 1100 lumen |
| Max Throw | 150 Meters |
| Power Source | Battery Powered (Customized Rechargeable Battery) |
| Special Feature | Night Vision (Red Light) |
| Water Resistance Level | IPX8 (Waterproof) |
| Drop Test Rating | 1.5 Meters |
| Weight | 54g (1.9oz) |
| Color Options | Black, Cool White, Olive Drab Green |
Maintenance
- Cleaning: Wipe the headlamp with a soft, damp cloth. Do not use abrasive cleaners or solvents.
- Battery Care: Recharge the battery regularly, even if not in frequent use, to maintain optimal performance and extend battery life. Store the headlamp with a partially charged battery if storing for long periods.
- O-rings: Periodically check the O-rings for wear and tear. Replace them if damaged to maintain the headlamp's water resistance. Apply silicone grease to the O-rings to keep them supple.
- Storage: Store the headlamp in a cool, dry place away from direct sunlight and extreme temperatures.
Troubleshooting
- Light Not Turning On:
- Ensure the battery is correctly inserted with the positive (+) end facing forward.
- Check if the tail cap is fully tightened.
- Verify the battery is charged.
- If the light is locked out, press and hold the side switch for several seconds until the light briefly flashes to unlock it.
- Dim Light or Short Runtime:
- Recharge the battery fully.
- Clean the contact points on the battery and inside the headlamp with a clean cotton swab.
- Magnetic Charging Not Working:
- Ensure the magnetic charging cable is properly connected to both the power source and the headlamp's tail cap.
- Check for any debris on the magnetic contact points.
Warranty and Support
OLIGHT products are manufactured with high-quality materials and workmanship. For detailed warranty information and customer support, please refer to the official OLIGHT website or contact their customer service directly. Keep your purchase receipt as proof of purchase for warranty claims.
For further assistance, visit the OLIGHT Store on Amazon.