1. Introduction
This manual provides essential information for the installation, operation, and maintenance of your SPYMINNPOO 48V 800W Electric Scooter Controller. This controller is designed to provide stable speed control and responsive maneuverability for electric scooters, electric bicycles, and electric tricycles. Please read this manual thoroughly before installation and use to ensure proper function and safety.
2. Safety Information
- Professional Installation Recommended: Due to the electrical nature of this product, installation should ideally be performed by a qualified technician to prevent damage to the controller or the vehicle.
- Power Disconnection: Always disconnect the vehicle's power source before attempting any installation, maintenance, or repair work on the controller.
- Correct Voltage: Ensure the controller's voltage (48V) matches your vehicle's battery system. Incorrect voltage can cause severe damage.
- Wiring: Connect all wires according to the provided diagrams and labels. Incorrect wiring can lead to malfunction or electrical hazards.
- Environmental Conditions: Avoid exposing the controller to extreme moisture, dust, or temperatures outside its operating range.
3. Product Overview
The SPYMINNPOO 48V 800W Electric Scooter Controller is a robust control module featuring an aluminum alloy casing with a grooved design for efficient heat dissipation. It integrates various safety protections to ensure reliable operation.

Image 3.1: Overview of the SPYMINNPOO Electric Scooter Controller, showing its compact design and numerous wiring connections.
The controller comes with a comprehensive set of high-temperature resistant wires, each labeled for specific functions such as power, motor, Hall sensors, brakes, and throttle. This design facilitates organized and secure connections within your electric vehicle system.
4. Specifications
| Feature | Specification |
|---|---|
| Item Type | Electric Controller |
| Material | Aluminum Alloy |
| Voltage | 48V |
| Power | 800W |
| Model Number | SPYMINNPOO2i0qw381zm (T4-DB-L148) |
| Dimensions | 19 x 14 x 4 cm |
| Weight | 306 g |
| Application | Electric scooters, electric bicycles, electric tricycles |
5. Setup and Installation
Warning: Incorrect installation can lead to serious damage or injury. If you are not confident in performing the installation, seek assistance from a professional.
- Preparation: Ensure the vehicle's power is completely off and the battery is disconnected. Gather all necessary tools.
- Mounting: Securely mount the controller in a suitable location on your vehicle, ensuring it is protected from physical impact and excessive moisture. The aluminum casing's grooved design aids in heat dissipation, so ensure adequate airflow around the unit.
- Wiring Connections: Carefully connect each labeled wire from the controller to its corresponding component on your electric vehicle. Refer to the labels on the wires and your vehicle's wiring diagram. The wires are designed to be resistant to high temperatures for enhanced safety.
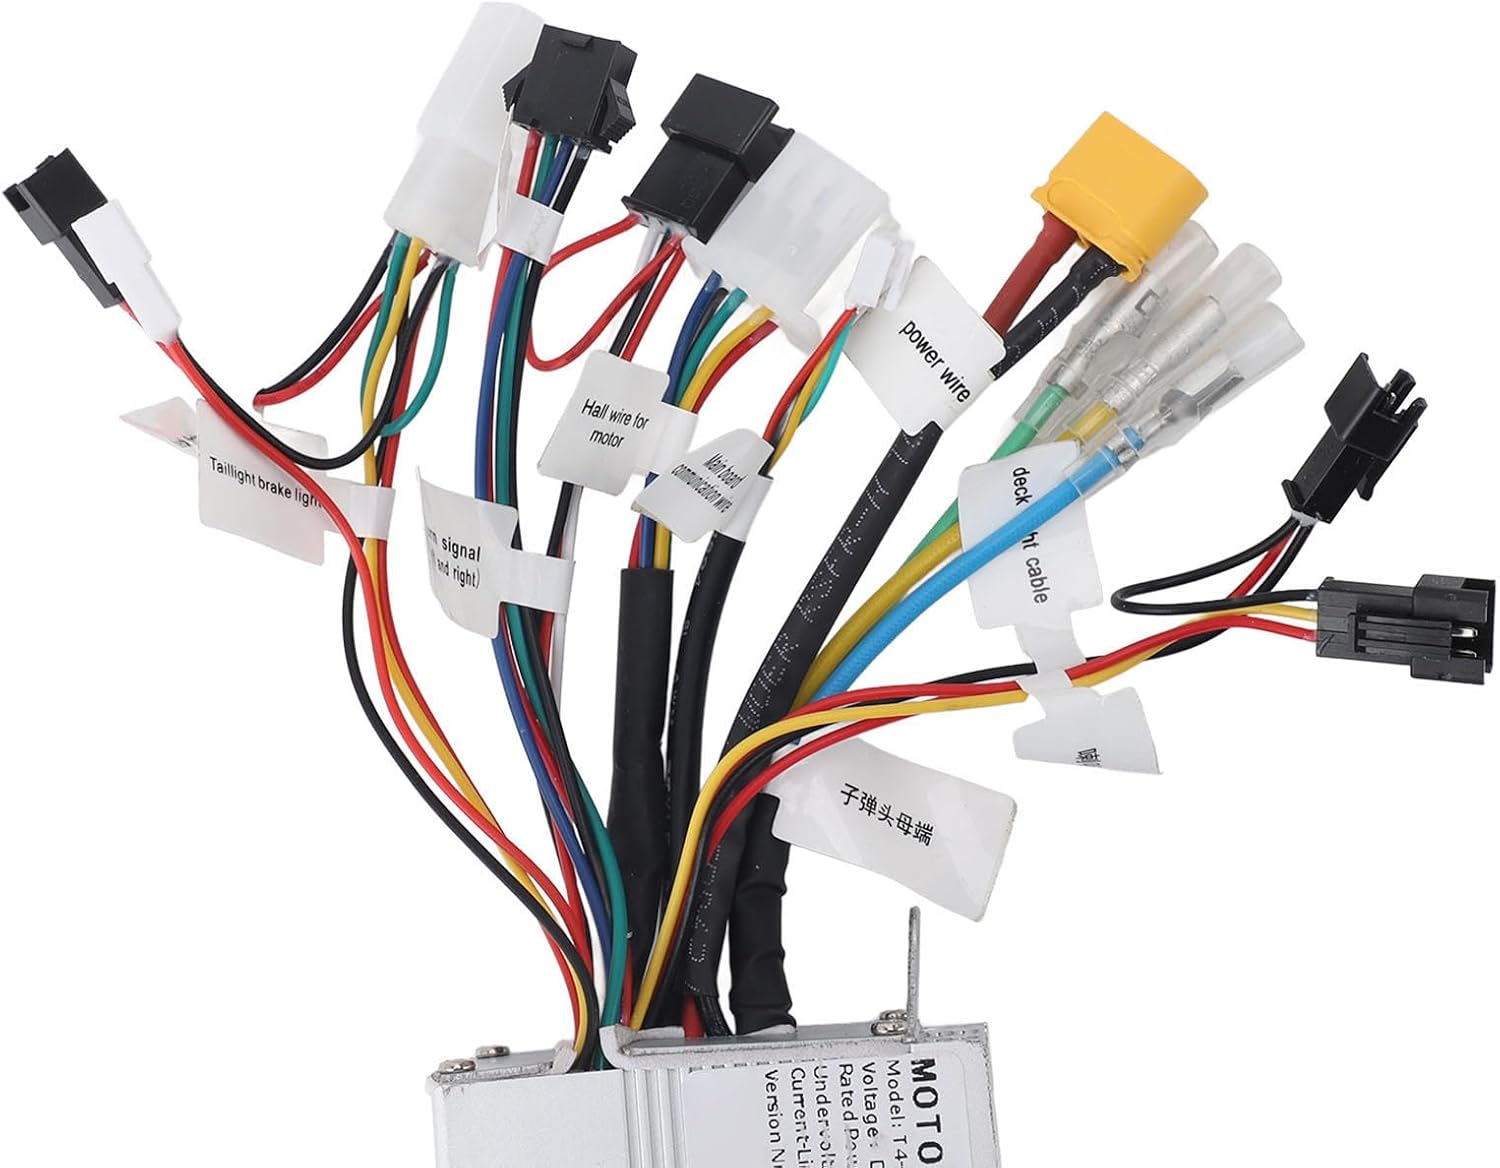
Image 5.1: Detailed view of the controller's wiring, showing individual labels for various connections.
- Power Wire: Connect to the battery's positive and negative terminals.
- Motor Wire: Connect to the motor's power input.
- Hall Wire: Connect to the motor's Hall sensor wires (if applicable).
- Brake Signal Wire: Connect to the brake levers.
- Throttle Cable: Connect to the throttle mechanism.
- Other Wires: Connect any remaining wires (e.g., taillight, turn signal) as per your vehicle's specific requirements.
- Double-Check: Before reconnecting the battery, meticulously check all connections to ensure they are secure and correctly wired.
- Power On: Reconnect the battery and power on the vehicle. Test all functions at a low speed in a safe environment.
6. Operating Instructions
Once properly installed, the controller will manage the power delivery to your electric vehicle's motor, providing a stable and responsive riding experience. The controller is equipped with several protective features to ensure safe operation:

Image 6.1: The controller provides stable speed control and incorporates multiple safety guards.
- Stable Speed Control: The controller maintains a consistent speed based on throttle input, offering a smooth ride.
- Responsive Braking and Directional Changes: It ensures that braking and steering inputs are translated into immediate and controlled responses.
- Undervoltage Protection: Automatically cuts off power if the battery voltage drops below a safe threshold, protecting the battery from deep discharge.
- Overcurrent Protection: Prevents damage to the motor and controller by limiting current flow during excessive load conditions.
- Overspeed Protection: Helps prevent the vehicle from exceeding safe speeds, contributing to rider safety.
7. Maintenance
Regular maintenance helps ensure the longevity and optimal performance of your controller.
- Cleaning: Periodically clean the exterior of the controller with a dry, soft cloth to remove dust and debris. Do not use water or harsh chemicals.
- Connection Check: Regularly inspect all wiring connections to ensure they remain tight and free from corrosion. Loose connections can lead to intermittent operation or damage.
- Heat Dissipation: The aluminum alloy shell with its grooved design is crucial for dissipating heat. Ensure that the controller's fins are not obstructed by dirt or other materials to maintain effective cooling.

Image 7.1: The controller's aluminum alloy casing with a grooved design ensures effective heat dissipation.
- Environmental Protection: While the controller is designed for durability, avoid prolonged exposure to direct sunlight, heavy rain, or extreme temperatures.
8. Troubleshooting
If you encounter issues with your controller, consider the following basic troubleshooting steps:
- No Power:
- Check the main power connection from the battery to the controller.
- Ensure the battery is charged and functioning correctly.
- Verify all power-related fuses or circuit breakers in your vehicle.
- Motor Not Responding:
- Inspect the motor phase wires and Hall sensor wires for secure connections.
- Check the throttle connection and ensure it is not damaged.
- Confirm that the brake levers are not engaged, as some systems cut power when brakes are applied.
- Intermittent Operation:
- Examine all wiring connections for looseness or corrosion.
- Check for any signs of physical damage to the controller or its wires.
- Overheating:
- Ensure the controller's heat dissipation fins are clean and unobstructed.
- Reduce heavy loads or prolonged high-speed operation if overheating persists.
If these steps do not resolve the issue, it is recommended to consult a qualified technician or contact customer support for further assistance.
9. Warranty and Support
For warranty information, please refer to the terms and conditions provided at the point of purchase. If you require technical support or have questions regarding your SPYMINNPOO Electric Scooter Controller, please contact your retailer or the manufacturer's customer service department. When contacting support, please have your product model number (T4-DB-L148) and any relevant purchase details available.


