1. Introduction
This manual provides detailed instructions for the installation, operation, and maintenance of your Insoma 2-Zone Digital Sprinkler Timer (Model: SGW20-TT). This device is designed to automate your garden watering system, offering programmable schedules for two independent zones, rain delay functionality, and manual watering options. Please read this manual thoroughly before use to ensure proper setup and optimal performance.

Image 1.1: The Insoma 2-Zone Digital Sprinkler Timer, showcasing its dual outlets, control panel, and included hose connectors and Teflon tape.
2. Package Contents
Upon unpacking, please verify that all items listed below are present and in good condition:
- 1 x Insoma 2-Zone Digital Sprinkler Timer (Model: SGW20-TT)
- 2 x 1/2" Threaded Hose Connectors
- 2 x Thread Seal Teflon Tapes
- 1 x User Manual (this document)
Note: 4 x AAA 1.5V Alkaline batteries are required for operation and are not included in the package. Please purchase them separately.
3. Product Features
- Dual Independent Zones: Control two separate watering areas with distinct schedules.
- Programmable Schedules: Up to 6 different watering programs per zone, with adjustable duration (1 min - 5h 59 min) and frequency (every 1-7 days or specific days).
- Rain Delay Function: Pause watering for 1-7 days to conserve water during rainy periods.
- Manual Watering Mode: Initiate immediate watering from 1 minute to 8 hours without affecting programmed schedules.
- Large LCD Display: 2.5-inch screen for clear visibility of settings and status.
- Durable Construction: IP55 waterproof rating, anti-UV coating, and anti-rust ABS plastic for long-lasting outdoor use.
- Easy Installation: Tool-free setup with standard hose connections.
4. Setup and Installation
Follow these steps for quick and easy installation:
- Install Batteries: Open the battery compartment on the back of the timer. Insert 4 new AAA 1.5V Alkaline batteries, ensuring correct polarity. Close the compartment securely to maintain the waterproof seal.
- Attach to Faucet: Screw the timer onto your outdoor 3/4" faucet. Ensure the connection is hand-tight to prevent leaks. Use the provided Teflon tape on the faucet threads if necessary for a better seal.
- Connect Hoses: Attach your garden hoses to the two independent outlets at the bottom of the timer. If your hoses have 1/2" threads, use the provided 1/2" threaded hose connectors. Apply Teflon tape to hose threads if needed.
- Test Connection: Briefly turn on the faucet to check for any leaks at the connections. Tighten if necessary.
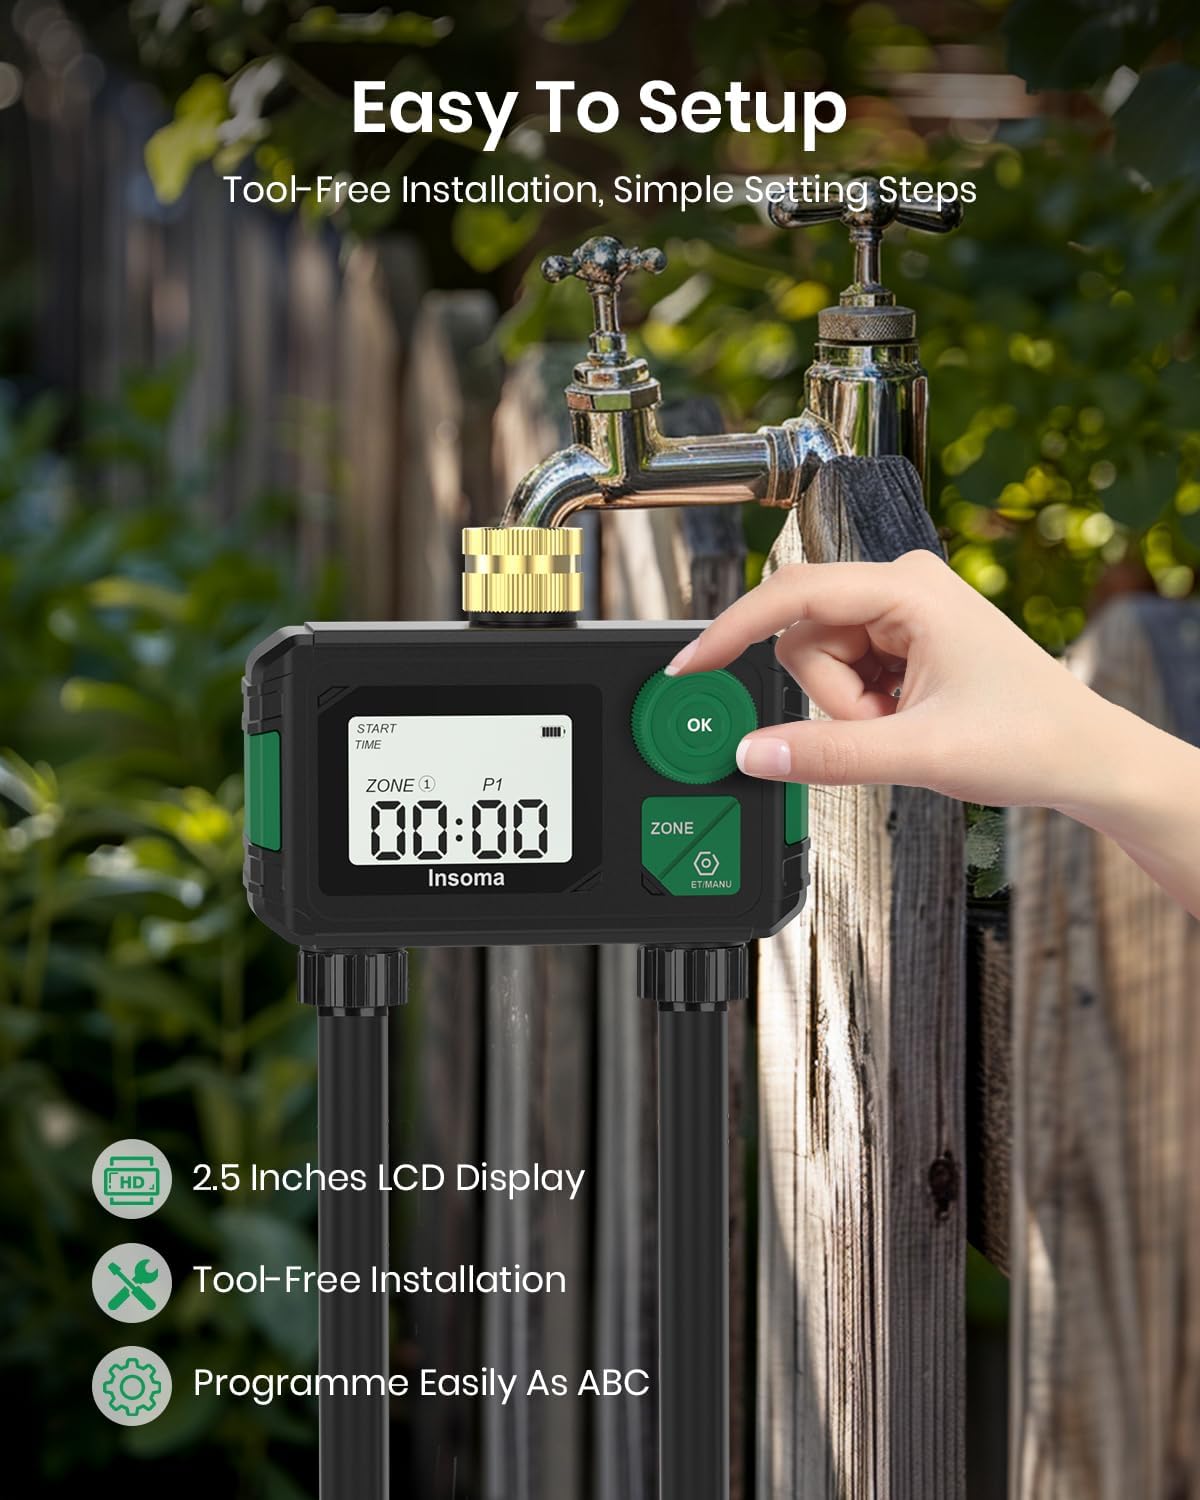
Image 4.1: The Insoma Sprinkler Timer connected to an outdoor faucet, highlighting its easy, tool-free installation and clear LCD display.
5. Operating Instructions
The timer features a central dial, an "OK" button, and a "ZONE" button for navigation and setting. The dial is used to select different modes and adjust values, while the "OK" button confirms selections and the "ZONE" button switches between watering zones or programs.
5.1. Setting the Clock
- Rotate the dial to the "SET CLOCK" position.
- Use the dial to adjust the hour, then press "OK" to confirm.
- Use the dial to adjust the minute, then press "OK" to confirm.
- The clock is now set.
5.2. Programming Watering Schedules (P1-P6)
Each of the two zones (Zone 1 and Zone 2) can have up to 6 independent watering programs (P1 to P6). Follow these steps for each program you wish to set:
- Rotate the dial to the "PROGRAM" position.
- Press the "ZONE" button to select either Zone 1 or Zone 2.
- Press "OK" to cycle through programs P1 to P6. Select the desired program (e.g., P1) by stopping on it.
- Set Start Time: With the program selected, rotate the dial to adjust the start time (hour and minute). Press "OK" after setting each.
- Set Watering Duration: Rotate the dial to adjust how long the watering will last (from 1 minute to 5 hours 59 minutes). Press "OK" to confirm.
- Set Watering Frequency: Rotate the dial to choose how often watering occurs. Options include "Every 1 Day" to "Every 7 Days", or specific days of the week (e.g., Mon, Wed, Fri). Press "OK" to confirm.
- Repeat steps for other programs (P2-P6) and for the other zone if desired.

Image 5.1: Visual representation of setting up to 6 custom watering programs (P1-P6) for two independent zones, detailing start time, duration, and frequency.

Image 5.2: A close-up of the timer's display showing options for setting watering duration (1 min to 5h59min) and frequency (daily or specific days of the week).
5.3. Rain Delay Function
To temporarily pause your watering schedule due to rain:
- Rotate the dial to the "RAIN DELAY" position.
- Use the dial to select the desired delay duration (1 to 7 days).
- Press "OK" to activate the rain delay. The timer will resume its programmed schedule automatically after the selected delay period.

Image 5.3: The timer displaying the rain delay feature, illustrating how to pause watering for a set number of days and its automatic resumption.
5.4. Manual Watering
To water immediately without affecting your programmed schedules:
- Rotate the dial to the "MANUAL" position.
- Press the "ZONE" button to select the desired zone (Zone 1 or Zone 2).
- Use the dial to set the manual watering duration (from 1 minute to 8 hours).
- Press "OK" to start manual watering. The timer will automatically stop after the set duration.
5.5. Turning Off the Timer
To stop all watering activities and turn off the timer:
- Rotate the dial to the "OFF" position. This will disable all programmed schedules and manual watering.
6. Maintenance
- Battery Replacement: Replace batteries annually or when the low battery indicator appears on the display. Always use new AAA 1.5V Alkaline batteries.
- Cleaning: Periodically wipe the timer's exterior with a soft, damp cloth. Do not use abrasive cleaners or solvents.
- Filter Cleaning: Check the filter washer located at the inlet connection for debris. Clean it as needed to ensure proper water flow.
- Winterization: Before the first frost, disconnect the timer from the faucet and hoses. Remove batteries and store the timer indoors in a dry, frost-free location to prevent damage from freezing water.
7. Troubleshooting
| Problem | Possible Cause | Solution |
|---|---|---|
| Timer does not turn on / Display is blank. | Dead or incorrectly installed batteries. | Replace with new AAA 1.5V Alkaline batteries, ensuring correct polarity. |
| No water flow from outlets. | Faucet is off; low water pressure; clogged filter; rain delay active; timer is in "OFF" mode. | Ensure faucet is fully open. Check water pressure. Clean the inlet filter. Check if rain delay is active and wait for it to expire or cancel it. Rotate dial to "AUTO" or "MANUAL" mode. |
| Water leaks from connections. | Loose connections; worn out washers; damaged threads. | Tighten all connections by hand. Replace rubber washers if worn. Use Teflon tape on threads for a better seal. |
| Timer not watering at scheduled times. | Incorrect program settings; timer in "OFF" or "RAIN DELAY" mode; low battery. | Verify program start times, durations, and frequencies. Ensure timer is in "AUTO" mode. Check for active rain delay. Replace batteries. |
8. Specifications
| Feature | Detail |
|---|---|
| Model | SGW20-TT |
| Brand | Insoma |
| Number of Zones | 2 |
| Watering Duration | 1 minute to 5 hours 59 minutes |
| Watering Frequency | Every 1-7 days or specific days of the week |
| Rain Delay | 1 to 7 days |
| Manual Watering Duration | 1 minute to 8 hours |
| Power Source | 4 x AAA 1.5V Alkaline batteries (not included) |
| Material | ABS Plastic |
| Waterproof Rating | IP55 |
| Display Size | 2 Inches (LCD) |
| Product Dimensions | 7.11 x 8.13 x 9.65 cm |
| Item Weight | 249.48 g |
9. Warranty Information
Specific warranty details for the Insoma Sprinkler Timer (Model: SGW20-TT) are typically provided with the product packaging or available directly from the manufacturer. Please refer to the documentation included with your purchase or visit the official Insoma website for comprehensive warranty terms and conditions.


