
1. Introduction
This manual provides comprehensive instructions for the safe and efficient operation of your ZXSYYDS 256-Egg Automatic Incubator. Please read this manual thoroughly before initial use to ensure proper setup, operation, and maintenance, which will contribute to successful hatching results. This incubator is designed for various poultry eggs, including chicken, duck, goose, pigeon, and quail eggs.
2. Safety Instructions
- Always connect the incubator to a grounded power outlet.
- Do not operate the incubator with a damaged power cord or plug.
- Keep the incubator away from water or excessive humidity to prevent electrical shock.
- Ensure proper ventilation around the incubator.
- Do not open the machine frequently during the incubation process to maintain stable temperature and humidity.
- Unplug the incubator before cleaning or performing any maintenance.
- Keep out of reach of children and pets.
3. Product Overview
3.1 Components
Familiarize yourself with the main components of your incubator:
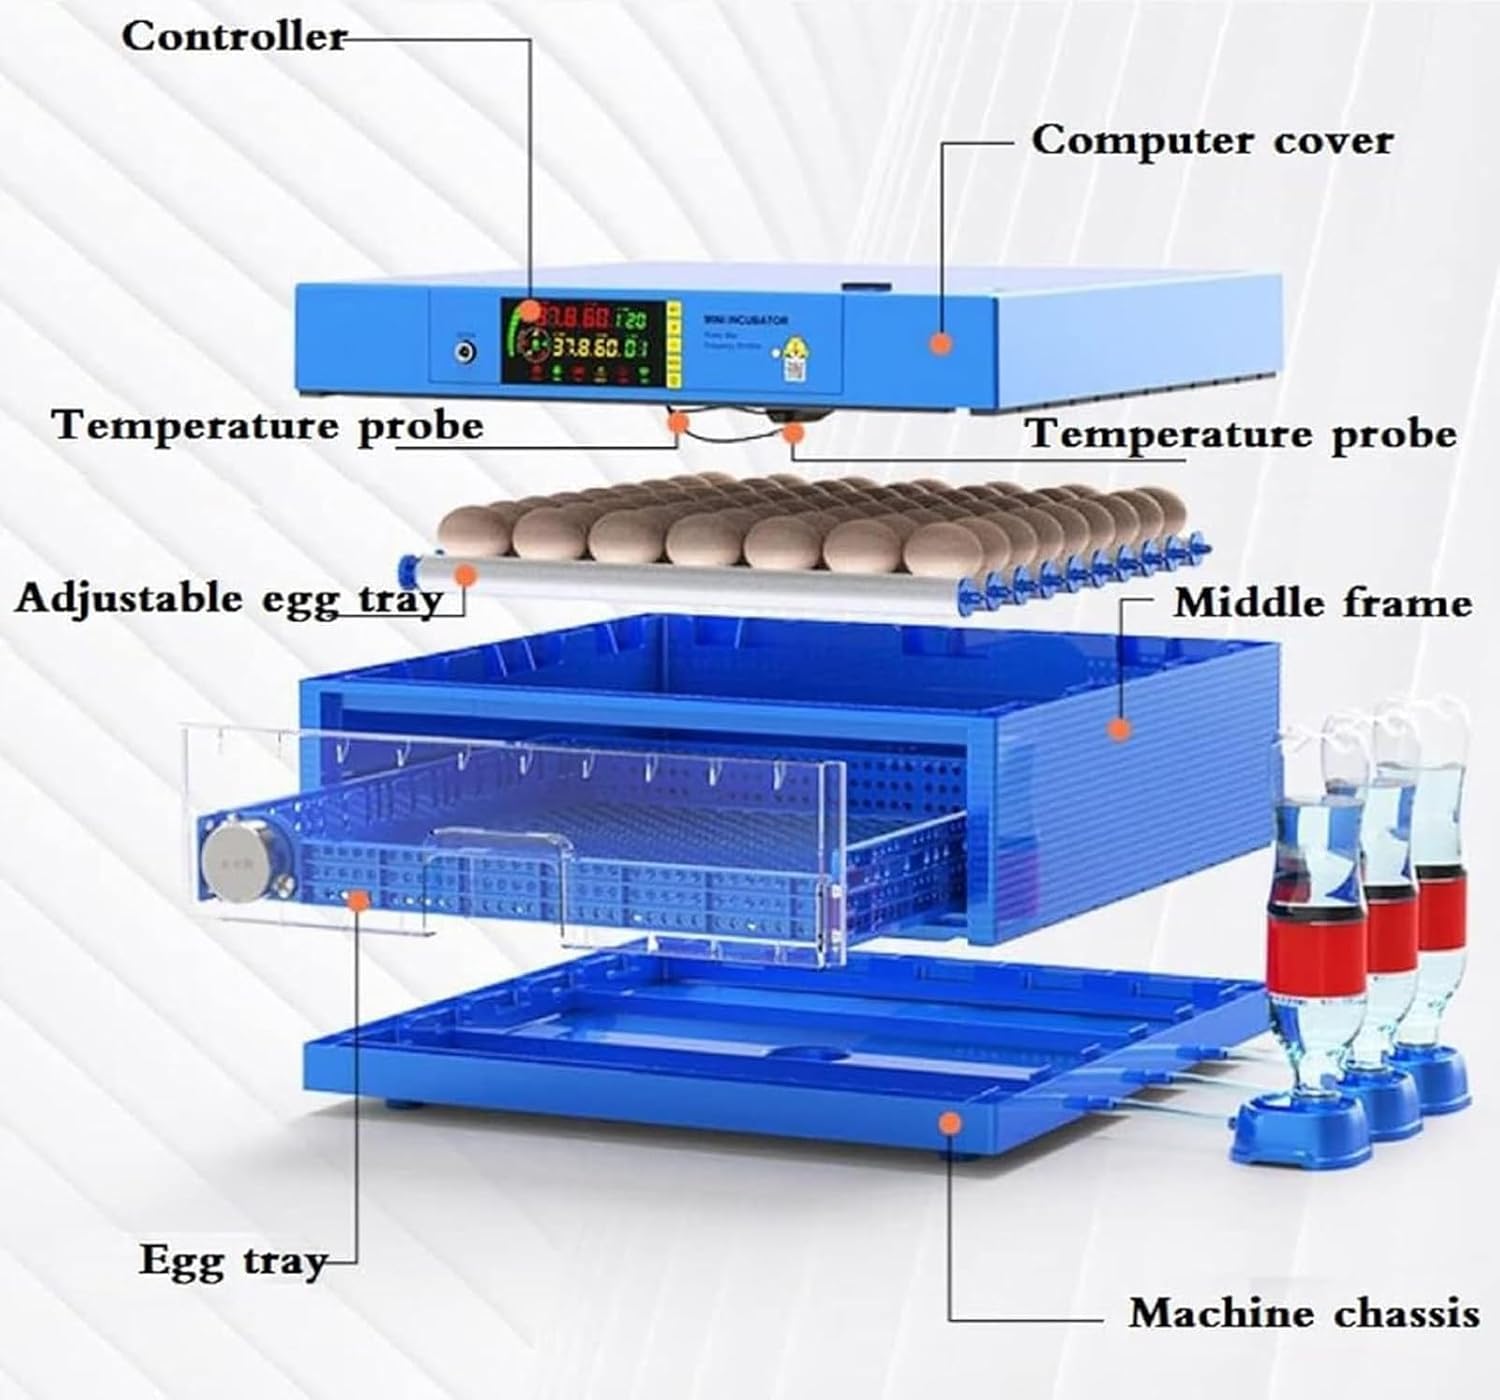
Figure 1: Incubator Components. This image displays an exploded view of the incubator, highlighting key parts such as the controller, computer cover, temperature probes, adjustable egg trays, middle frame, and machine chassis. Water bottles are also shown, indicating the external water addition system.
- Controller: The main unit housing the display and control buttons.
- Computer Cover: Protects the internal electronics of the controller.
- Temperature Probe: Sensors for monitoring internal temperature.
- Adjustable Egg Tray: Designed to hold various egg sizes.
- Middle Frame: Structural support for the egg trays.
- Egg Tray: The primary trays where eggs are placed for incubation.
- Machine Chassis: The base structure of the incubator.
- Water Bottles (not included): Used for external water addition to maintain humidity.
3.2 Control Panel and Display
The digital display provides real-time information and allows for precise control over incubation parameters.

Figure 2: Control Panel Details. This image illustrates the various indicators and controls on the incubator's LED display, including temperature, humidity, and operational status.
- Temperature display
- Humidity display
- Egg turnover time
- Set temperature
- Set humidity
- Incubation days
- Customize Display
- Heating display
- Humidification display
- Egg flipping display
- Alarm display
- Display according to eggs
- Incubation flashing light
3.3 Key Features
- Automatic Temperature and Humidity Control: LED display for setting and monitoring, with external water addition for humidity.
- Automatic Egg Turning: Eggs are turned automatically every 120 minutes to ensure even heating and prevent adhesion.
- Adjustable Egg Tray Spacing: Roller spacing can be adjusted to accommodate various egg sizes (chicken, duck, goose, quail, parrot).
- Integrated Egg Candler: LED cold light source for easy observation of egg development without harming the embryo.
- 360° Clear View: Transparent lid allows for continuous observation of the hatching process.
- Dual Power Supply: Supports 110V AC power and can switch to a 12V DC battery (not included) during power outages.
- Circulating Air Duct System: Ensures internal air circulation for improved hatching rates.

Figure 3: Circulating Air Duct. This image highlights the internal air circulation system, crucial for maintaining uniform temperature and humidity.
4. Setup Instructions
4.1 Initial Assembly
- Unpack all components and verify against the component list (refer to Figure 1).
- Place the machine chassis on a stable, level surface.
- Install the middle frame and egg trays into the chassis.
- Ensure the controller unit is securely placed on top of the incubator.
- Connect the temperature probes and any other necessary internal connections as per the diagram.
4.2 Water Addition for Humidity
The incubator features an external water addition system to maintain humidity without opening the lid.

Figure 4: External Water Addition. This image demonstrates how water can be added from the outside, minimizing temperature fluctuations.
- Prepare clean water bottles (not included).
- Connect the water bottles to the external water inlets on the side of the incubator.
- Adjust the number of water bottles as needed to achieve the desired humidity level.
- Monitor the humidity display (Figure 2, item 2) and refill water as necessary.
4.3 Power Connection and Preheating
- Connect the incubator to a 110V AC power supply.
- The display will illuminate, showing current temperature and humidity.
- Set the desired preheating temperature to 37.8°C (100°F) and humidity to 50-70%.
- Allow the incubator to preheat for at least 2-3 hours to stabilize the internal environment before placing eggs.
- In case of a power outage, the incubator can be manually switched to a 12V DC battery power supply (battery not included).
5. Operating Instructions
5.1 Egg Selection and Placement
- Use fresh fertilized eggs. For optimal results, eggs should be collected within 7 days in cooler seasons (spring, autumn, winter) and within 3 days in summer.
- Adjust the spacing of the egg trays according to the size of the eggs you are incubating. This prevents eggs from leaking or being pinched.

Figure 5: Adjustable Egg Tray Spacing. This image illustrates how the roller spacing can be modified for different egg sizes.

Figure 6: Versatile Egg Tray. This image shows the types of eggs the adjustable tray can accommodate.
- Carefully place the eggs into the adjusted egg trays.
5.2 Setting Temperature and Humidity
Refer to the control panel (Figure 2) for setting and monitoring.
- Use the control buttons (e.g., '+' and '-' keys) to set the desired temperature (Figure 2, item 4) and humidity (Figure 2, item 5).
- The recommended incubation temperature is 37.8°C (100°F).
- The recommended humidity range is 50-70% for most of the incubation period, increasing during the last few days before hatching.
- The incubator will automatically maintain these settings.
5.3 Automatic Egg Turning
The incubator automatically turns eggs every 120 minutes. This process is essential for embryo development and prevents the embryo from sticking to the shell.
- Ensure the egg turning mechanism is connected and functioning.
- The egg flipping display (Figure 2, item 10) will indicate when turning is active.
5.4 Monitoring and Candling
- Regularly check the temperature and humidity displays to ensure they are within optimal ranges.
- Use the built-in LED egg candler to observe the development of the embryos. This allows you to identify infertile or non-viable eggs and remove them.
- The transparent lid provides a 360° view, allowing observation without disturbing the internal environment.
5.5 Incubation Stages (One Machine Three Uses)
The incubator supports three main stages:

Figure 7: Incubation Stages. This image outlines the three primary functions of the incubator: incubation, hatching, and initial chick care.
- Incubation: The primary stage where fertilized eggs are kept under controlled temperature and humidity. Ensure eggs are fresh.
- Broken Shell Out (Hatching): In the last 3 days of the incubation cycle, remove the eggs from the roller trays and place them on the provided hatching net (if applicable). Disconnect the motor connecting the rollers to stop automatic turning. Increase humidity during this period.
- Feeding (Initial Chick Care): After chicks hatch, they can remain in the machine to stay warm until they are dry. It is recommended to move them to a specialized brooder for long-term care.
6. Maintenance
6.1 Cleaning
- Always unplug the incubator before cleaning.
- Wipe down all surfaces with a damp cloth and a mild disinfectant solution.
- Clean egg trays and water channels thoroughly after each hatch.
- Ensure all components are completely dry before reassembling or storing.
6.2 Storage
- Store the incubator in a clean, dry place, away from direct sunlight and extreme temperatures.
- Keep the original packaging for safe storage if possible.
7. Troubleshooting
This section addresses common issues you might encounter. For problems not listed here, please contact customer support.
| Problem | Possible Cause | Solution |
|---|---|---|
| Incubator not powering on | Power cord disconnected; no power from outlet; fuse blown. | Check power cord connection; test outlet with another device; check incubator fuse (if accessible, refer to service manual). |
| Temperature fluctuations | Room temperature unstable; incubator lid not sealed properly; faulty temperature probe. | Ensure incubator is in a stable environment; check lid for proper closure; contact support if probe is suspected faulty. |
| Humidity too low | Insufficient water in external bottles; water channels blocked; dry environment. | Refill water bottles; check and clear water channels; consider increasing ambient humidity if necessary. |
| Humidity too high | Too many water bottles connected; overly humid environment. | Reduce the number of connected water bottles; ensure adequate ventilation in the room. |
| Eggs not turning automatically | Motor disconnected; mechanism jammed; power issue to turning motor. | Check motor connection; ensure no obstructions in the turning mechanism; verify power supply. |
| Poor hatching rate | Infertile eggs; incorrect temperature/humidity; improper egg handling; old eggs. | Use fresh, fertile eggs; verify temperature and humidity settings; ensure proper egg turning; candle eggs to remove non-viable ones. |
8. Specifications
| Feature | Detail |
|---|---|
| Model | 256-Egg Incubator |
| Capacity | Up to 256 eggs (depending on size) |
| Voltage | AC110V / DC12V |
| Operation | Digital display button |
| Item Weight | 15.4 pounds (approx. 7 kg) |
| Package Dimensions | 3.94 x 3.94 x 3.94 inches (approx. 10 x 10 x 10 cm) - Note: This package dimension seems incorrect for an incubator of this capacity. Please refer to actual product packaging for accurate dimensions. |
| Manufacturer | ZXSYYDS |
9. Customer Support
If you have any questions about the product, require technical assistance, or need to report an issue, please contact our customer support team. We aim to answer your inquiries within 24 hours.
Contact information is typically provided on the product packaging or purchase receipt.