
1. Introduction
This manual provides essential information for the safe and efficient operation, maintenance, and troubleshooting of your HASWING Protruar 3.0 Electric Trolling Motor. Designed with a robust 12V brushless motor, this motor delivers an impressive thrust of 110 pounds, making it suitable for various boats and water conditions. It features stepless speed control, a magnetic emergency kill switch, adjustable height, and an LED voltage status indicator. Please read this manual thoroughly before using the product.
2. Safety Information
Always prioritize safety when operating any marine equipment. Failure to follow these instructions may result in injury or damage to the product.
- Read and understand all instructions before operation.
- Ensure the motor is securely mounted to the transom before connecting power.
- Always wear a personal flotation device (PFD) when on the water.
- Keep hands, feet, and clothing clear of the propeller at all times, especially when the motor is running.
- Connect the magnetic emergency kill switch lanyard to yourself or the boat to ensure immediate motor shutdown in case of an accidental fall overboard.
- Do not operate the motor if the propeller is damaged or obstructed.
- Ensure proper ventilation when charging batteries.
- Disconnect the battery before performing any maintenance or adjustments.
- Avoid operating the motor in extremely shallow water where the propeller may strike the bottom.
- This motor is designed for 12V DC power. Do not connect to other voltage sources.
3. Product Overview
3.1 Key Features
- Powerful Thrust: 110 lbs thrust for excellent power in various water conditions.
- Durable Brushless Motor: Reliable 12V brushless motor for enhanced efficiency and longevity.
- Adjustable Stepless Speed Control: Fine-tune your pace seamlessly for precise control.
- Safety Features: Equipped with a magnetic emergency kill switch for quick action.
- Customizable Height & Tilt: Easily tilts and height adjusts for different water depths (7 levels of tilting position).
- LED Voltage Indicator: Helps monitor battery life for effective journey planning.
- Foldable Handle: Trolling handle has folding functions with a 400mm extension and 180° folding angle.
3.2 Components Diagram

Figure 3.2.1: Main components of the HASWING Protruar Trolling Motor.
- Magnetic Kill Switch
- Battery Meter
- Stepless Speed Control Extendable Handle
- Foldable Handle
- Level Lock Bracket
- Sacrificial Anode
3.3 Product Views

Figure 3.3.1: Front view of the HASWING Protruar Trolling Motor.

Figure 3.3.2: HASWING Protruar Trolling Motor mounted on a boat transom.
4. Setup
- Mounting the Motor:
The Protruar motor is designed for transom mounting. Securely attach the motor's mounting bracket to the boat's transom using the integrated clamps. Ensure the clamps are tightened firmly to prevent movement during operation. Verify the motor shaft is vertical and the propeller is clear of any obstructions.
- Battery Connection:
Connect the motor's power cables directly to a 12V deep cycle marine battery. Ensure the positive (+) cable (red) is connected to the positive terminal of the battery and the negative (-) cable (black) to the negative terminal. Secure all connections to prevent corrosion and ensure good electrical contact. Warning: Incorrect polarity can damage the motor.
- Magnetic Kill Switch:
Insert the magnetic kill switch into its designated slot on the motor head. Attach the lanyard to your wrist or a secure point on the boat. This safety feature will immediately cut power to the motor if the magnet is dislodged.
5. Operating Instructions
- Power On:
Once the motor is mounted and connected to the battery with the kill switch in place, the motor is ready for operation. The LED voltage indicator will illuminate, showing the current battery level.
- Adjusting Speed (Stepless Speed Control):
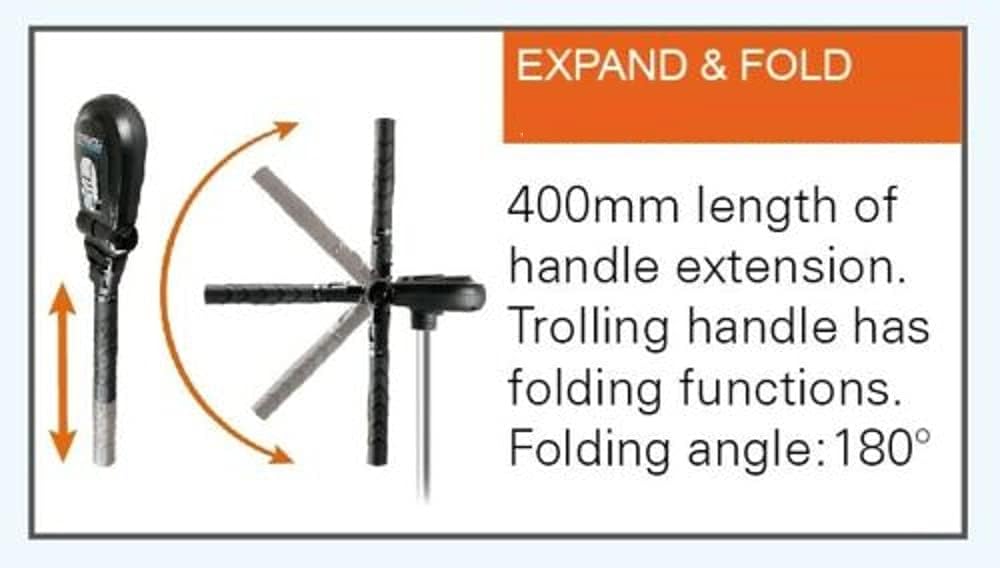
Figure 5.1: Stepless speed control on the motor handle.
The motor features stepless speed control for both forward and reverse. Rotate the handle grip to increase or decrease speed. The digital technology allows for precise adjustments to match your desired pace and water conditions.
- Tilting and Depth Adjustment:

Figure 5.2: Tilting mechanism of the motor.
To adjust the motor's depth, loosen the level lock bracket and slide the shaft up or down. Tighten the bracket firmly once the desired depth is achieved. The motor also offers 7 levels of tilting positions. Use the tilt mechanism to raise the motor out of the water when not in use or when navigating shallow areas.
- Monitoring Battery Life (LED Indicator):
Figure 5.3: Power display on the motor head (part of the main diagram).
The motor head features an LED voltage status indicator that displays 3 levels of battery power. Monitor this indicator regularly to plan your trips and avoid unexpected power loss. Recharge your battery when the indicator shows low power.
- Folding the Handle:
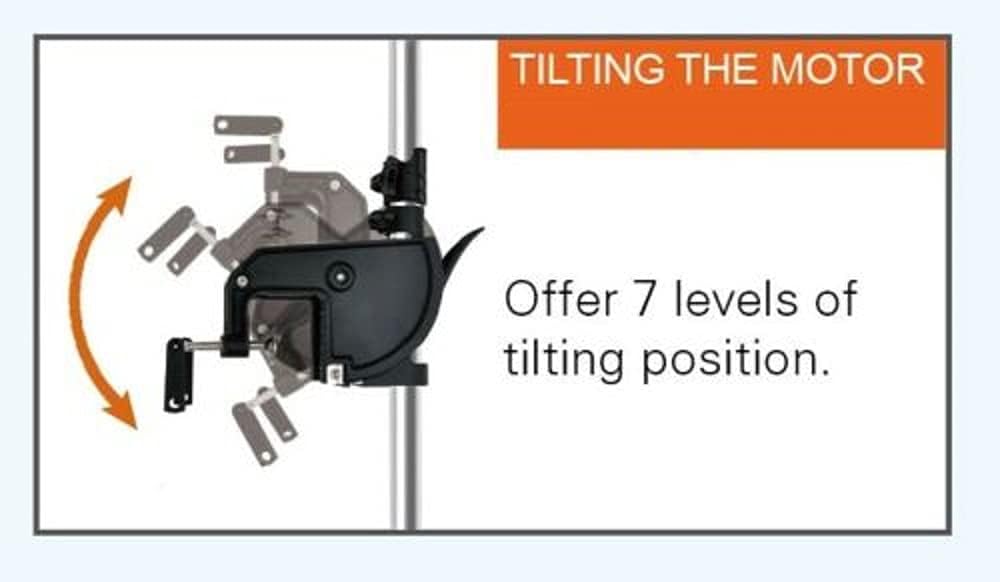
Figure 5.4: Foldable and extendable handle.
The trolling handle can be extended by 400mm and features a folding function with a 180° folding angle for convenient storage and transport. Adjust the handle as needed for comfortable operation.
6. Maintenance
Regular maintenance ensures the longevity and optimal performance of your trolling motor.
- After Each Use:
- Rinse the motor thoroughly with fresh water, especially after saltwater use, to prevent corrosion.
- Wipe down all surfaces with a clean, dry cloth.
- Inspect the propeller for any fishing line, weeds, or debris. Remove any obstructions carefully.
- Check all electrical connections for tightness and signs of corrosion. Clean if necessary.
- Periodically:
- Inspect the propeller for nicks, cracks, or bends. Replace if damaged.
- Check the sacrificial anode (located near the propeller) for wear. Replace if significantly corroded to protect the motor from galvanic corrosion.
- Lubricate moving parts of the mounting bracket and tilt mechanism with a marine-grade lubricant.
- Ensure battery terminals are clean and free of corrosion. Apply a thin layer of dielectric grease to prevent future corrosion.
- Storage:
When storing the motor for extended periods, ensure it is clean and dry. Store in a cool, dry place. Disconnect the battery and ensure it is fully charged before storage, and periodically check its charge during storage.
7. Troubleshooting
| Problem | Possible Cause | Solution |
|---|---|---|
| Motor does not run. |
|
|
| Motor runs slowly or with reduced thrust. |
|
|
| Excessive vibration or noise. |
|
|
| Battery indicator shows incorrect reading. |
|
|
If the problem persists after attempting these solutions, please contact qualified service personnel or the manufacturer for assistance.
8. Specifications
| Model: | PROTRUAR 50756 12V-3HP |
| Brand: | HASWING (MTLAKEMOTOR) |
| Engine Type: | Electric, Brushless |
| Voltage: | 12 Volts |
| Maximum Horsepower: | 3 HP |
| Thrust: | 110 lbs |
| Shaft Length: | 39.4 inches (1000mm) |
| Mounting Type: | Transom Mount |
| Recommended Uses: | Freshwater, Saltwater |
| Control: | Stepless Speed Control |
| Handle Features: | Extendable (400mm), Foldable (180° angle) |
| Safety Features: | Magnetic Emergency Kill Switch |
9. Warranty and Support
For specific warranty terms and conditions, please refer to the warranty card included with your product or visit the official HASWING (MTLAKEMOTOR) website. For technical support, service, or parts inquiries, please contact the manufacturer or your authorized dealer directly.
Manufacturer: Haswing