1. Introduction
This manual provides detailed instructions for the proper setup, operation, and maintenance of your McKesson Refrigerator and Freezer Thermometer with Alarm, Dual-Probe. This device is designed for accurate temperature monitoring in cold storage environments, featuring dual probes, a digital display, and customizable high/low temperature alarms. Please read this manual thoroughly before use to ensure optimal performance and longevity of the product.
2. Product Overview
The McKesson Dual-Probe Thermometer is a reliable instrument for monitoring temperatures in refrigerators and freezers. It offers precise readings and alerts to help maintain optimal conditions for stored items.
Key Features:
- Dual-Probe Measurement: Allows simultaneous monitoring of two distinct locations.
- Waterproof Digital Display: Clear and easy-to-read display with a 10-second refresh rate.
- High Accuracy: Provides readings with an accuracy of ±0.5°C and a 0.1° display resolution.
- Max/Min Temperature Alarm: Audible and visual alarms activate when temperatures exceed or fall below user-defined thresholds.
- NIST Traceable: Each thermometer is certified, sterilized, traceable, and tested against standards calibrated at the National Institute of Standards and Technology.
- Wide Temperature Range: Measures temperatures from -58°F to +158°F (-50°C to +70°C).
What's in the Box:
- McKesson Refrigerator/Freezer Thermometer Unit
- Two Temperature Probes (S1 and S2)
- Batteries (typically AAA, included)

This image displays the McKesson Dual-Probe Refrigerator and Freezer Thermometer alongside its retail packaging. The thermometer features a digital display and two external probes.
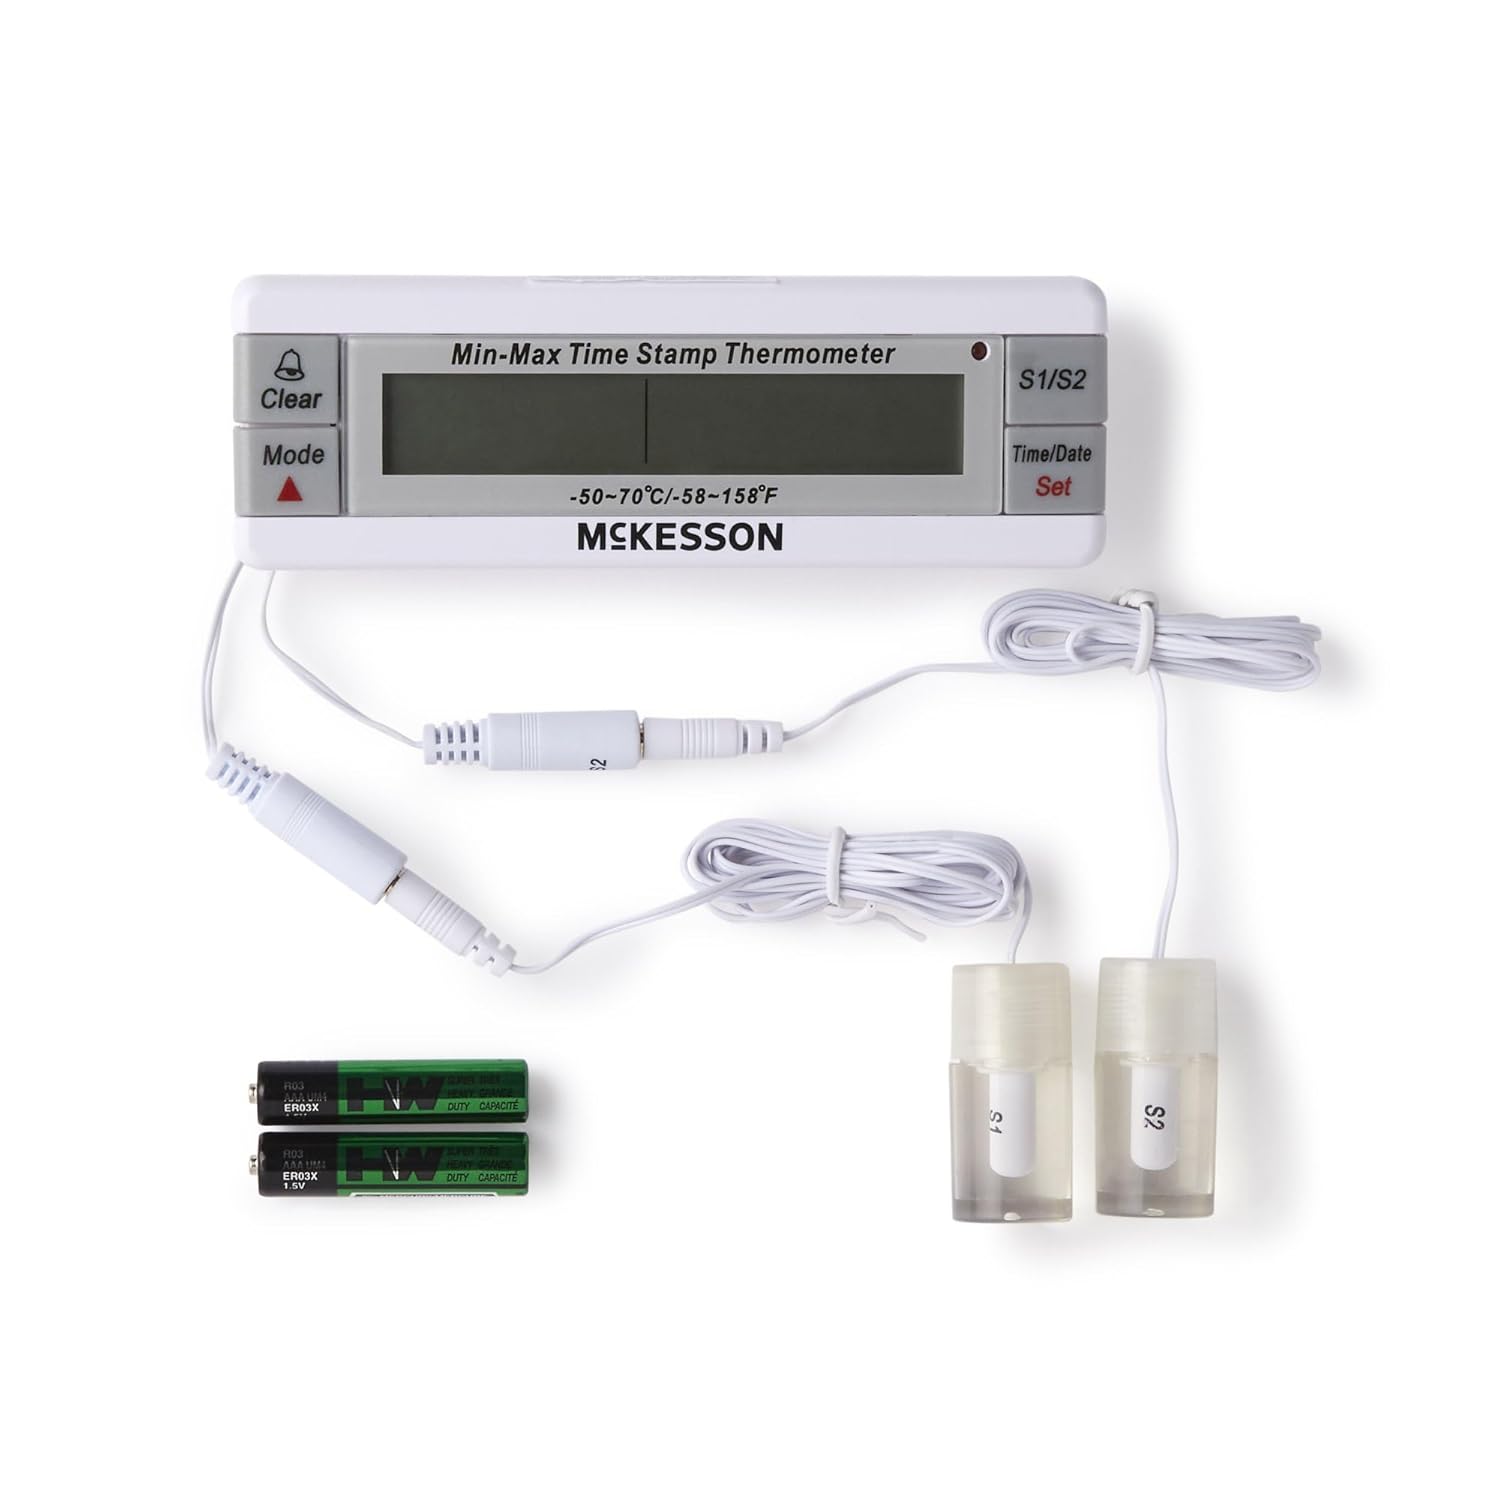
An overhead view showing the main thermometer unit, two wired temperature probes (S1 and S2), and two AAA batteries, illustrating all included components.
3. Setup
3.1 Battery Installation
- Locate the battery compartment on the back of the thermometer unit.
- Open the compartment cover.
- Insert the included AAA batteries, ensuring correct polarity (+/-).
- Close the battery compartment cover securely.
3.2 Probe Connection and Placement
- Connect the two temperature probes (S1 and S2) into their respective ports on the thermometer unit.
- Place Probe S1 in the desired location for monitoring (e.g., refrigerator compartment).
- Place Probe S2 in the second desired location (e.g., freezer compartment). Ensure probes are not submerged in liquid unless specifically designed for it and are positioned to accurately reflect the ambient temperature of the monitored area.
- The main unit can be placed outside the refrigerator/freezer for easy viewing, using its built-in stand or magnetic back (if applicable).
A close-up shot of the two distinct temperature probes, labeled S1 and S2, designed for monitoring temperatures in different environments.
4. Operating Instructions
4.1 Power On/Off
The thermometer typically powers on automatically once batteries are installed. There may be a dedicated power button or it may remain on continuously.
4.2 Reading the Display
The digital display shows the current temperature readings for both probes (S1 and S2). It may also show the time and date, and indicators for Max/Min temperatures or alarm status.

A detailed view of the thermometer's digital screen, indicating a current temperature reading of 21.3°C and a time display of 15:36. The S1/S2 indicators and control buttons are also visible.
4.3 Switching Temperature Units (°C/°F)
Press the 'Mode' button (or a dedicated °C/°F button if present) to toggle between Celsius and Fahrenheit temperature units.
4.4 Setting Max/Min Alarms
- Press the 'Set' button to enter alarm setting mode.
- Use the 'Up' or 'Down' arrow buttons (or 'Mode' button to cycle) to adjust the desired high temperature limit for Probe S1.
- Press 'Set' again to confirm and move to the low temperature limit for Probe S1. Adjust as needed.
- Repeat the process for Probe S2's high and low temperature limits.
- Press 'Set' one last time to exit alarm setting mode.
- When the temperature goes above or below these set limits, an audible and visual alarm will trigger.
4.5 Viewing and Clearing Max/Min Recorded Temperatures
- Press the 'Mode' button repeatedly to cycle through current temperature, maximum recorded temperature, and minimum recorded temperature for each probe.
- To clear the recorded Max/Min temperatures, press and hold the 'Clear' button while viewing the Max or Min readings. This will reset them to the current temperature.
4.6 Setting Time and Date
Press and hold the 'Time/Date Set' button to enter time and date setting mode. Use the 'Up' or 'Down' arrow buttons to adjust values and 'Set' to confirm and move to the next setting (e.g., hour, minute, day, month, year).

The thermometer unit is shown on a wooden countertop, displaying a temperature of 24.0°C and a time of 12:10:05. Its two probes are positioned next to it, ready for temperature monitoring.
5. Maintenance
5.1 Cleaning
Wipe the thermometer unit and probes with a soft, damp cloth. Do not use abrasive cleaners or immerse the main unit in water. The probes are waterproof and can be cleaned with mild soap and water if necessary, then rinsed thoroughly.
5.2 Battery Replacement
When the display becomes dim or the unit stops functioning, replace the batteries. Follow the battery installation steps in Section 3.1. Dispose of old batteries according to local regulations.
5.3 Storage
If storing the thermometer for an extended period, remove the batteries to prevent leakage. Store the unit and probes in a cool, dry place away from direct sunlight and extreme temperatures.
6. Troubleshooting
| Problem | Possible Cause | Solution |
|---|---|---|
| No display or dim display | Dead or incorrectly installed batteries | Replace batteries, ensuring correct polarity. |
| Incorrect temperature readings | Probe not properly connected or damaged; probe placed incorrectly | Ensure probes are securely plugged in. Reposition probes to accurately measure ambient air. If problem persists, probe may be faulty. |
| Alarm not sounding/visualizing | Alarm limits not set correctly; alarm function disabled | Verify alarm settings (Section 4.4). Ensure alarm is enabled (if applicable). |
| Display shows 'LLL' or 'HHH' | Temperature is outside the measurable range | Move the probe to an environment within the specified temperature range (-58°F to +158°F). |
7. Specifications
| Feature | Specification |
|---|---|
| Model Number | MCK8100MATB |
| Temperature Range | -58°F to +158°F (-50°C to +70°C) |
| Accuracy | ±0.5°C |
| Display Resolution | 0.1° |
| Refresh Rate | 10 seconds |
| Probe Type | Dual, Waterproof |
| Product Dimensions | 8.25 x 5 x 2.5 inches |
| Item Weight | 7.2 ounces |
8. Warranty and Support
For general questions or technical support regarding your McKesson Refrigerator and Freezer Thermometer, please refer to the contact information provided on the product packaging or the official McKesson website.
- General Questions: Call 1-800-777-4908
- Technical Support: Call 1-777-300-9100
Please retain your purchase receipt for warranty purposes. Specific warranty details may vary and are typically outlined in the product packaging or on the manufacturer's website.


