
Mount-It! MI-384L
Mount-It! Fireplace Mantel TV Wall Mount MI-384L Instruction Manual
Model: MI-384L
For 65" - 85" TVs, 75-110 Lbs
Important Safety Information
Please read this entire manual before installation and assembly. If you have any questions regarding any of the instructions or warnings, please contact your local distributor for assistance.
- This wall mount requires solid concrete or wood studs for installation. It is not suitable for stone or marble surfaces.
- Maximum allowable mantle depth is 16".
- When fully raised, the mount arm may be as high as 37" over the top of the mantle. Ensure adequate vertical distance is available between the mantle and the ceiling, especially for larger size TVs.
- For smaller TVs and TVs with lower VESA mounting holes, a portion of the wall mount might be visible under the TV when the TV is raised.
- This is not a low profile TV mount due to its extensive height adjustment and extension capabilities. The TV mount sits a minimum of 5.7" away from the wall.
- Gas spring tension adjustment may be required for heavier or lighter TVs.
- The temperature at the front of the fireplace mantle must never exceed 100°F (38°C). Use an infrared thermometer to check the temperature while the fire is lit.
- If mounting to wood studs, the studs must be spaced no more than 24 inches apart and symmetrically positioned for even installation.
- The drywall must be no more than 5/8 inch thick.
- The distance from the mantle of the fireplace to the wall must be less than 12 inches.
- This mount is designed for TVs weighing between 75 lbs and 110 lbs. If your TV weighs less than 75 lbs, the arm may not fully lower under the weight of the TV.
Product Overview
The Mount-It! MI-384L is a height-adjustable pull-down TV wall mount specifically designed for mounting large televisions over a fireplace mantel. It offers dynamic gas spring height adjustment, full motion capabilities, and universal compatibility for a comfortable viewing experience.
Key Features:
- Height Adjustable: Offers 29 inches of total height adjustment, allowing the TV to be pulled down to a comfortable viewing height.
- Dynamic Gas Spring Assist: Advanced gas spring mechanism assists in lifting and lowering the TV with fluid, tool-less adjustment using a cushioned handle. Spring tension is adjustable to suit TV weight.
- Full Motion Capabilities: Includes a tilt range between +10 and -5 degrees, and a +/-30 degree swivel left and right for optimal viewing angles and glare reduction.
- Leveling Feature: Allows for micro-adjustments after installation for perfect horizontal alignment.
- Universal Fit: Compatible with TVs from 65 to 85 inches, weighing between 75 lbs and 110 lbs. Supports VESA patterns from 100x100 to 800x500.
- Cable Management: Integrated clips on the underside of the mount arm help prevent cables from hanging freely.
Video: Mount-It! MI-384L - Pull Down Fireplace TV Mount (Features). This video demonstrates the key features and functionality of the MI-384L mount, including its height adjustment, tilt, and swivel capabilities.
Pre-Installation Checklist
Before beginning installation, ensure the following conditions are met and you have the necessary tools and understanding:
- Wall Type: Confirm your wall is solid concrete or has wood studs. Do not install on stone or marble surfaces.
- Mantle Depth: Measure your mantle depth. It must be a maximum of 16 inches.
- Vertical Clearance: Ensure sufficient vertical space between the mantle and ceiling for your TV size, considering the mount arm can extend up to 37 inches above the mantle when raised.
- TV Weight: Your TV must weigh between 75 lbs and 110 lbs. If it's lighter, the gas spring may not allow the arm to fully lower.
- VESA Pattern: Verify your TV's VESA pattern is compatible (100x100, 200x200, 300x200, 300x300, 400x200, 400x300, 400x400, 600x500, 800x500).
- Mantle Temperature: With the fireplace lit, use an infrared thermometer to ensure the temperature at the front of the mantle does not exceed 100°F (38°C).
- Stud Spacing (for wood studs): If mounting to wood studs, ensure they are spaced no more than 24 inches apart and are symmetrically positioned.
- Drywall Thickness: Drywall must be no more than 5/8 inch thick.
- Mantle-to-Wall Distance: The distance from the mantle of the fireplace to the wall must be less than 12 inches.

Image: VESA compatibility and weight range. This diagram illustrates the compatible VESA patterns and the minimum/maximum weight capacity for the mount.

Image: Minimum TV size requirement. This image shows that the TV must be at least 35 inches tall to fully cover the mount when in the raised position.

Image: Wall clearance and mount extension. This image shows the minimum distance of the TV from the wall when in the up position (5.7") and the maximum extension when lowering (22.4").

Image: Vertical clearance calculation. This diagram provides a table and example for calculating the necessary vertical clearance above your mantle based on its depth and your TV's height.
Installation Guide
Follow these steps carefully for a secure installation. It is recommended to have two people for certain steps.
Video: Mount-It! MI-384L - Pull Down Fireplace TV Mount (Installation). This video provides a detailed visual guide for the complete installation process of the MI-384L mount.
Step-by-Step Installation:
- Determine Mounting Location:
- Use a tape measure to find the center point of your mantle. Mark this center line with a pencil.
- For wood studs installation, use a stud finder to locate studs and mark their edges. Ensure studs are symmetrically positioned and no more than 24 inches apart.
- For concrete/brick installation, ensure the wall is suitable.
- Prepare Wall Plate Template:
- Refer to the mantle depth chart (see Pre-Installation Checklist) to determine the correct height for the wall plate.
- Hold the template against the wall at the determined location. Use a bubble level to ensure it is straight.
- Tape the template securely to the wall. Mark the four corners and two middle points of the template.
- Drill Pilot Holes:
- Remove the template.
- For wood studs: Drill four pilot holes using a 3/16-inch drill bit to a depth of 2.7 inches. Ensure you drill into the center of the wood stud.
- For concrete/brick: Drill six pilot holes using a 3/8-inch masonry drill bit to a depth of 2.7 inches. Clear any dust and debris, then insert the six provided concrete anchors.
- Connect Spring Arm to Wall Plate:
- Connect the spring arm to the wall plate using the provided bolts (C3).
- Optionally, position the spring arm left or right on the wall plate by sliding it to the required location.
- Mount Assembled Arm to Wall:
- Install the assembled arm to the wall using the provided lag screws (H) and washers. For concrete/brick, ensure concrete anchors (I) are in place before securing with lag screws and washers.
- This step is recommended for two people.
- Hang the VESA Plate:
- Hang the VESA plate (BB) onto the end of the spring arm.
- Secure the VESA plate to the end of the spring arm using the provided washers (C1) and nuts (C5) on the two lower bolts protruding through the end of the spring arm.
- Attach VESA Arms to TV:
- Lay your TV face down on a soft, clean surface.
- Select the appropriate size mounting hardware (bolts) for your TV's VESA mounting holes.
- Attach the VESA arms to the back of your TV using the selected bolts. Tighten until secure, but do not overtighten.
- Assemble and Attach Crossbar (Optional Soundbar):
- Assemble the crossbar by attaching the crossbar latches over the bar and securing them together using bolts (C4) and nuts.
- If no soundbar: Attach the crossbar to the VESA arms at a height close to the bottom of the TV without being visible, using bolts (C6).
- If using a soundbar: Attach the soundbar to the crossbar using bolts (C4) or other bolts as identified by your soundbar's manual. Secure the crossbar to the VESA arms so it is below the bottom of the screen, using bolts (C6).
- Hang TV on Mount Arm:
- Lower the mount arm by pulling it down until it is perpendicular to the wall. Insert the arm lock pin (K) through the holes to lock the arm in the lowered position for easier access.
- Carefully lift the TV (with VESA arms and crossbar attached) and hang it onto the horizontal supports of the mount arm. Ensure all four points of contact are fully seated in their hooks. This step is recommended for two people.
- Install Safety Brackets:
- Install the safety brackets (HH) using the provided bolts (F) in all four locations as shown in the manual.

Image: Movable for TV centering. This diagram illustrates how the mount can slide horizontally on 16" or 24" wood studs to adjust for off-center mounting.
Operation
The Mount-It! MI-384L offers flexible viewing options:
Height Adjustment:
- To lower the TV: Gently pull down on the cushioned handle. The gas spring mechanism will assist in smooth movement.
- To raise the TV: Push the TV upwards using the cushioned handle. The gas spring will assist in lifting.

Image: TV lowered for comfortable viewing. This image shows the TV pulled down from above the fireplace to a comfortable eye-level viewing position.
Tilt and Swivel Adjustment:
- Tilt: Loosen the adjustment handle on the upper back sides of the VESA plate. Adjust to the desired tilt angle (+10° to -5°) to reduce glare, then tighten the handle back down.
- Swivel: The mount allows for a +/-30° swivel left and right. Gently push the TV to the desired angle.
- Leveling: The screen level can be adjusted ±5° by loosening the nuts on the lower back of the VESA plate. Adjust to the desired level and tighten the nuts back down.
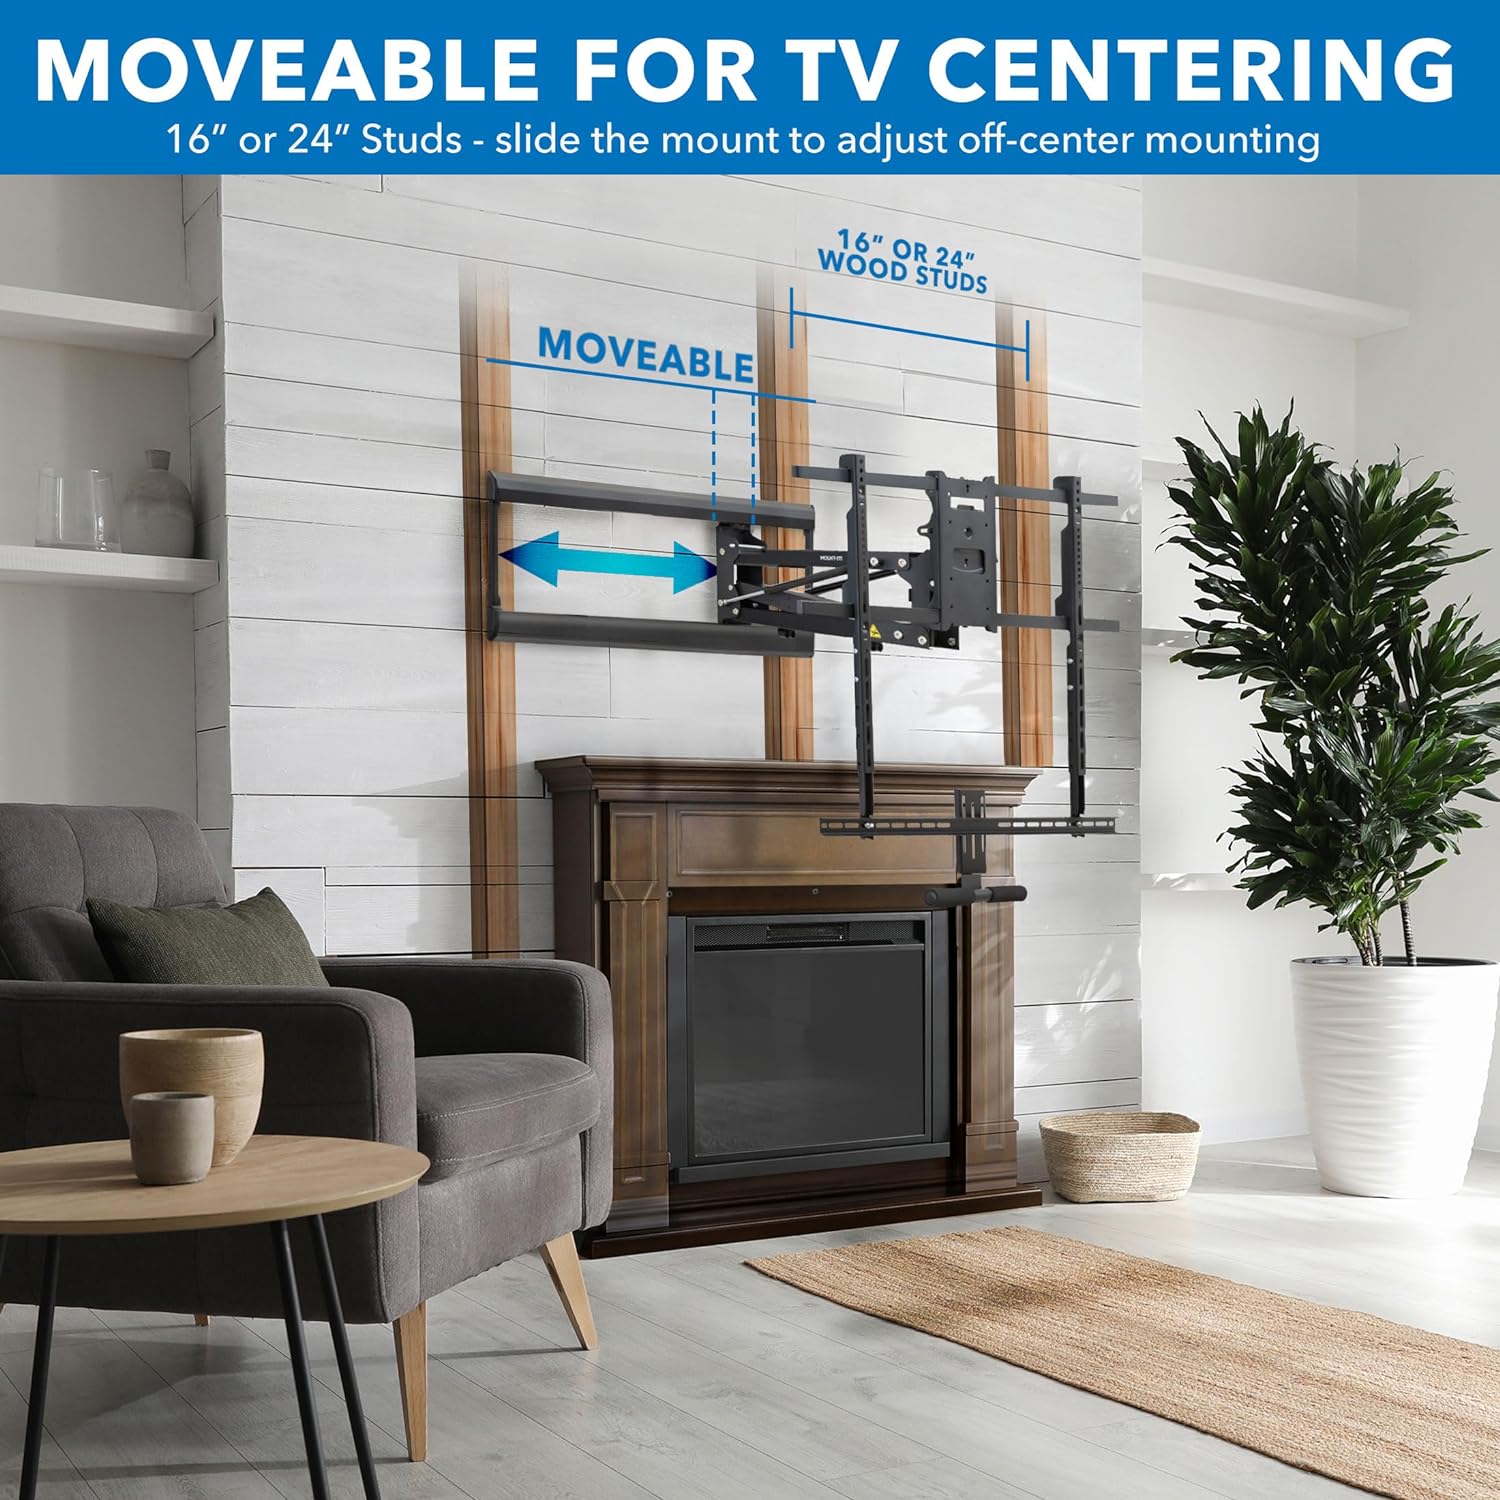
Image: Full motion mount features. This graphic illustrates the swivel, leveling, and tilt adjustments available with the mount.
Maintenance
Regular maintenance ensures the longevity and safe operation of your Mount-It! TV mount:
- Check Connections: Periodically check that all screws and connections are tight and secure. Re-tighten if necessary.
- Clean Surfaces: Wipe down the mount with a soft, dry cloth to remove dust. Avoid abrasive cleaners.
- Inspect Moving Parts: Ensure the gas spring mechanism and articulating arms move smoothly. If any stiffness or unusual noise is observed, contact customer support.
- Cable Management: Ensure cables are properly routed through the cable management clips and have enough slack to accommodate the full range of motion.
Troubleshooting
If you encounter issues with your Mount-It! MI-384L, refer to the following common solutions:
- TV does not stay in lowered position or raises on its own: This indicates the gas spring tension is too high for your TV's weight. Turn the adjustment bolt toward the "-" symbol to decrease tension until the arm stops at the desired position.
- TV does not lower easily or stays too low: This indicates the gas spring tension is too low for your TV's weight. Turn the adjustment bolt toward the "+" symbol to increase tension until the arm stops at the desired position.
- TV is not level: Loosen the nuts on the lower back of the VESA plate, adjust the screen to the desired level, and then tighten the nuts back down.
- Mount feels unstable: Double-check all wall mounting screws and TV attachment bolts to ensure they are securely tightened. Verify that the mount is installed on appropriate wall studs or concrete as per instructions.
Specifications
| Feature | Detail |
|---|---|
| Brand | Mount-It! |
| Model Number | MI-384L |
| Compatible TV Sizes | 65" - 85" |
| Weight Capacity | Min. 75 lbs, Max. 110 lbs |
| VESA Compatibility | 100x100, 200x200, 300x200, 300x300, 400x200, 400x300, 400x400, 600x500, 800x500 |
| Height Adjustment | 29 inches (Gas Spring Assisted) |
| Tilt Range | +10° to -5° |
| Swivel Range | +/-30° |
| Leveling Adjustment | +/-5° |
| Distance from Wall (Min) | 5.7 inches |
| Material | Alloy Steel |
| Color | Black |
| Item Weight | 38.1 pounds |
| Product Dimensions | 36 x 15.5 x 6.5 inches |
Warranty and Support
This Mount-It! Pull Down TV Mount over Fireplace comes with a LIFETIME warranty.
Our knowledgeable and responsive US-based customer support team is available to answer any questions you may have during standard business hours. For assistance, please visit the Mount-It! website or refer to the contact information provided with your product packaging.
Related documentsMI-384L


Ask a question about this manual
Ask about setup, troubleshooting, compatibility, parts, safety, or missing instructions. Manuals+ will review the question and use this page’s manual context to help answer it.