PALBY'S B0CYG7RCLR
User Manual
PALBY'S 36V Electric Dirt Bike Motorcycle
Model: B0CYG7RCLR
Important Safety Information
Read this manual thoroughly before operating the PALBY'S 36V Electric Dirt Bike Motorcycle. Failure to follow instructions can result in serious injury or property damage. Always wear appropriate safety gear, including a helmet, knee pads, and elbow pads. Supervise young riders at all times. Do not operate near roads, water, or steep inclines. This product is intended for off-road use only.
- Always wear a helmet and other protective gear.
- Ensure all bolts and fasteners are secure before each ride.
- Do not exceed the maximum load capacity of 175 lbs (80 kg).
- Keep hands and feet away from moving parts.
- Charge the battery only with the provided charger.
- Do not modify the electrical system or motor.
Product Overview
The PALBY'S 36V Electric Dirt Bike Motorcycle is designed for off-road adventures, offering a thrilling and safe riding experience for teens. It features a robust motor, durable construction, and user-friendly controls.

Figure 1: Overview of the PALBY'S 36V Electric Dirt Bike Motorcycle in blue.
Key Features:
- Powerful Motor: Equipped with a 500W Brushed Motor (Blue model) for enhanced performance.
- High-Capacity Battery: 36V 7AH rechargeable battery system.
- Speed: Maximum speed of 15.5 MPH (25 KM/H).
- Comfortable Ride: Features a leather seat, high-quality pneumatic tires, and front & rear metal spring suspensions for shock absorption.
- Visibility: Integrated bright LED Headlight.
- User-Friendly Controls: Easy acceleration via twist throttle and responsive disc brakes.
- Load Capacity: Supports a maximum load of 175 lbs (80 kg).
Package Contents
Upon opening the package, ensure all components are present and undamaged. If any parts are missing or damaged, contact customer support immediately.
- PALBY'S 36V Electric Dirt Bike Motorcycle (main frame, wheels, handlebars, seat)
- Battery Pack (pre-installed or separate)
- Battery Charger
- Assembly Tools (if required)
- User Manual (this document)
Setup and Assembly
Follow these steps carefully to assemble your dirt bike. It is recommended to have two adults for assembly.
- Unpacking: Carefully remove all components from the packaging. Lay them out on a clean, flat surface.
- Handlebar Installation: Attach the handlebars to the steering column. Ensure they are centered and tightened securely using the provided bolts.
- Front Wheel Installation (if separate): If the front wheel is not pre-installed, attach it to the front fork, ensuring the axle is properly aligned and secured with nuts. Verify disc brake alignment.
- Seat Installation: Secure the seat to the frame.
- Battery Connection: If the battery is not pre-connected, connect it according to the labels. Ensure a secure connection.
- Initial Charge: Before first use, fully charge the battery. Refer to the "Charging the Battery" section for details.
- Pre-Ride Inspection: Before every ride, check all bolts, nuts, and fasteners to ensure they are tight. Inspect tires for proper inflation and brakes for functionality.

Figure 2: Handlebar Controls. 1. Rear Brake, 2. Front Brake, 3. Throttle for Accelerate, 4. Power Switch, 5. Power Display, 6. Front Light Button.
Operating Instructions
Charging the Battery:
The battery should be fully charged before the first use and after each ride. A full charge provides approximately 30 minutes of continuous use.
- Locate the charging port on the dirt bike.
- Ensure the power switch is in the "OFF" position.
- Connect the charger to the charging port, then plug the charger into a standard wall outlet.
- The charger indicator light will typically show red during charging and turn green when fully charged.
- Do not overcharge the battery. Disconnect the charger once charging is complete.
Starting and Riding:
- Power On: Locate the power switch (refer to Figure 2) and turn it to the "ON" position. The power display will illuminate.
- Headlight: Press the Front Light Button (refer to Figure 2) to turn on the LED headlight for improved visibility.
- Acceleration: Gently twist the throttle on the right handlebar (refer to Figure 2) to accelerate. The bike has progressive throttle for smooth control.
- Braking: To slow down or stop, gently squeeze the brake levers on the handlebars (refer to Figure 2). The bike is equipped with disc brakes for effective stopping power.
- Stopping: To stop completely, release the throttle and apply the brakes. Turn the power switch to "OFF" when finished riding.

Figure 3: Key performance specifications including battery, speed, max load, and motor type.

Figure 4: Detailed features of the dirt bike, including the LED headlight, non-slip handles, adjustable speed control, durable EVA tires, and spring suspension system.
Maintenance
Regular maintenance ensures the longevity and safe operation of your dirt bike.
- Cleaning: Wipe down the bike with a damp cloth after each use. Do not use harsh chemicals or high-pressure water.
- Tire Pressure: Check tire pressure regularly. Ensure tires are inflated to the recommended PSI (usually found on the tire sidewall).
- Brakes: Periodically check brake pads for wear and adjust brake cables if necessary to ensure proper stopping power.
- Lubrication: Lubricate moving parts such as the chain and suspension joints as needed with appropriate lubricants.
- Fasteners: Regularly inspect all nuts, bolts, and screws for tightness. Tighten any loose fasteners.
- Battery Care: Store the bike and battery in a cool, dry place. If storing for extended periods, charge the battery every 30-60 days to maintain its health.
Troubleshooting
This section addresses common issues you might encounter. For problems not listed here, contact customer support.
| Problem | Possible Cause | Solution |
|---|---|---|
| Bike does not power on. | Battery is not charged or not connected. Power switch is off. | Ensure battery is fully charged and properly connected. Turn power switch to "ON". |
| Bike runs slowly or loses power quickly. | Low battery charge. Overload. | Recharge battery fully. Ensure rider weight is within the 175 lbs limit. |
| Brakes are not effective. | Brake pads worn. Brake cable loose. | Inspect brake pads and replace if worn. Adjust brake cable tension. |
| Unusual noises during operation. | Loose components. Lack of lubrication. | Check all fasteners for tightness. Lubricate chain and moving parts. |
Specifications
| Feature | Detail |
|---|---|
| Model | B0CYG7RCLR |
| Motor Type | 500W Brushed Motor (Blue model) |
| Battery | 36V 7AH Rechargeable |
| Max Speed | 15.5 MPH (25 KM/H) |
| Run Time | Up to 30 minutes (continuous use) |
| Max Load Capacity | 175 lbs (80 kg) |
| Recommended Age | 14+ years (Ideal for riders up to 5FT / 60" height) |
| Product Dimensions (L x W x H) | 49.2" x 24.8" x 32.4" |
| Item Weight | 80 pounds |
| Brakes | Disc Brakes |
| Tires | Air-Filled Pneumatic Tires |
| Suspension | Front & Rear Metal Spring Suspensions |
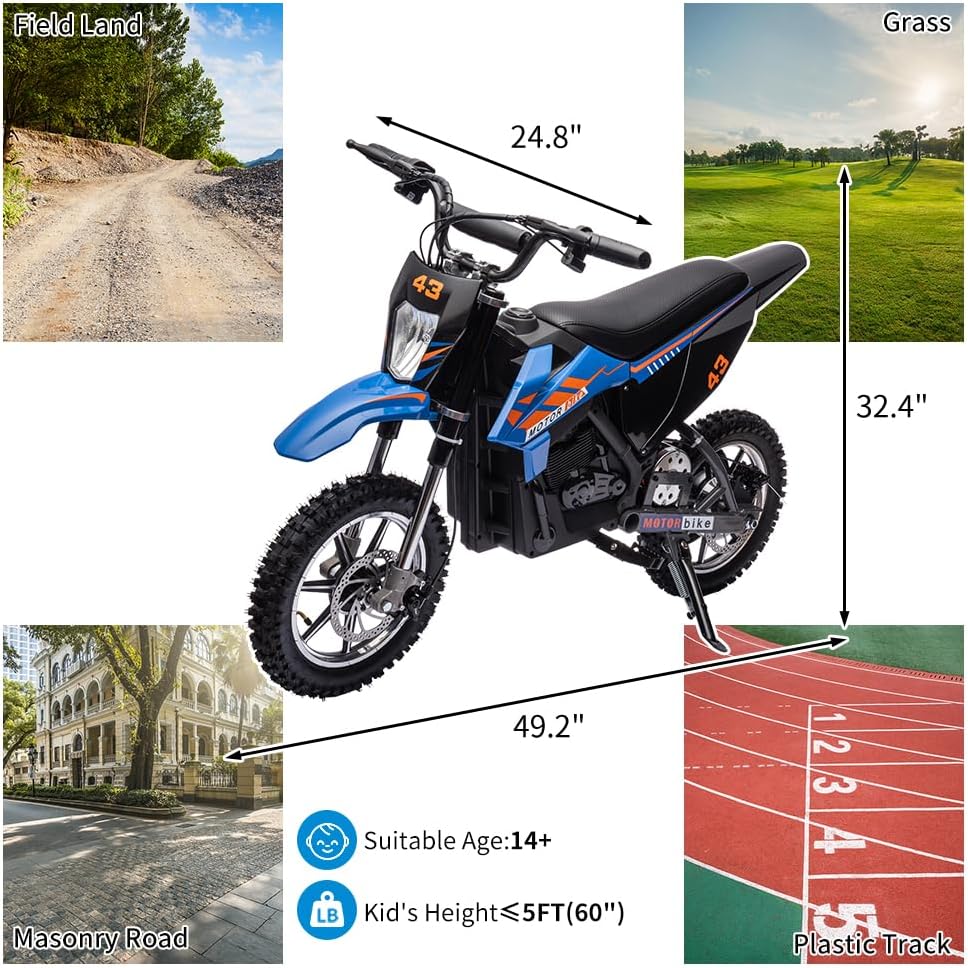
Figure 5: Product dimensions and suitability for different riding environments.
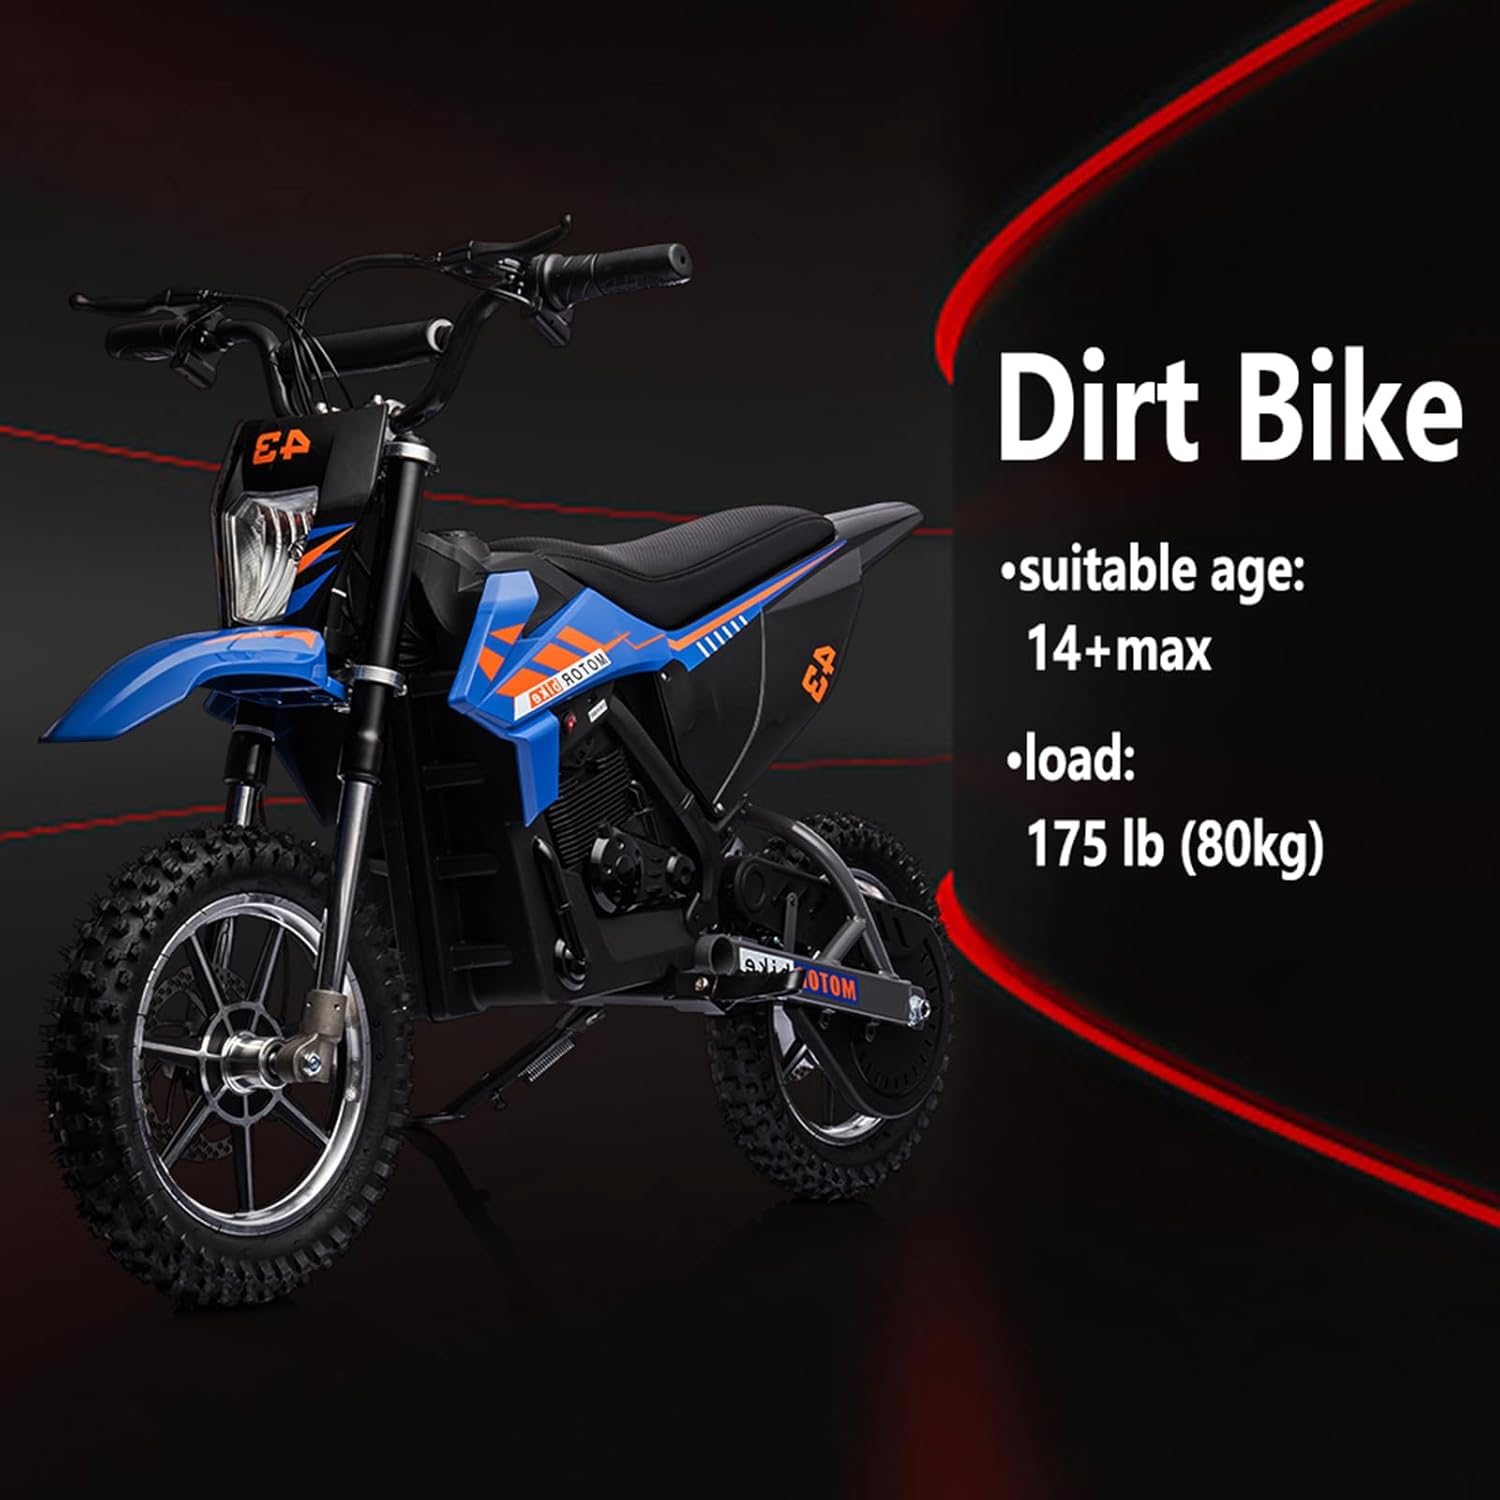
Figure 6: Summary of recommended age and maximum load capacity.
Warranty and Support
PALBY'S products are manufactured to high-quality standards. For warranty information or technical support, please contact our customer service team.
Please have your model number (B0CYG7RCLR) and purchase date ready when contacting support.
For customer support, please refer to the contact information provided with your purchase or visit the official PALBY'S website.
Related Documents - B0CYG7RCLR
 |
SX2068 12V Ride-On Tractor User Manual Comprehensive user manual for the SX2068 12V ride-on tractor, covering assembly, operation, safety, charging, maintenance, and troubleshooting for children. |
 |
Stone Mountain Bike Co. Bryce 500 Electric Bicycle Owner's Manual This owner's manual provides comprehensive information for the Stone Mountain Bike Co. Bryce 500 electric bicycle, covering its features, operation, maintenance, battery care, safety guidelines, and warranty details. |
 |
COSTWAY Kids Battery-Powered Ride-On Motorcycle TQ10106DE User Manual This user manual provides comprehensive instructions for the COSTWAY TQ10106DE Kids Battery-Powered Ride-On Motorcycle, covering safe assembly, operation, maintenance, and troubleshooting for an enjoyable and secure child experience. |
 |
SBS Brake Pads, Discs & Clutch Kits Catalog | High-Performance Motorcycle Components Explore the comprehensive SBS catalog featuring high-tech brake pads, discs, and clutch kits for motorcycles, scooters, ATVs, and UTVs. Find ECE R90 approved solutions for all riding styles. |
 |
Huffy 36V Electric Ride-On Motorcycle Owner's Manual Comprehensive owner's manual for the Huffy 36V Electric Ride-On Motorcycle, covering safety, assembly, operation, maintenance, and troubleshooting. Ensure safe use and proper care of your electric ride-on toy. |
 |
SBS Motorcycle Brake Components Catalog & Application Guide Comprehensive catalog from SBS Friction A/S featuring high-performance motorcycle brake pads, shoes, clutch kits, and brake discs. Find the right components for your motorcycle, scooter, ATV, or UTV using the online product selector at sbsbrakes.com. Featuring ECE R90 approved products made in Europe. |
Ask a question about this manual
Ask about setup, troubleshooting, compatibility, parts, safety, or missing instructions. Manuals+ will review the question and use this page’s manual context to help answer it.