1. Product Overview
The BLAVOR Solar Power Bank (Model PN-W12) is a versatile portable charger designed for outdoor enthusiasts and daily use. It features a large 20000mAh battery capacity, multiple charging options including built-in cables and solar charging, and additional functionalities such as a powerful LED flashlight and a thermometer. Its durable, waterproof, dustproof, and shockproof design ensures reliability in various environments.

Image: Front and back view of the BLAVOR Solar Power Bank, showcasing its rugged design and solar panel.
Package Contents:
- 1 x BLAVOR 20000mAh Solar Power Bank
- 1 x Carabiner
- 1 x USB-C Cable
- 1 x User Manual
2. Product Features
- Built-in 4 Cables & 7 Charging Ways: Includes 2 USB-C, 1 iOS, and 1 USB-A built-in cables, plus 4 charging ports (two-way USB-C, 2 USB-A, 1 iOS) for simultaneous charging of up to 7 devices.
- Large Battery Capacity & Fast Charging: 20000mAh capacity with 20W PD fast charging via USB-C, offering rapid power delivery.
- Apple Watch Charging: Dedicated wireless charging area for Apple Watch.
- Integrated Accessories: Features a camping light with 3 adjustable levels, a thermometer, and a carabiner.
- Durable & Outdoor-Ready: Constructed with flame-retardant ABS+PC shell, IPX5 waterproof, shockproof, and dustproof.
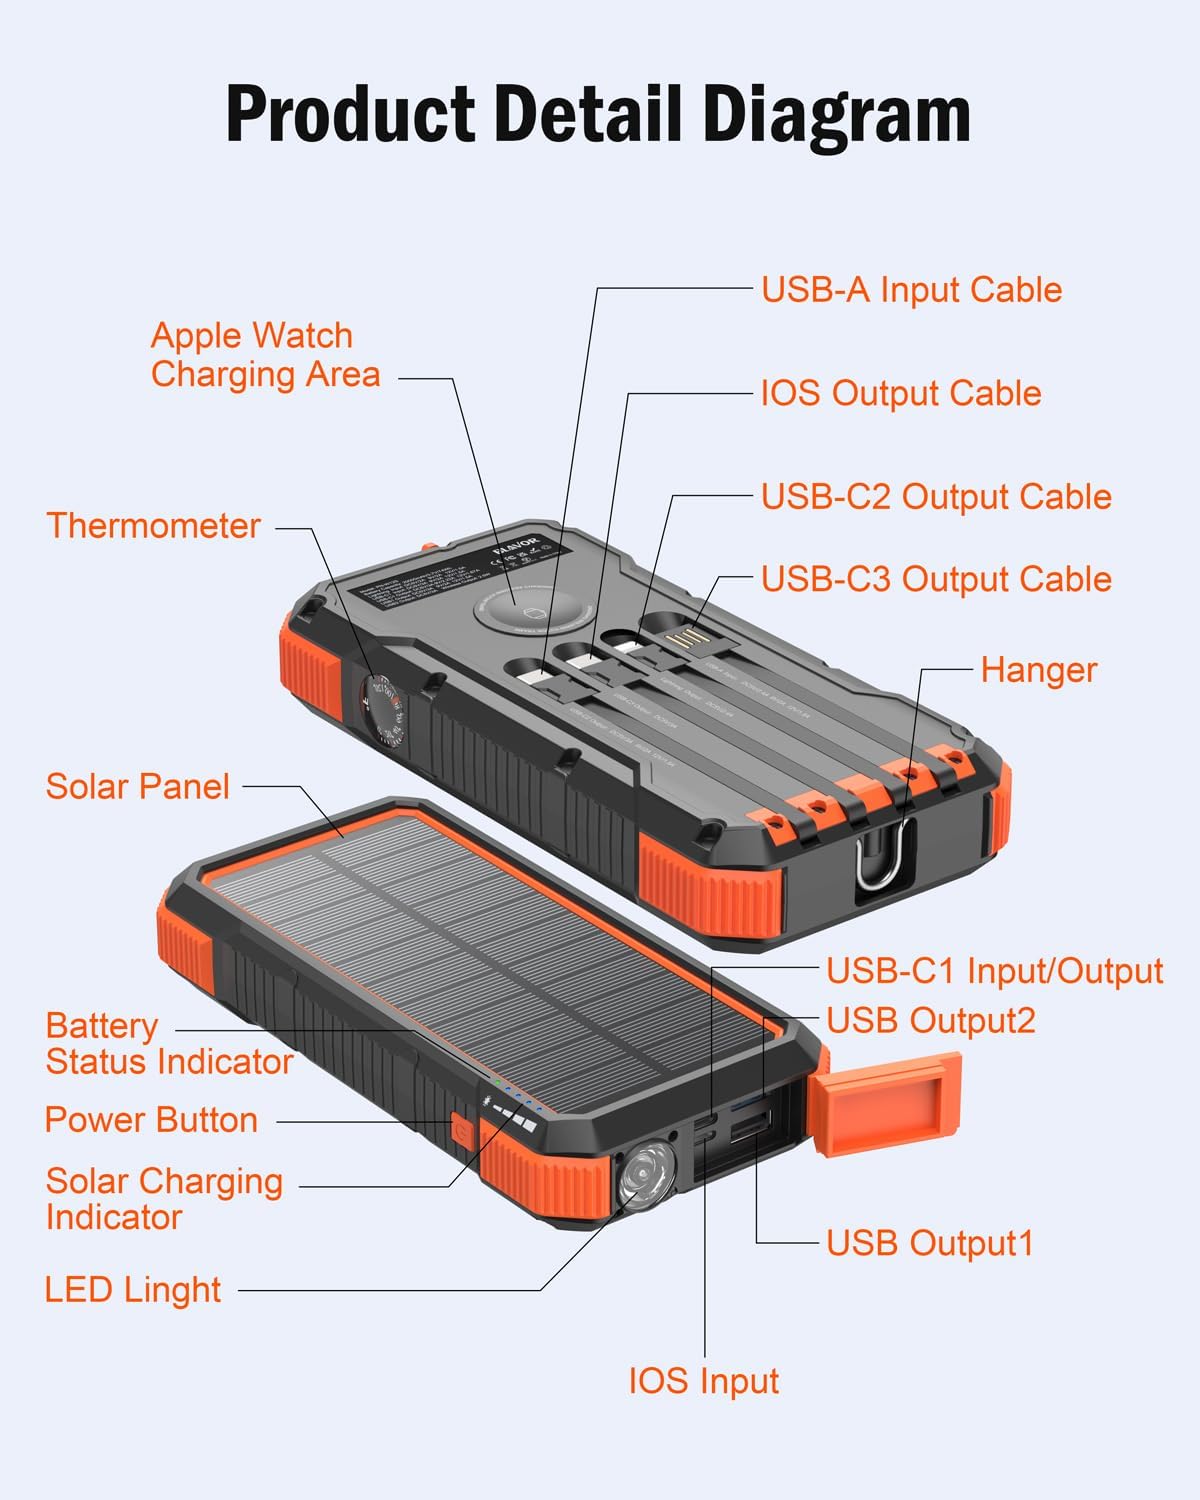
Image: Detailed diagram of the power bank, labeling components such as the Apple Watch Charging Area, Thermometer, Solar Panel, Battery Status Indicator, Power Button, Solar Charging Indicator, LED Light, USB-A Input Cable, iOS Output Cable, USB-C2 Output Cable, USB-C3 Output Cable, Hanger, USB-C1 Input/Output, USB Output2, USB Output1, and iOS Input.
3. Setup
Initial Charging:
Before first use, it is recommended to fully charge the power bank using a wall adapter via one of its input ports (USB-C, iOS, or USB-A cable input). This ensures the internal battery is calibrated and ready for optimal performance.

Image: Illustrates four recharging methods: Solar panel charging, iOS Input, USB-C Input, and USB-A cable Input.
Battery Status Indicator:
The power bank features LED indicators to show the current battery level. Refer to the product diagram for the exact location of these indicators. A full charge is indicated when all LEDs are solid.
4. Operating Instructions
4.1 Charging the Power Bank
The power bank can be recharged using four methods:
- Wall Charger (Recommended): Connect a USB-C, iOS, or USB-A cable to a compatible wall adapter and plug it into the respective input port on the power bank. This is the fastest charging method.
- Solar Charging: Place the power bank in direct sunlight. The solar panel will begin to charge the internal battery. Note that solar charging is primarily for emergency use and supplemental charging, and is significantly slower than wall charging.

Image: Depicts the four ways of recharging: USB-A Cable Input, iOS Input, USB-A Cable Input (again, likely a typo in original image, should be USB-C or another port), and Solar Panel charging. A note states: "Solar charging is only used as a backup charging method."
4.2 Charging External Devices
The power bank supports charging up to 7 devices simultaneously using its built-in cables and external ports.
- Using Built-in Cables:
- Locate the appropriate built-in cable (USB-C, iOS, or USB-A) and connect it directly to your device.
- Using USB Output Ports:
- Connect your device's charging cable to one of the available USB-A or USB-C output ports on the power bank.
- Wireless Charging for Apple Watch:
- Place your Apple Watch on the designated wireless charging area on the power bank. Ensure the watch is properly aligned for charging to begin.
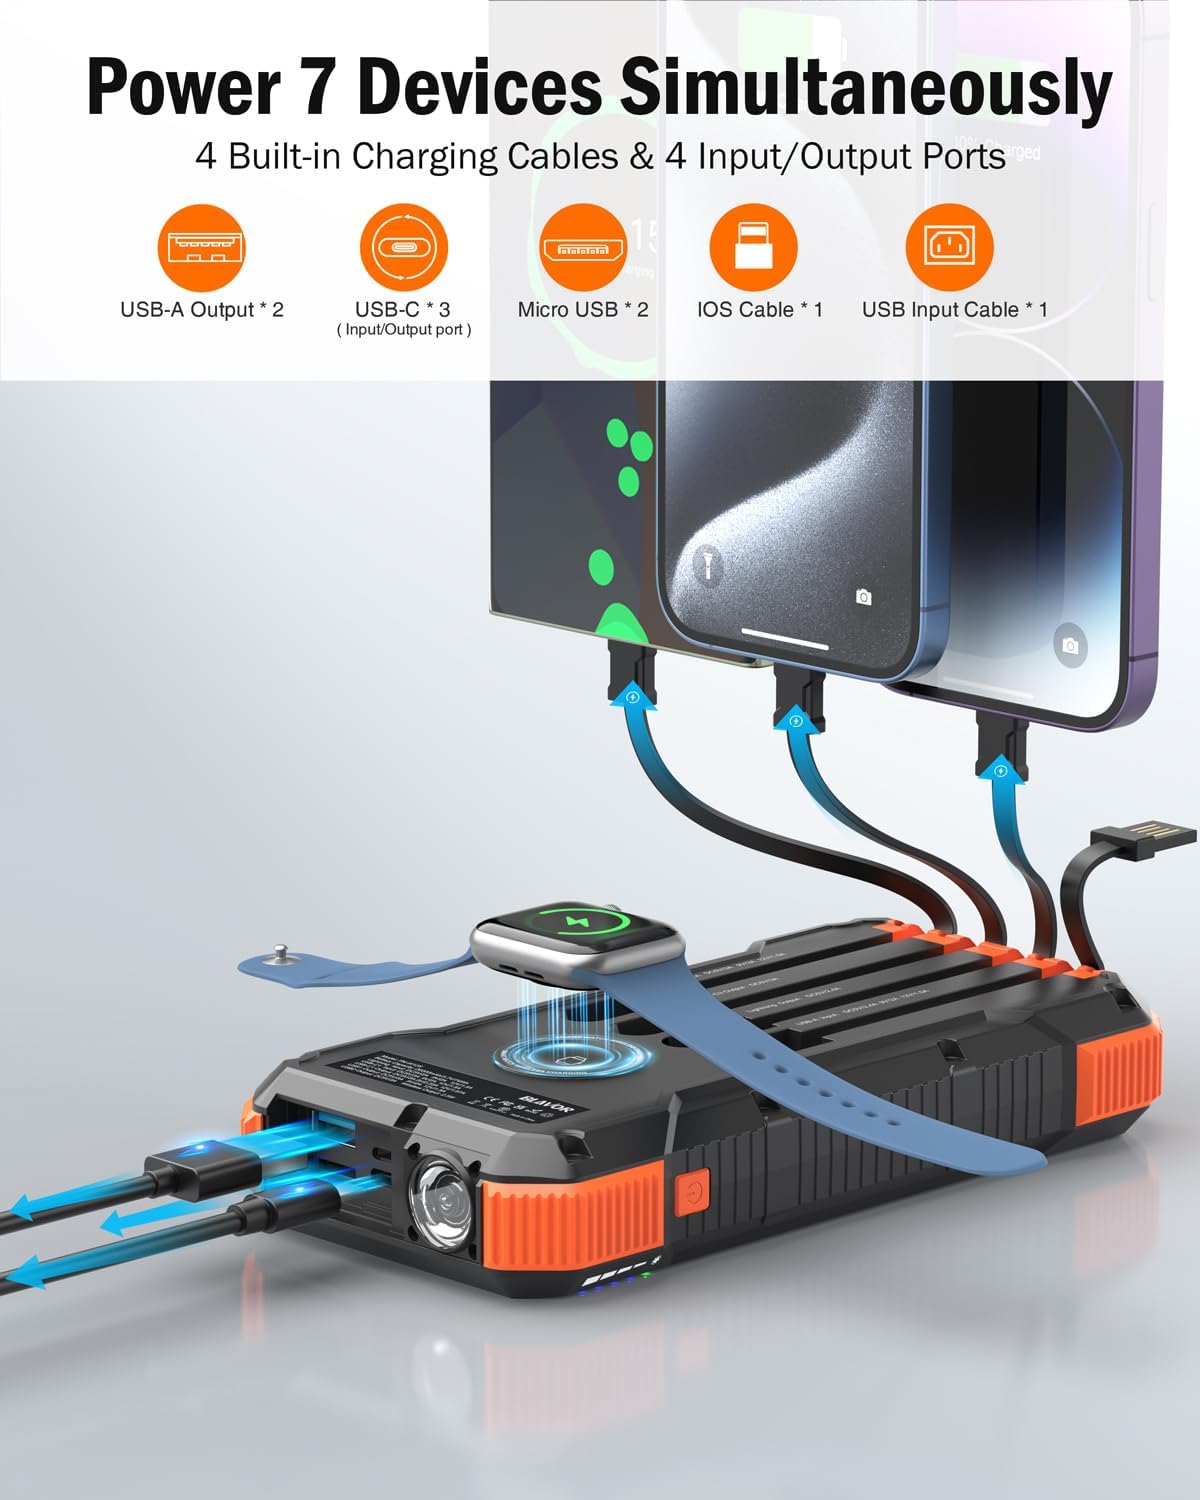
Image: Shows the power bank connected to multiple devices (phones, tablet, Apple Watch) using its built-in cables and ports, demonstrating its ability to charge 7 devices simultaneously.

Image: An Apple Watch is placed on the wireless charging area of the power bank, indicating compatibility with various Apple Watch series.
4.3 Flashlight Operation
The power bank includes a super bright LED flashlight with multiple modes.
- To Turn On/Off: Press the power button for 3 seconds.
- To Cycle Modes: Once on, short press the power button to cycle through LED Mode, SOS Mode, and Strobe Mode.

Image: Demonstrates the three modes of the LED flashlight: LED Mode (steady light), SOS Mode (flashing SOS signal), and Strobe Mode (rapid flashing).
4.4 Thermometer Usage
The integrated thermometer provides ambient temperature readings. Refer to the product detail diagram for the thermometer's location. The temperature is displayed on the device's screen or indicated by a dial, depending on the model variant.

Image: Close-up of the power bank's thermometer dial, showing temperature readings in various outdoor settings.
5. Maintenance
- Cleaning: Use a soft, dry cloth to clean the power bank. Avoid using harsh chemicals or abrasive materials.
- Storage: Store the power bank in a cool, dry place away from direct sunlight and extreme temperatures.
- Battery Care: To prolong battery life, fully charge the power bank at least once every three months if not in regular use. Avoid completely draining the battery frequently.
- Water Resistance: While the device is IPX5 waterproof, avoid submerging it in water. Ensure all ports are dry before charging.

Image: Shows the power bank being splashed with water, covered in dust/sand, and a close-up of its shock-absorbing corners, illustrating its waterproof, dustproof, and shockproof capabilities.
6. Troubleshooting
| Problem | Possible Cause | Solution |
|---|---|---|
| Power bank not charging | Cable not connected properly; faulty cable/adapter; power bank fully charged. | Ensure cables are securely connected. Try a different cable or wall adapter. Check battery indicators; if full, no further charging is needed. |
| Device not charging from power bank | Power bank battery low; incorrect cable/port; device not compatible; power bank in standby. | Recharge the power bank. Ensure you are using the correct output cable/port for your device. Press the power button to activate output if needed. |
| Solar charging is slow | Insufficient sunlight; solar panel is for emergency/supplemental use. | Ensure the solar panel is in direct, strong sunlight. Solar charging is not intended for primary rapid charging. Use a wall adapter for faster charging. |
| Flashlight not working | Power bank battery low; incorrect operation. | Recharge the power bank. Press and hold the power button for 3 seconds to turn on/off. |
7. Specifications
| Feature | Detail |
|---|---|
| Brand | BLAVOR |
| Model | PN-W12 |
| Battery Capacity | 20000 Milliamp Hours (mAh) |
| Battery Cell Composition | Lithium Polymer |
| Power Source Type | Corded Electric & Solar Powered |
| Special Features | Built-in 4 Charging Cables, IPX5 Waterproof, Dustproof and Shockproof, PD 20W & Quick Charge 3.0 Fast Charging, Solar Panel Recharging, Built-in Flashlight and Thermometer, Wireless Charging for Apple Watch |
| Compatible Devices | Camera, Speaker, Tablet, iPhone 15/15 Plus/15 Pro/15 Pro Max, iPhone 14/13/12/11 Series, iPhone XR, iPhone XS Max, Samsung Galaxy S23/S22/S21/S20 Ultra series, Samsung Galaxy Note series, Samsung Galaxy Fold series, Google Series, Apple Watch |
| Product Dimensions | 17.5 x 8 x 2 cm; 550 g |
| Number of Ports | 4 (USB-C, 2x USB-A, iOS) |
| Connector Type | USB Type A, USB Type C |
8. Warranty and Support
BLAVOR is committed to providing excellent customer service. This solar rechargeable power bank comes with a 3-year warranty.
If you have any questions or concerns regarding your BLAVOR Solar Power Bank, please do not hesitate to contact our professional support team. They are available 24/7 to provide prompt and satisfactory assistance.
For support, please visit the official BLAVOR store or contact them via the email provided in the product specifications (if applicable): BLAVOR Official Store.


