1. Introduction
The maXpeedingrods On Board Air Compressor System is designed for light-duty or medium-duty applications, ideal for occasional hauling or towing. This system is compatible with most brands of air springs, providing versatile control over your vehicle's suspension.
The single-path system allows for on-the-go air pressure adjustments, enabling simultaneous adjustment of air springs without leaving the cab. An upgraded low-pressure sensor automatically detects and restores air pressure if it falls below a minimum level, ensuring prolonged spring life and maintaining safe operating pressure.
2. Package Contents
Before beginning installation, please verify that all components listed below are present in your package. Refer to the detailed installation manual provided with the product for a complete list and visual guide.
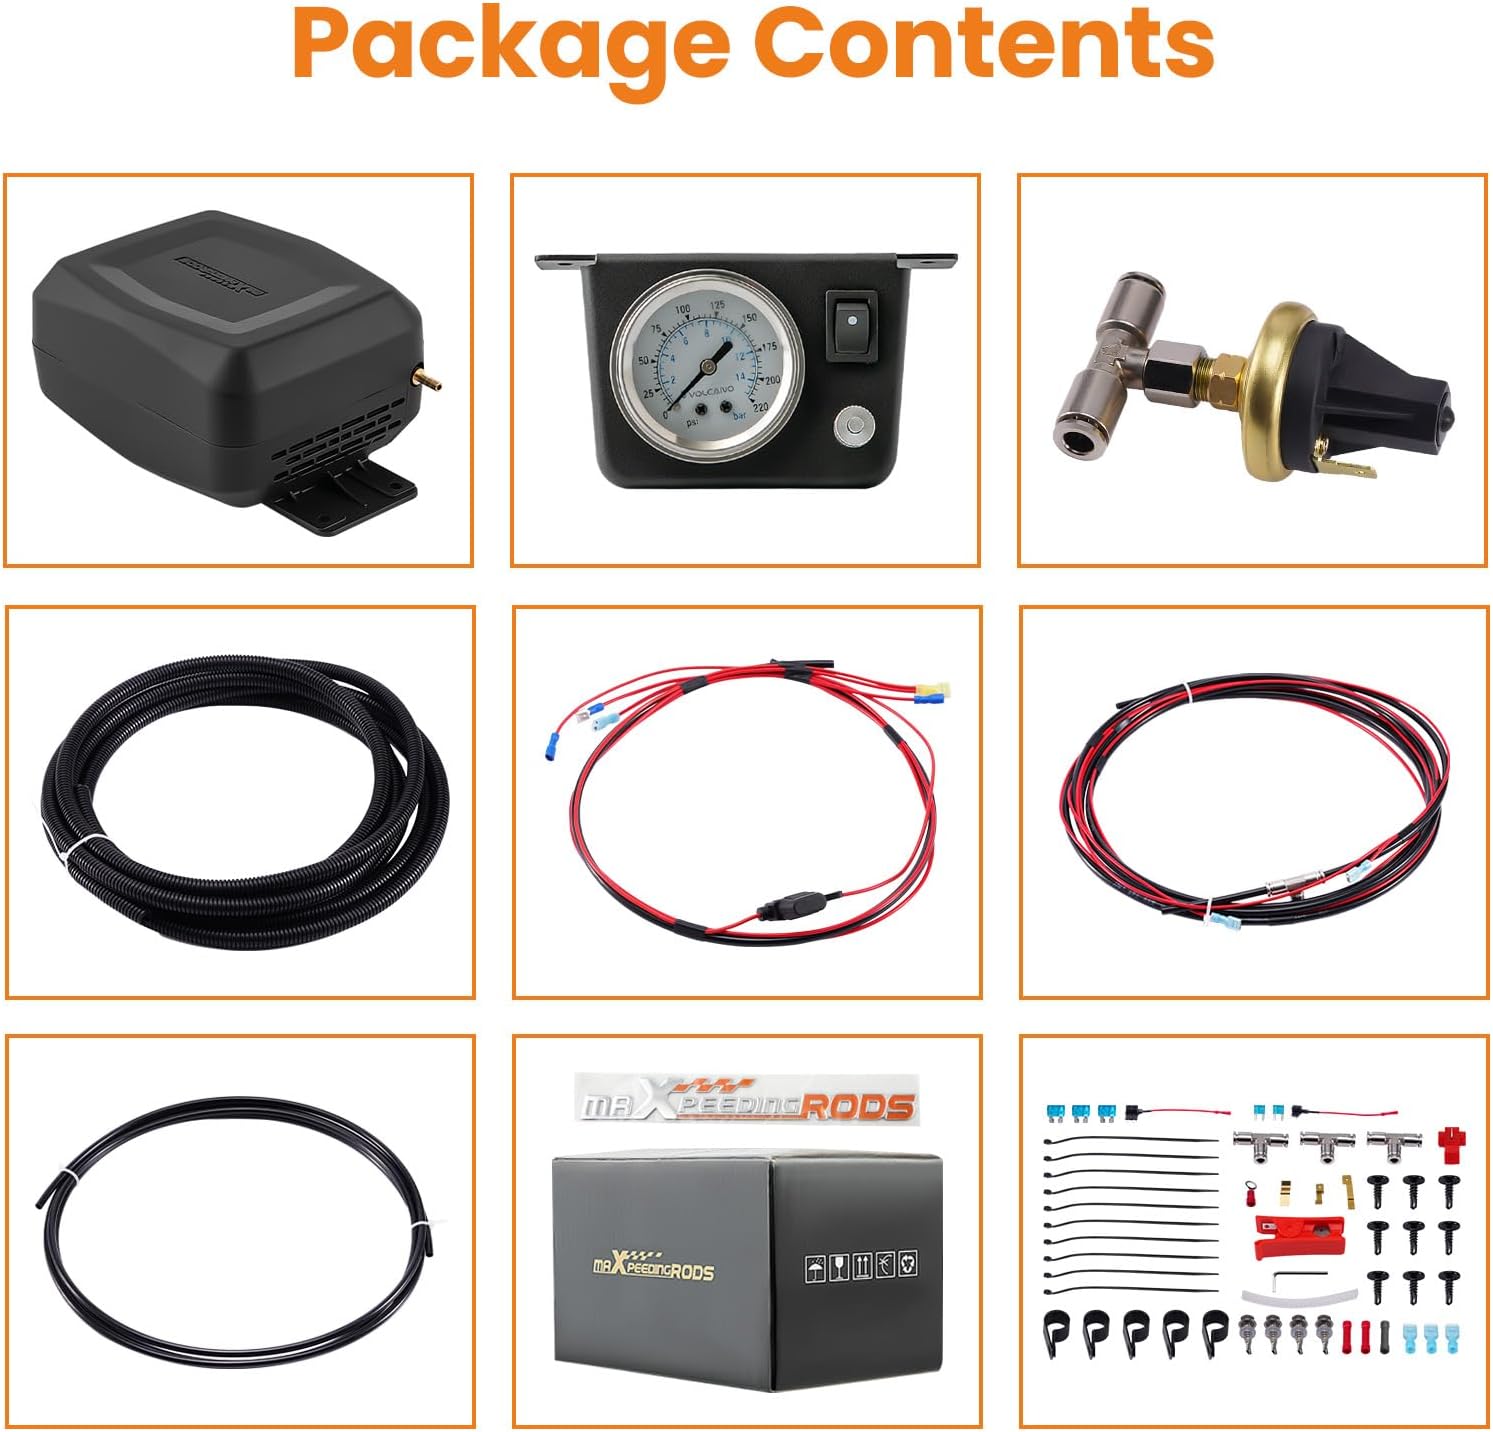
Image: All components included in the maXpeedingrods On Board Air Compressor System package.
For a visual unboxing and overview of the kit components, please watch the official seller video below:
Video: Unboxing and overview of the Air Compressor Kit with Low Pressure Sensor by maXpeedingrods-us.
- Air Compressor Unit
- Single Gauge Dash Panel
- Low Pressure Sensor with T-fitting
- Air Line (6mm * 1, 4.1m)
- Protection Conduit (10mm * 1, 3m)
- Wiring Harnesses (#1, #2, #3)
- Fuse Plug Kit
- Hardware Kit (various fittings, zip ties, screws, etc.)
3. Specifications
| Feature | Detail |
|---|---|
| Brand | maXpeedingrods |
| Model Number | AB74IG |
| Item Weight | 6.14 pounds |
| Product Dimensions | 14.72 x 13.5 x 7.36 inches |
| Low Pressure Sensor | Included for automatic pressure restoration |
| System Type | Single Path |
4. Safety Information
Always prioritize safety during installation and operation. Failure to follow safety guidelines can result in injury or damage to the product/vehicle.
- Read the entire instruction manual before installation and operation.
- Ensure the vehicle is securely supported on jack stands or a lift before working underneath.
- Disconnect the vehicle's battery before performing any electrical work.
- Wear appropriate personal protective equipment (PPE), including safety glasses and gloves.
- Ensure all air line connections are secure and leak-free to prevent system malfunction.
- Do not exceed the maximum recommended air pressure for your air springs.
- Keep hands and clothing clear of moving parts during compressor operation.
5. Installation Guide
The installation process is designed to be straightforward, with some parts pre-assembled. A detailed installation manual is included in your kit. For visual assistance, please refer to the images and videos provided below.
5.1 Pre-Installation Checks
- Verify all package contents against the packing list.
- Read through the entire installation guide and safety notices.
- Gather all necessary tools (e.g., wrenches, wire strippers, drill, air line cutter).
5.2 Compressor Assembly & Mounting
The compressor unit is designed for flexible mounting. Choose a location on the vehicle's frame rail that is protected from direct road debris and heat, yet accessible for maintenance. Ensure the intake port faces towards the front of the vehicle.

Image: The compact onboard air compressor mounted on the frame rail of a truck.
For a comprehensive installation walkthrough, including compressor mounting, please watch the following official seller videos:
Video: Detailed Installation Guide of Onboard Air Compressor Kit by maXpeedingrods-us.
Video: Installation Quick View of the Air Compressor Kit by maXpeedingrods-us.
5.3 Air Line Connections
Proper air line connection is crucial to prevent leaks. Use the provided air line cutter to ensure clean, square cuts. Push the air tubing fully into the fittings until it locks. If the tubing is stiff, soak it in hot water or use a heat gun to soften it for easier installation.

Image: Diagram illustrating the single path air system connecting to air springs.
For detailed instructions on making secure air line connections, refer to the video below:
Video: Proper Air Line Connections to Prevent Air Leaks by maXpeedingrods-us.
5.4 Wiring
The system includes flame-retardant wire harnesses for safety and longevity. Use the provided wire conduit and zip ties to manage and protect the wiring, routing it from the compressor to the cab and connecting to the fuse box.

Image: Control panel installed in the vehicle interior, showing wiring connections.
For detailed wiring instructions, including connecting the low pressure sensor and control panel, please refer to the official seller video:
Video: Installation Guide, App & Remote Operating Instructions by maXpeedingrods-us.
5.5 Control Panel Installation
The single gauge dash panel is strictly tested for airtightness and accuracy. Install it in a convenient location within the cab, such as under the dashboard, for easy access and monitoring of air pressure levels. The incandescent backlight ensures clear reading in any lighting condition.

Image: Close-up view of the Single Gauge Dash Panel, highlighting its features.
6. Operating Instructions
Once installed, the system allows for full control of your air springs from the driver's seat. Use the control panel to inflate or deflate the air springs as needed. The low pressure sensor will automatically maintain the set pressure.
Image: Control panel installed in the vehicle interior, showing its accessibility.
For detailed operating instructions, including app and remote control functionalities (if applicable to your specific kit version), please refer to the official seller video:
Video: Installation Guide, App & Remote Operating Instructions by maXpeedingrods-us.
7. Maintenance
- Regularly inspect air lines and fittings for any signs of wear, damage, or leaks.
- Check electrical connections for corrosion or loose terminals.
- Ensure the compressor unit is free from excessive dirt or debris.
- Verify the functionality of the low pressure sensor periodically.
8. Troubleshooting
- Compressor not turning on: Check electrical connections, fuse, and ensure the power switch is engaged.
- Air leaks: Inspect all air line connections using a soapy water solution. Tighten or replace fittings as necessary. Ensure air lines are cut cleanly and seated properly.
- Inaccurate pressure readings: Verify the gauge is properly connected and free from obstructions.
9. Warranty and Support
maXpeedingrods warrants its products against manufacturing defects in materials and workmanship for 1 year from the date of purchase. The company provides unlimited technical support and customer service to assist with any inquiries or issues.
For warranty claims or technical assistance, please contact maXpeedingrods customer service directly.


