
1. Introduction
The LairtPOW 40A Smart MPPT Solar Charge Controller is designed to efficiently manage power flow from your solar panels to your battery bank and DC loads. Utilizing an advanced Maximum Power Point Tracking (MPPT) algorithm, it optimizes solar energy harvesting, offering over 30% higher efficiency than traditional PWM controllers and up to 99.9% conversion efficiency. This controller supports various battery types, including lead-acid, lithium, and LiFePO4, and features dual USB outputs for charging devices. Real-time monitoring and control are available via a user-friendly mobile application.
2. Safety Information
Please read all safety instructions before installation and operation. Failure to follow these instructions may result in electric shock, fire, or serious injury.
- Ensure all connections are tight and correct to prevent loose connections that can cause excessive heat.
- Always connect the battery first, then the solar panel, and finally the DC load. Disconnect in reverse order.
- Do not disassemble or attempt to repair the controller yourself. Contact qualified personnel for service.
- Install the controller in a well-ventilated area, away from flammable materials and direct sunlight.
- The controller includes multiple safety protections: overvoltage, short circuit, reverse connection, reverse charging, over temperature, and TVS lightning protection.

Image: Internal view of the controller highlighting various security protections such as short circuit, open circuit, over current, overcharge, and reverse connection protection.
3. Setup
3.1 Mounting the Controller
Mount the controller vertically on a flat surface in a dry, well-ventilated area. Use the provided template to mark and pre-drill holes. Install all four screws partially, then slide the controller onto the screws and tighten them securely. Ensure adequate airflow around the unit for proper cooling.
3.2 Wiring Connections
Follow the connection order precisely to avoid damage to the controller or other components.
- Connect the Battery: Connect the positive and negative terminals of your battery to the corresponding battery ports on the controller. Ensure correct polarity.
- Connect the Solar Panel: Connect the positive and negative terminals of your solar panel(s) to the corresponding solar panel ports on the controller. Ensure correct polarity.
- Connect the DC Load: If using a DC load, connect its positive and negative terminals to the corresponding DC load output ports on the controller.
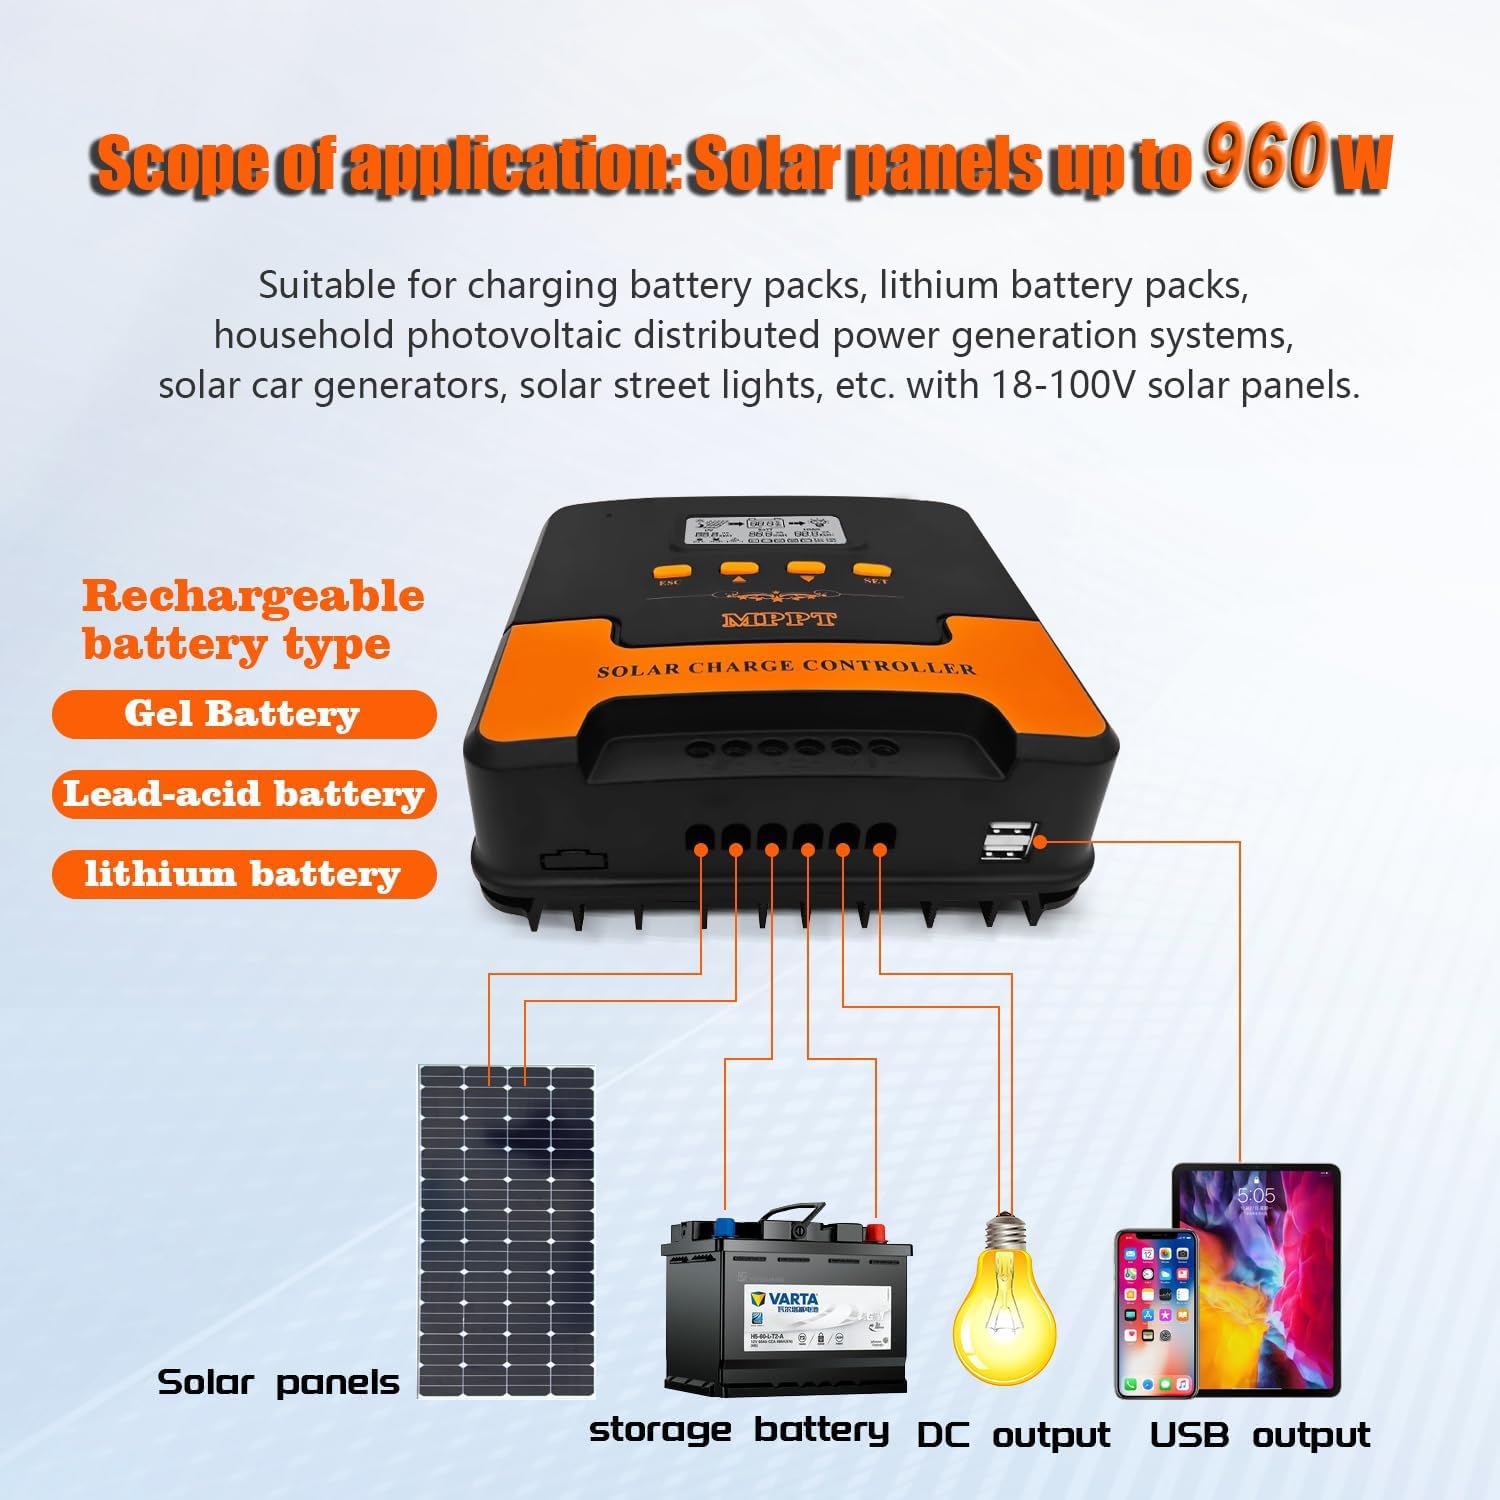
Image: Connection diagram illustrating how to connect solar panels, a storage battery, DC load, and USB devices to the LairtPOW MPPT solar charge controller.
3.3 Battery Type Configuration
The controller is compatible with various battery types. You can adjust charging parameters to match your specific battery (e.g., LiFePO4, AGM, Sealed Gel, Flooded Lithium). Refer to the 'Operating Instructions' section for details on adjusting settings via the LCD display or mobile app.
3.4 App and WiFi Control
Download the dedicated mobile application to monitor and control your solar system remotely. Follow the in-app instructions to connect the controller via WiFi.
Video: An animation demonstrating the correct connection sequence for the solar charge controller, battery, and solar panel.
4. Operating Instructions
4.1 LCD Display and Buttons
The controller features an intelligent LCD display that shows real-time operating information, parameters, and fault icons. The main interface cycles through various data points automatically every 5 seconds. Use the buttons for manual navigation and settings adjustment.

Image: Close-up of the controller's LED display, showing PV, battery, and load information, along with labels for the output switch, set buttons, and flip up/down buttons.
- ESC Button: Short press to switch the DC load output on/off. Long press to enter parameter setting mode.
- SET Button: In parameter setting mode, short press to confirm and save changes.
- Up/Down Buttons: Short press to scroll through display parameters. In setting mode, use to adjust values.
4.2 Parameter Setting
To adjust parameters such as battery type, charging voltage, or load control mode:
- Long press the 'ESC' button until the value on the display flashes.
- Use the 'Up' or 'Down' buttons to adjust the desired value.
- Press the 'SET' button to confirm and save the new setting.
4.3 Smart App Monitoring
The mobile application provides a comprehensive overview of your solar system's performance. You can view real-time data, power generation logs, and adjust settings remotely. This allows for efficient control and tracking of your solar energy production.

Image: The controller connected to a smartphone displaying the monitoring application, showing setup options, power generation logs, and real-time data for photovoltaic voltage, current, battery voltage, and load current.
Video: Detailed instructions on how to use the MPPT controller, including navigating the display and adjusting settings.
4.4 Charging Protection
The controller employs a 3-stage intelligent charging protection system to optimize battery health and lifespan:
- Boost Charging: Rapidly charges the battery to a set voltage.
- Strong Charging: Maintains a constant current until the battery reaches a higher voltage.
- Pulse Charging: Applies short pulses of current to keep the battery fully charged and prevent sulfation.

Image: A graph showing the three stages of intelligent charging protection: Boost charging, Pulse charging, and Strong charging, designed to prevent battery damage and extend life.
5. Maintenance
Regular maintenance ensures optimal performance and longevity of your solar charge controller.
- Cleaning: Periodically clean the controller's exterior with a dry cloth. Ensure ventilation openings are free from dust and debris.
- Connection Checks: Annually inspect all wiring connections for tightness and corrosion. Loose connections can lead to overheating and performance issues.
- Environmental Conditions: Ensure the installation environment remains within the specified operating temperature range and is free from excessive moisture.
- Firmware Updates: Check the mobile application periodically for any available firmware updates to ensure your controller has the latest features and improvements.

Image: The rear view of the MPPT controller, highlighting its pure aluminum heat sink and integrated intelligent cooling dual fans, which help dissipate heat during operation.
6. Troubleshooting
If you encounter issues with your LairtPOW MPPT Solar Charge Controller, refer to the following common problems and solutions:
- No Display/No Power:
- Check battery connections and ensure they are secure and correctly polarized.
- Verify the battery voltage is within the controller's operating range. - No Charging Current:
- Ensure solar panel connections are correct and secure.
- Check if solar panels are receiving sufficient sunlight.
- Verify solar panel voltage is within the controller's input range (18-100V).
- Check for any fault icons on the LCD display. - Load Not Working:
- Check load connections and ensure they are secure and correctly polarized.
- Verify the load is not exceeding the controller's rated load current.
- Press the 'ESC' button to ensure the DC load output is enabled. - App Connection Issues:
- Ensure the controller's WiFi function is active.
- Check your mobile device's WiFi connection.
- Restart the controller and your mobile device.
- Ensure the app is updated to the latest version. - Overheating:
- Ensure the controller is installed in a well-ventilated area.
- Check if the cooling fans are operating correctly (they activate under higher current loads).
- Reduce the load or solar input if consistently overheating.
For persistent issues or fault codes not listed, please contact customer support.
7. Specifications
Key technical specifications for the LairtPOW 40A Smart MPPT Solar Charge Controller (Model: CM-D40).
| Feature | Specification |
|---|---|
| Model | CM-D40 |
| Rated Charging Current | 40A |
| Rated Load Current | 20A |
| System Voltage | 12V/24V Auto-Identification |
| Max. Solar Input Voltage | 100V PV |
| Max. Photovoltaic System Input Power | 480W/12V, 960W/24V |
| Conversion Efficiency | ≥98% |
| MPPT Tracking Efficiency | >99% |
| Product Dimensions (L x W x H) | 7.32" x 7.32" x 2.63" |
| Material | Metal |
| Display Type | LED |
| Included Components | Controller, Manual |
8. Warranty and Support
LairtPOW products are designed for reliability and performance. For warranty information, please refer to the documentation included with your purchase or visit the official LairtPOW website.
If you require technical assistance, troubleshooting, or have questions regarding your LairtPOW 40A Smart MPPT Solar Charge Controller, please contact LairtPOW customer support through the contact information provided on the product packaging or the official brand website. When contacting support, please have your model number (CM-D40) and purchase details ready.