Introduction
This manual provides essential information for the safe operation, setup, maintenance, and troubleshooting of your MJX 14303 1/14 Citroen C3 Fast RC Car. Please read this manual thoroughly before operating the vehicle to ensure optimal performance and longevity.
Safety Information
For your safety and to prevent damage to the product, observe the following precautions:
- Always remove the battery from the car when not in use. Do not leave the battery installed in the vehicle during storage.
- This product is recommended for users aged 14 years and up.
- Operate the RC car in open areas, away from people, pets, and obstacles.
- Avoid operating in wet conditions as the product is only splash-proof, not waterproof.
- Ensure proper ventilation during battery charging.
What's in the Box
Verify that all components are present upon unboxing:
- 1 X Truck (MJX 14303 RC Car)
- 1 X T3C 2.4GHz 3-Channel Transmitter
- 2 X 2S 2000 mAh Rechargeable Battery
- 4 X Extra High Rebound Shock Spring
- 8 X Extra Clips
- 8 X Extra Tires (including drift and rally tires)
- 1 X Protective Shell
- 1 X 2S USB Cable (Charging Cable)
- 1 X Cross Wrench
- 1 X Screwdriver
- 1 X Product Manual (this document)

Figure 1: Contents included in the MJX 14303 package.
Setup
1. Battery Charging and Installation
- Connect the provided 2S 2000 mAh LiPo battery to the USB charging cable.
- Plug the USB charging cable into a compatible USB power source (e.g., computer USB port, USB wall adapter).
- Allow the battery to fully charge. Charging typically takes 4 to 5 hours.
- Once charged, carefully install the battery into the battery compartment of the RC car. Ensure the battery is secured with the strap fixing mechanism.
- Ensure the battery is properly connected to the Electronic Speed Controller (ESC).
2. Transmitter Setup
- Install the required batteries (not specified in product data, assume standard AA/AAA) into the T3C 2.4GHz 3-Channel Transmitter.
- Familiarize yourself with the transmitter controls, including the steering wheel, throttle trigger, and light control buttons.
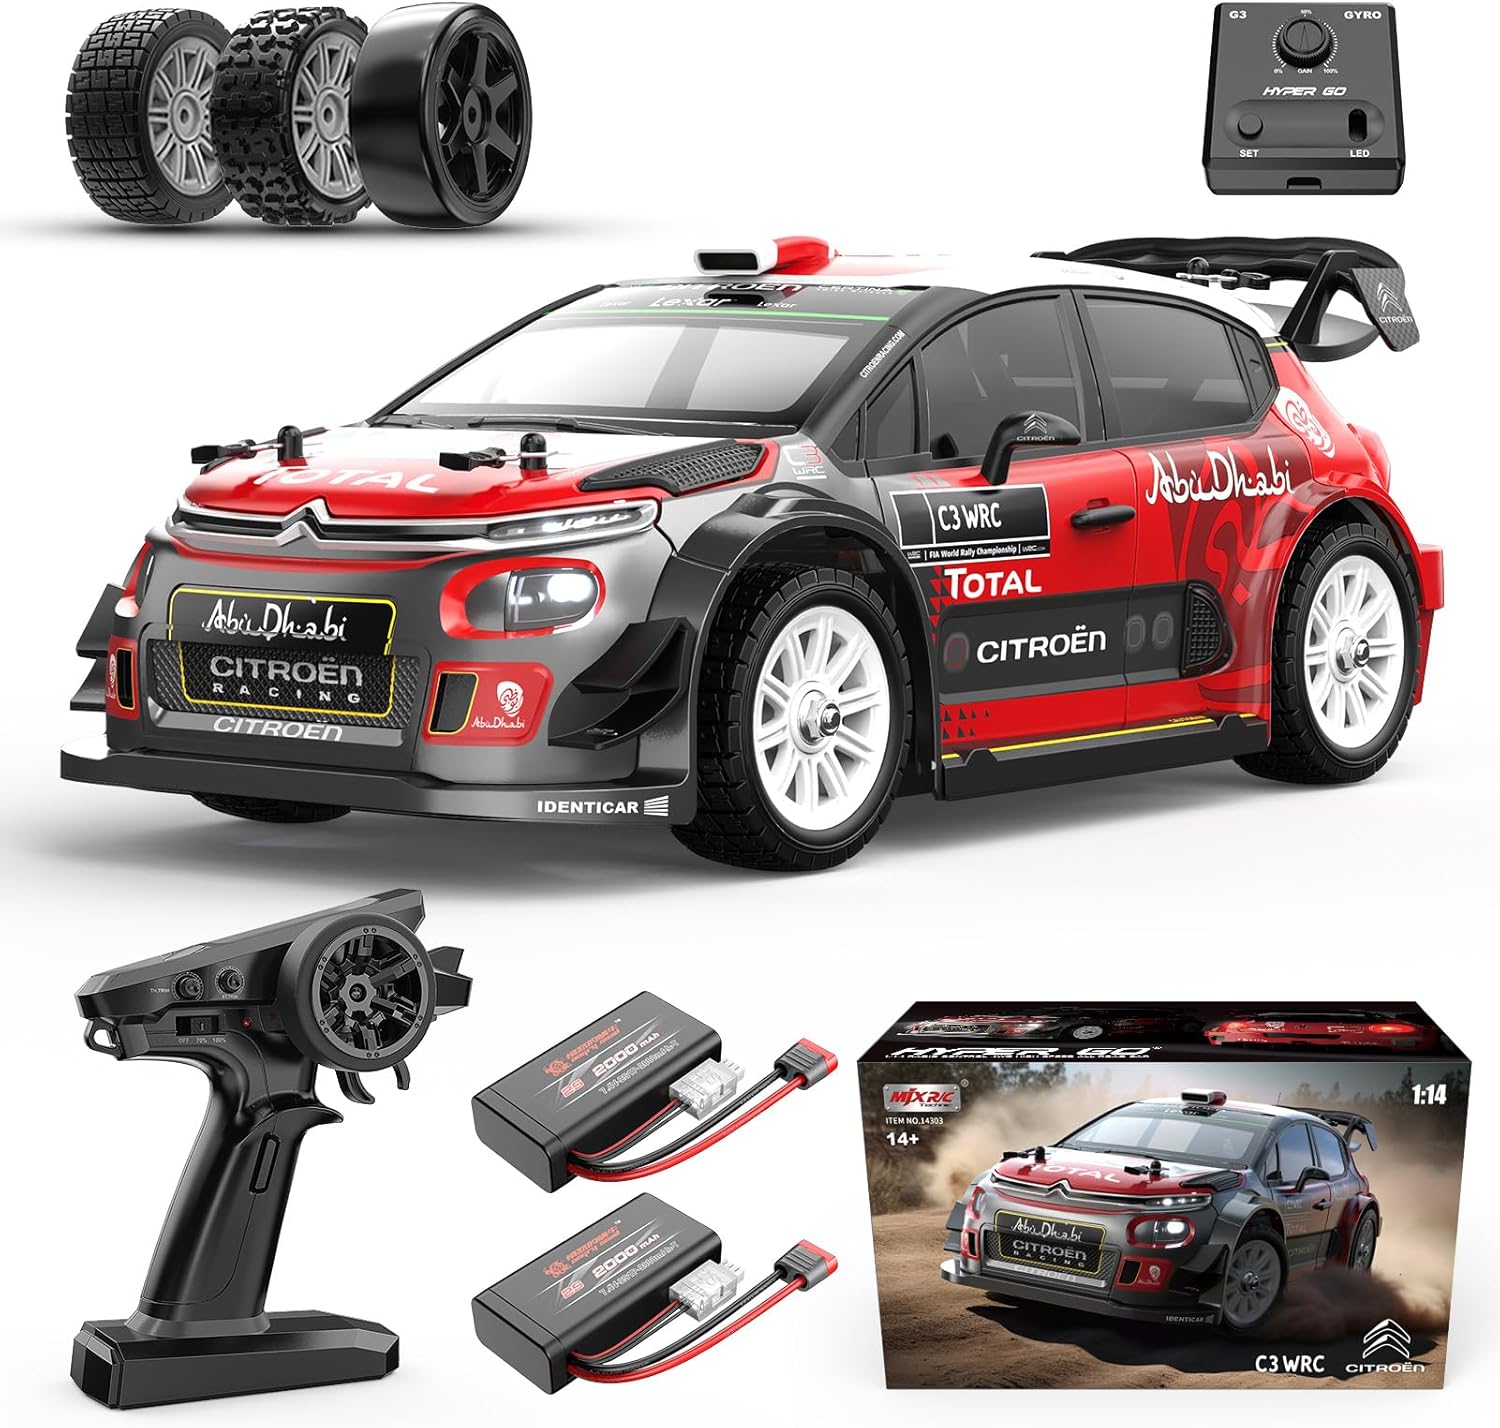
Figure 2: RC Car, Transmitter, and Batteries.
Operating Instructions
1. Power On
- Turn on the RC car first, then the transmitter.
- Wait for the car and transmitter to establish a connection.
2. Driving Controls
- Use the steering wheel on the transmitter to control the direction (left/right).
- Use the throttle trigger to control forward and reverse movement. Pull the trigger for forward, push for reverse. Note: Reverse functionality may sometimes be inconsistent.
3. Gyro Adjustment
The independent GYRO system assists with straight-line stability and drifting. It is recommended to adjust the gyro to 75% for optimal performance, especially when drifting.

Figure 3: Independent Gyro and Adjustable Oil-Filled Shocks.
4. Light Control
The vehicle features interactive lights, including simulated brake lights and turn signals. The entire vehicle's lighting can be controlled via the transmitter. Available modes include flash mode, continuous light mode, and OFF.

Figure 4: Interactive Lights (Front and Rear).
5. Speed Settings
The transmitter allows for speed adjustment. New users are advised to start with the 70% speed limit until fully comfortable with the car's handling. The car can reach 26+ mph (42 kph) with the included 2S battery and up to 38+ mph (62 kph) with an optional 3S 11.1V LiPo battery (not included).

Figure 5: 70% vs 100% Throttle Comparison.
6. Tire Selection
The car comes with three sets of tires for different road surfaces: drift tires, rubber tires (pre-installed), and rally tires. Choose the appropriate tires for your driving environment.
Figure 6: Multiple Tire Sets for Versatile Driving.
Maintenance
1. General Care
- After each use, clean the car to remove dirt, dust, and debris.
- Always remove the battery from the car when not in use to prevent discharge and potential damage.
- Store the RC car in a cool, dry place away from direct sunlight and extreme temperatures.
2. Tire and Shock Absorber Care
- Inspect tires for wear and tear. Replace worn tires as needed. Avoid using off-road tires on hard surfaces as they wear out quickly.
- The car features oil-filled shock absorbers. Periodically check for leaks and ensure smooth operation.
3. Chassis and Drivetrain
- The 6061 aluminum alloy chassis and powder-metallurgy transmission gears are designed for durability. However, regular inspection for loose screws or damaged parts is recommended.
- The large front foam bumper provides maximum protection. Inspect it for damage after impacts.

Figure 7: Chassis and Front Bumper for Protection.
Troubleshooting
| Problem | Possible Cause | Solution |
|---|---|---|
| Car does not respond to transmitter. | Low battery in car or transmitter; car/transmitter not paired. | Charge car battery, replace transmitter batteries, re-pair car and transmitter. |
| Car pulls to one side. | Steering trim not adjusted. | Adjust the steering trim dial on the transmitter until the car drives straight. |
| Reverse function is inconsistent. | Known characteristic of the model; potential signal interference. | Ensure clear line of sight between transmitter and car. This is a common observation for this model. |
| Car gets stuck on off-road surfaces. | Soft terrain; incorrect tire type. | Use rally tires for off-road. Harder dirt tracks are more suitable than very soft terrain. |
Specifications
- Product Dimensions: 12.6 x 6 x 4.4 inches
- Item Weight: 4.8 pounds
- Model Number: 14303
- Manufacturer Recommended Age: 14 years and up
- Batteries: 1 Lithium Ion battery required (included, 2S 2000 mAh)
- Motor: Hobby 2845 3900KV Brushless with metal heatsink and dual cooling fans
- ESC: Independent 45A ESC
- Top Speed (2S Battery): 26+ mph (42 kph)
- Top Speed (3S Battery, optional): 38+ mph (62 kph)
- Chassis: 6061 aluminum alloy
- Transmission: Powder-metallurgy gears and differentials
- Radio System: 2.4GHz 3-Channel with light control

Figure 8: Internal Components and Chassis.
Warranty and Support
For warranty information and customer support, please refer to the product packaging or visit the official MJX website. Keep your purchase receipt as proof of purchase for any warranty claims.
You can also visit the MJX Store on Amazon for additional information and accessories.


