
GCSOAR MPPT 40A (WiFi)
GCSOAR 40A MPPT Solar Charge Controller User Manual
Model: MPPT 40A (WiFi)
Introduction
This user manual provides comprehensive instructions for the installation, operation, and maintenance of your GCSOAR 40A MPPT Solar Charge Controller. This controller is designed to efficiently manage power from your solar panels to charge various battery types, ensuring optimal performance and longevity of your solar system. It features a built-in WiFi module for remote monitoring and parameter setting via a dedicated mobile application.
Product Features
- High Efficiency MPPT Technology: Maximum Power Point Tracking technology with up to 99% tracking efficiency and 98% peak conversion efficiency, ensuring optimal power harvest even in cloudy conditions.
- Versatile Battery Compatibility: Auto-compatible with 12V or 24V battery systems. Supports 4-stage charging for Lead Acid Batteries (Bulk, Absorption, Float, Equalization) and 2-stage charging for Lithium batteries (Bulk, Absorption), including Lithium Reactivation. Compatible with Gel, Sealed, Flooded, and LiFePO4 battery types.
- Built-in WiFi Module: Enables remote monitoring and parameter configuration via the iConnect APP. Supports both "Online mode" for home networks and "Offline mode" for short-distance direct connection (e.g., RVs, boats).
- Robust Safety Features: Comprehensive protection against reverse polarity, battery overcharging, battery over-discharging, overload, short-circuiting, overheating, and reverse current. CE, FCC, IEC, UL, and RoHS certified.
- Durable Construction: Die-cast aluminum design for excellent heat dissipation.
- LCD Display: Provides real-time system information.
Package Contents
Upon opening the package, please verify that all components are present and undamaged:
- GCSOAR 40A MPPT Solar Charge Controller (TD2407-100V)
- User Manual
- Other included components (e.g., mounting screws, cables) if applicable.
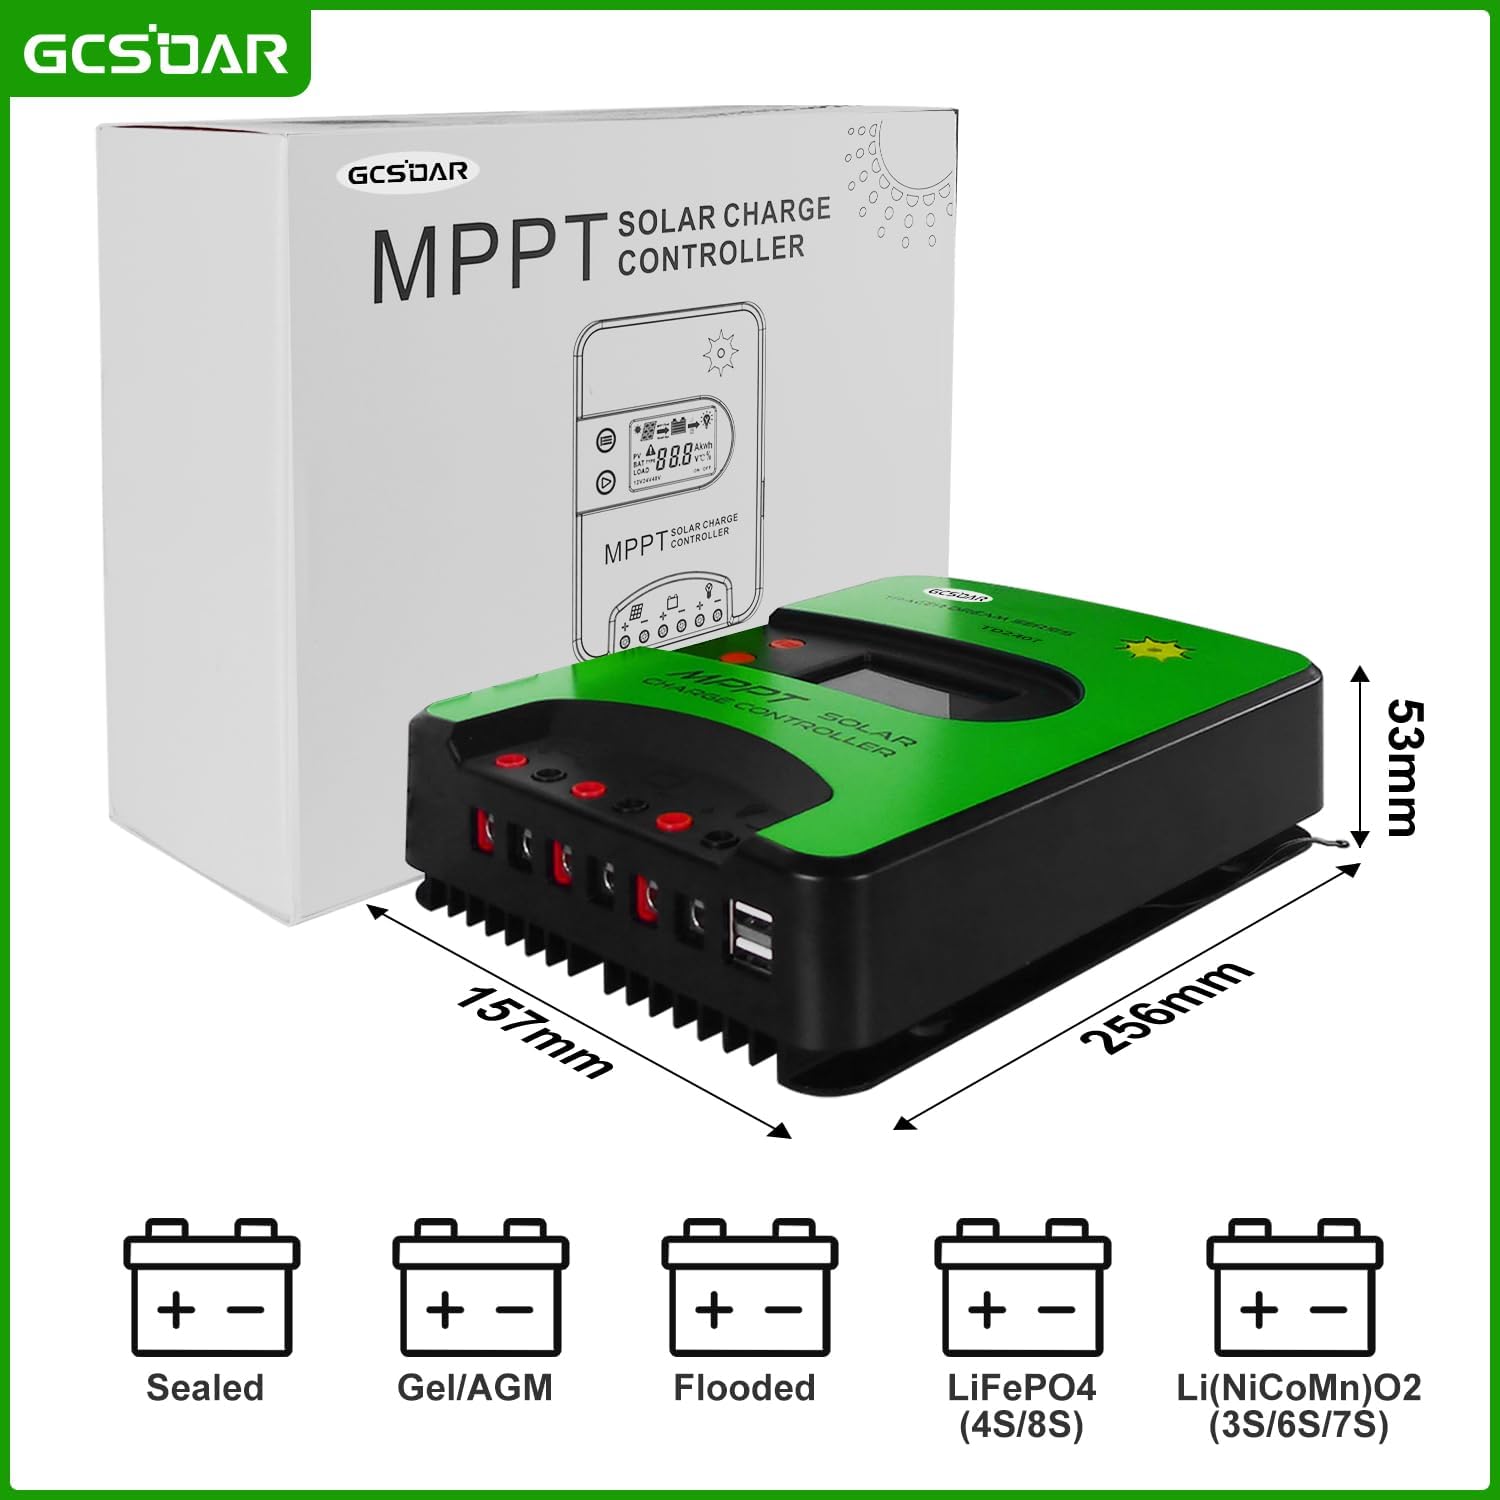
Image: The GCSOAR MPPT Solar Charge Controller shown next to its retail packaging, illustrating its compact size and the box it comes in. Dimensions are indicated on the image.
Setup and Installation
Proper installation is crucial for the safe and efficient operation of your solar charge controller. Please follow these steps carefully.
Wiring Diagram
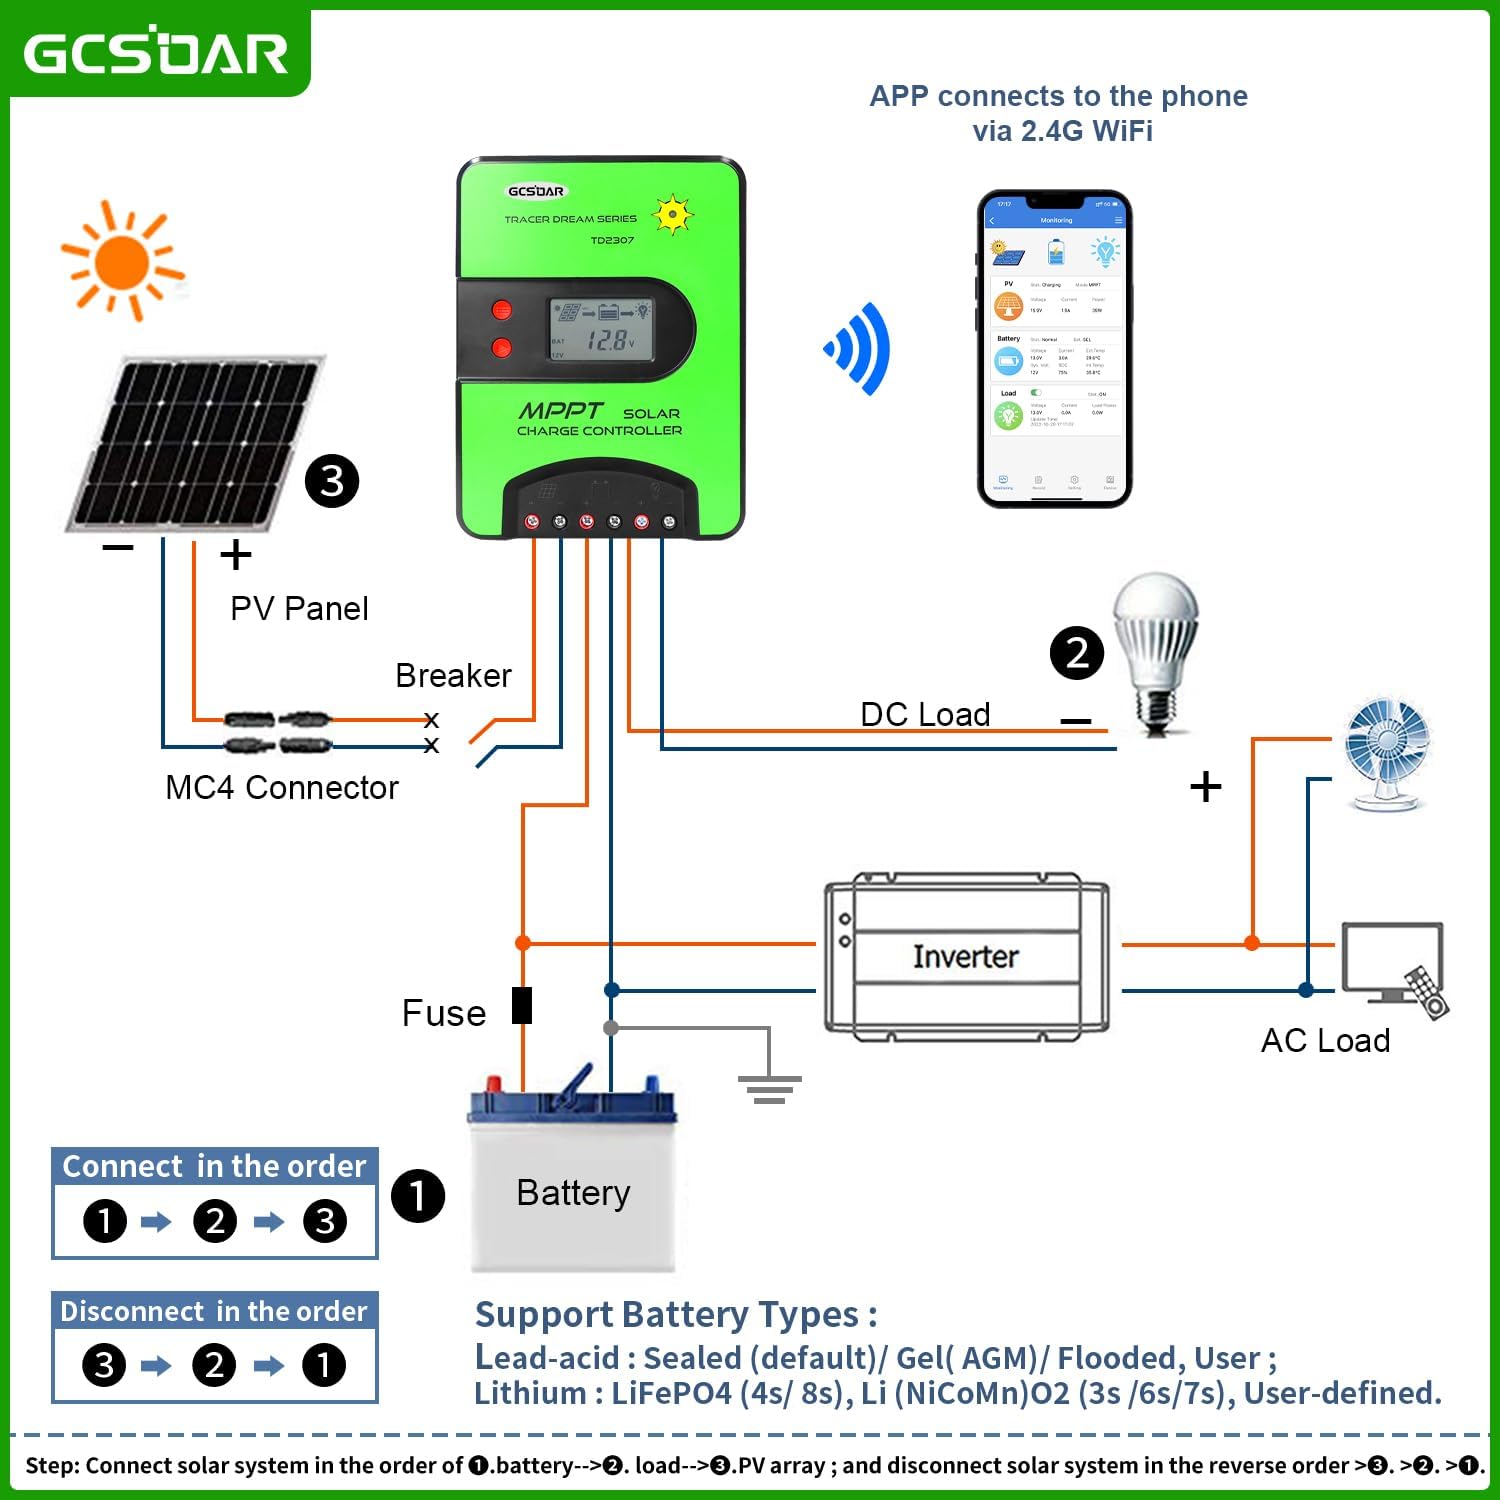
Image: A detailed wiring diagram showing the connection sequence for the solar charge controller, including PV panels, battery, DC load, and an inverter for AC load. It highlights the connection and disconnection order.
Important: Always connect and disconnect in the specified order to prevent damage to the controller or other components.
Connection Steps
- Connect Battery: First, connect the battery to the charge controller. Ensure correct polarity.
- Connect Load: Next, connect your DC loads to the controller.
- Connect PV Panel: Finally, connect the solar PV panel to the controller.
Disconnection Steps (Reverse Order):
- Disconnect PV Panel.
- Disconnect Load.
- Disconnect Battery.
The controller supports various battery types: Sealed (default), Gel (AGM), Flooded, and User-defined for Lead-acid batteries. For Lithium batteries, it supports LiFePO4 (4s/8s) and Li(NiCoMn)O2 (3s/6s/7s). LiFePO4 batteries require manual selection of 12V or 24V system voltage and allow for user-defined parameter adjustments.
Operating Instructions
LCD Display and Buttons

Image: The GCSOAR MPPT Solar Charge Controller displaying its LCD screen and control buttons, alongside a smartphone showing the iConnect monitoring application interface.
The integrated LCD provides real-time data on your solar system's performance. Use the buttons below the display to navigate through menus and adjust settings.
WiFi Module and APP Remote Monitoring
The controller features a built-in WiFi module for remote monitoring and control via the "iConnect" mobile application.
Downloading the APP
- For Android: Search for "LD iConnect" in the Google Play Store or scan the QR code provided in the manual. Download on Google Play
- For iOS: Search for "LD iConnect" in the Apple App Store. Download on Apple App Store
- Alternatively, download from the official LDSOLAR website: LDSOLAR Website

Image: Screenshots illustrating how to download the iConnect app from app stores or via QR codes, with a note about the app's update.
Connecting to the APP
The controller supports two WiFi modes:
- Online Mode: For environments with 2.4G router wireless network access (e.g., home). Allows high-speed network connection anytime, anywhere, not limited by distance.
- Offline Mode: For environments without a router (e.g., RV, Yacht, Boat, Camping). Provides short-distance effective signal transmission for direct connection.

Image: A diagram illustrating the connection flow from the solar panel to the controller, then via WiFi to a router, cloud, and finally to a smartphone for remote monitoring.

Image: A four-step visual guide on how to connect the iConnect app: Download, Add Device (Cloud Device), Configure WiFi, and Monitor/Record data.
Wake Up and Reset WiFi Module
To enter the distribution network interface, press the menu button (up/left key) on the controller. This interface has three states: Sleep (SLP), AP mode (AP-IoT flash), and Completion (IoT).
To enter AP distribution network mode, press and hold the menu button (up/left key) for more than 5 seconds while on the distribution network interface. The AP IoT will flash. Follow the process instructions within the APP.

Image: A visual guide demonstrating how to access the distribution network interface and activate AP mode on the controller by pressing and holding the menu button.
APP Operations: Monitor, Record, and Set Parameters
- Monitor: View real-time solar system data.
- Record: Access historical solar charging and discharging data.
- Setting: Select battery type, confirm system voltage, and adjust protection parameters for your solar system.

Image: Screenshots from the iConnect app demonstrating the real-time monitoring of solar system data and the recording of charging/discharging history.

Image: Screenshots from the iConnect app illustrating how to access and modify system parameters, including battery type and protection settings.
Maintenance
Regular maintenance ensures the longevity and optimal performance of your GCSOAR MPPT Solar Charge Controller.
- Visual Inspection: Periodically inspect the controller and all connections for any signs of damage, corrosion, or loose wiring.
- Cleanliness: Keep the controller clean and free from dust and debris. Ensure the heat sink fins are not obstructed to allow for proper heat dissipation. Use a dry, soft cloth for cleaning.
- Connection Tightness: Check all terminal connections regularly to ensure they are tight. Loose connections can cause overheating and damage.
- Battery Health: Monitor your battery's health and voltage levels through the LCD display or the iConnect APP. Ensure batteries are not overcharged or deeply discharged.
- Environmental Conditions: Ensure the controller is installed in a well-ventilated area, away from direct sunlight, moisture, and corrosive substances.
Troubleshooting
This section provides solutions to common issues you might encounter with your solar charge controller.
| Problem | Possible Cause | Solution |
|---|---|---|
| No display on LCD / Controller not powering on |
|
|
| No charging from PV panel |
|
|
| Load not working |
|
|
| WiFi connection issues |
|
|
The controller has intelligent self-diagnostic capabilities and protection against reverse polarity, battery overcharging/over-discharging, overload, short-circuiting, overheating, and reverse current. If issues persist, contact customer support.
Technical Specifications
Detailed specifications for the GCSOAR 40A MPPT Solar Charge Controller (TD2407-100V).
| Parameter | Value |
|---|---|
| Model | TD2407-100V (40A) |
| Battery System Voltage | 12V/24V Auto |
| Max PV Input Voltage | 100V |
| MPP Voltage Range | (Vbat+2V) ~ 65V |
| PV Max Input Power | 520W (12V) / 1040W (24V) |
| Self-consumption | ≤23mA |
| Max Charging Current | 40A |
| Max Discharging Current | 40A |
| USB Output | DC 5V 2A |
| LVD (Low Voltage Disconnect) | 11.0V ADJ 9V...12V ; ×2/24V |
| LVR (Low Voltage Reconnect) | 12.6V ADJ 11V...13.5V ; ×2/24V |
| Float Voltage | 13.8V ADJ 13V...15V ; ×2/24V |
| Boost Voltage | 14.4V ; ×2/24V (battery voltage less than 12.6V restart boost 2 hours) |
| BAT Over Voltage Protection | 16.5V ; ×2/24V |
| Reverse Connection Protection | Yes |
| Load Over Current Protection | Yes, each 30s auto restart again |
| Communication Method | Built-in WiFi Module (via APP) |
| Temperature Compensation | -24 mV /°C for 12V system ; ×2/24V |
| Working Temperature | -20°C ~ +50°C |
| Terminals Scale | 16mm² |
| Waterproof Grade | IP32 |
| Size | 256*157*53mm |
| New Weight | 1.5kg |

Image: A table detailing the electrical parameters for various GCSOAR MPPT Solar Charge Controller models, including the 40A version (TD2407).
Warranty and Support
GCSOAR products are designed for reliability and performance. For any technical assistance or warranty inquiries, please refer to the contact information provided with your purchase or visit the official GCSOAR website.
- Technical Assistance: GCSOAR offers free technical assistance.
- Service Centers: GCSOAR has set up warehouses and assistance centers in Chicago (USA), Munich (Germany), Toronto (Canada), and Melbourne (Australia).
For more information, visit the GCSOAR Store on Amazon.
Ask a question about this manual
Ask about setup, troubleshooting, compatibility, parts, safety, or missing instructions. Manuals+ will review the question and use this page’s manual context to help answer it.