Introduction
Thank you for choosing the FiveWillowise Rattan Shoe Storage Cabinet. This manual provides essential information for the safe assembly, operation, and maintenance of your new furniture. Please read these instructions carefully before beginning assembly and retain them for future reference.
Safety Information
- Always follow the assembly instructions provided to ensure structural integrity.
- Be cautious when handling the product, especially in low-light conditions, due to the embedded sensor light feature.
- Ensure all fasteners are securely tightened before use. Periodically check and re-tighten as necessary.
- Do not exceed the weight limit of 60 pounds for the cabinet.
- Keep small parts away from children during assembly to prevent choking hazards.

Image: The FiveWillowise Rattan Shoe Storage Cabinet, showcasing its natural rattan design and overall appearance in an entryway setting.
Components and Hardware
Before assembly, verify that all parts and hardware listed in your packaging are present and undamaged. If any components are missing or damaged, please contact customer support.
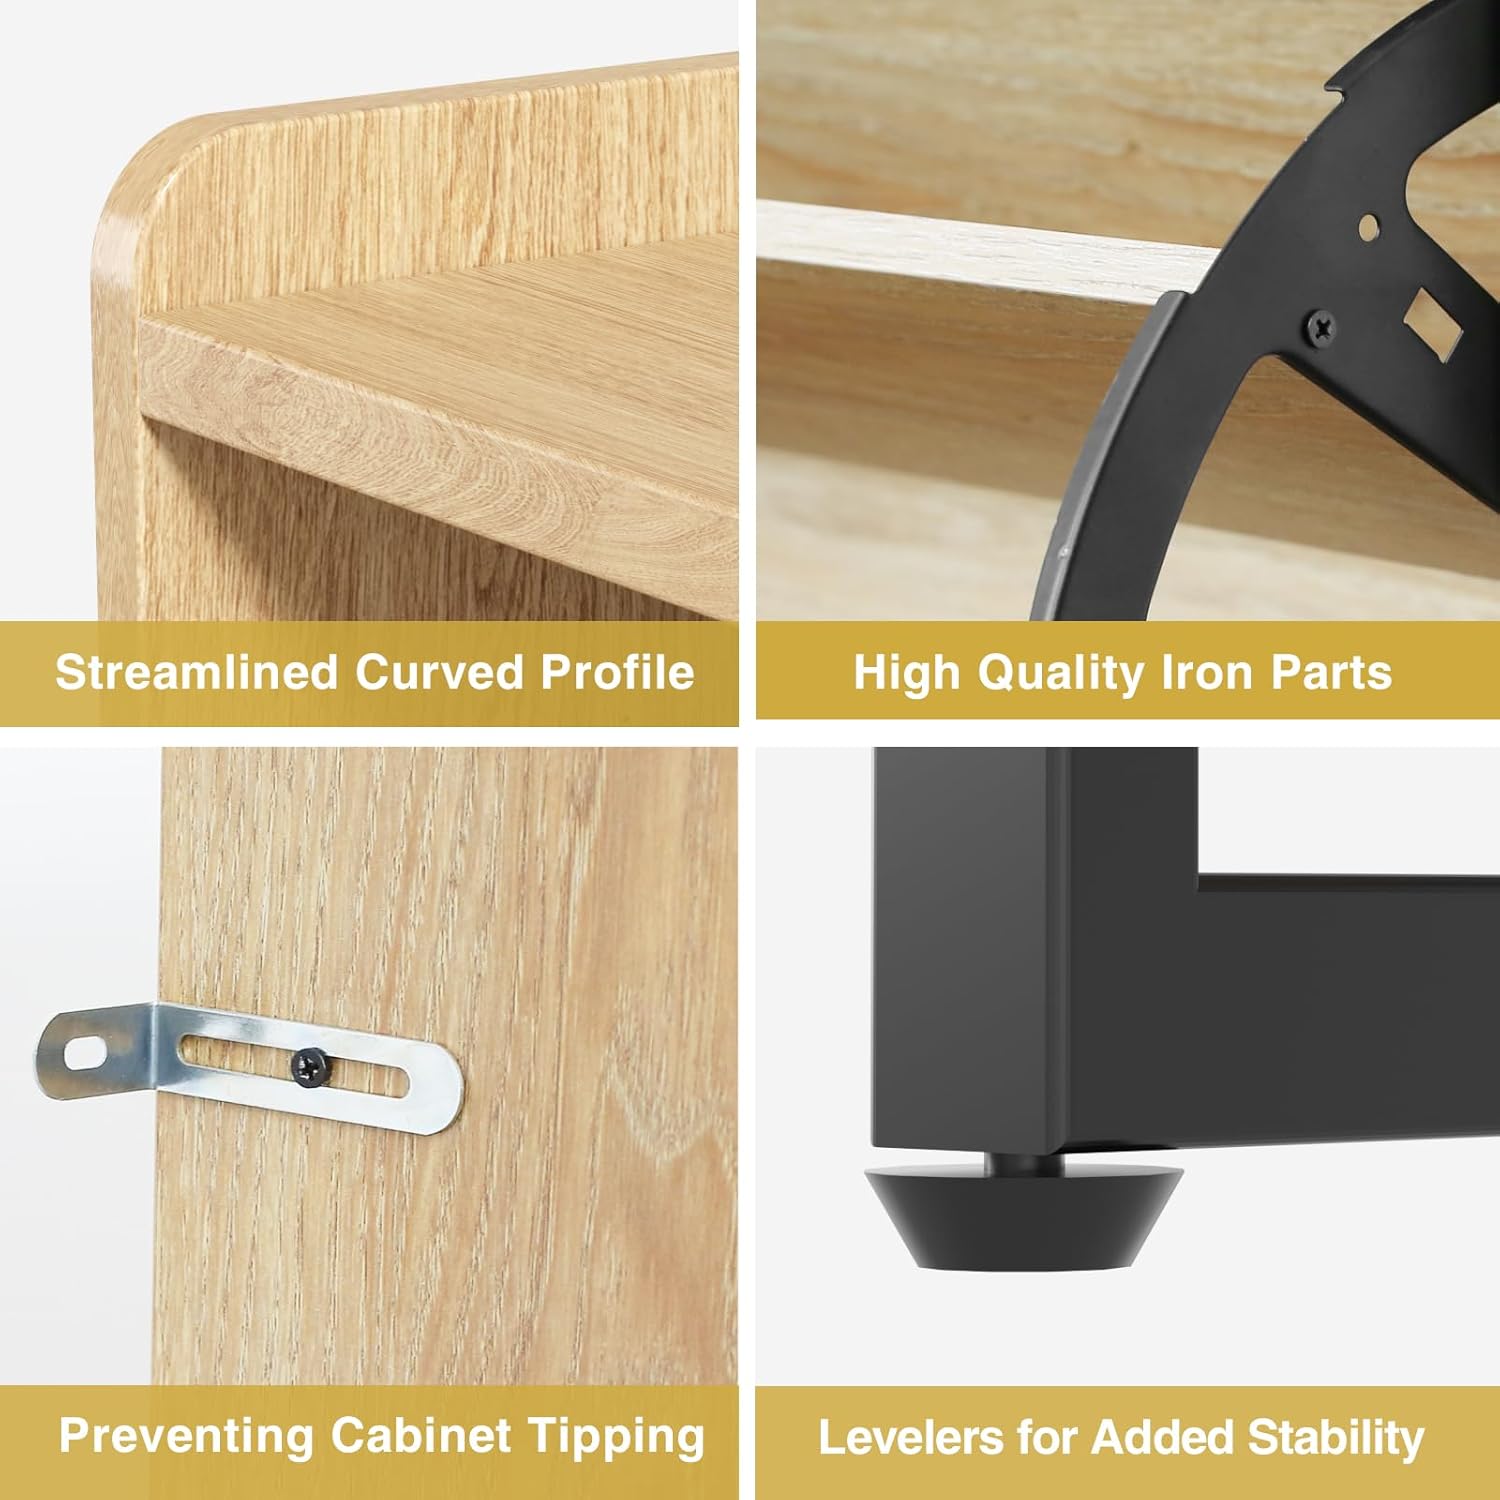
Image: Close-up details of the cabinet's construction, highlighting the streamlined curved profile, high-quality iron parts, the anti-tipping bracket for wall attachment, and adjustable levelers for stability.
Key Features Overview
- Natural Rattan Style: Enhances aesthetic appeal and adds warmth.
- Advanced Embedded Sensor Light: Automatic illumination for visibility.
- Multifunctional Storage: Two flip drawers and open shelves with adjustable options.
- Premium Quality Materials: Crafted with high-end iron fittings and durable wood panels.

Image: An annotated diagram of the shoe cabinet, pointing out key features such as the countertop with a fence, rattan-decorated doors, the adjustable and removable shelf, and the study metal legs.
Assembly Instructions
Assembly of this shoe cabinet is designed to be straightforward. It is recommended to have a clear, spacious area for assembly. Follow the steps below carefully.
- Unpack and Identify: Carefully unpack all components and hardware. Refer to the parts list (not provided in this document, refer to physical manual) to identify each piece.
- Assemble Frame: Begin by attaching the metal legs to the base of the cabinet using the provided screws. Ensure they are securely fastened.
- Install Side Panels: Connect the side panels to the base and back panel. Use the appropriate fasteners and ensure all connections are flush and stable.
- Insert Shelves: Place the fixed shelves into their designated slots. The adjustable shelves can be positioned according to your storage needs.
- Attach Flip Drawers: Install the flip drawer mechanisms and attach the rattan-decorated drawer fronts. Ensure the flipping action is smooth and unobstructed.
- Install Sensor Light: Position the sensor light in the designated area on the top shelf. Ensure it is correctly aligned for optimal motion detection.
- Anti-Tipping Device: For safety, attach the anti-tipping bracket to the back of the cabinet and secure it to a wall stud using appropriate wall anchors (not provided, consult local hardware store for suitable anchors for your wall type).
- Adjust Levelers: Use the adjustable levelers on the bottom of the metal legs to ensure the cabinet is stable and level on uneven floors.
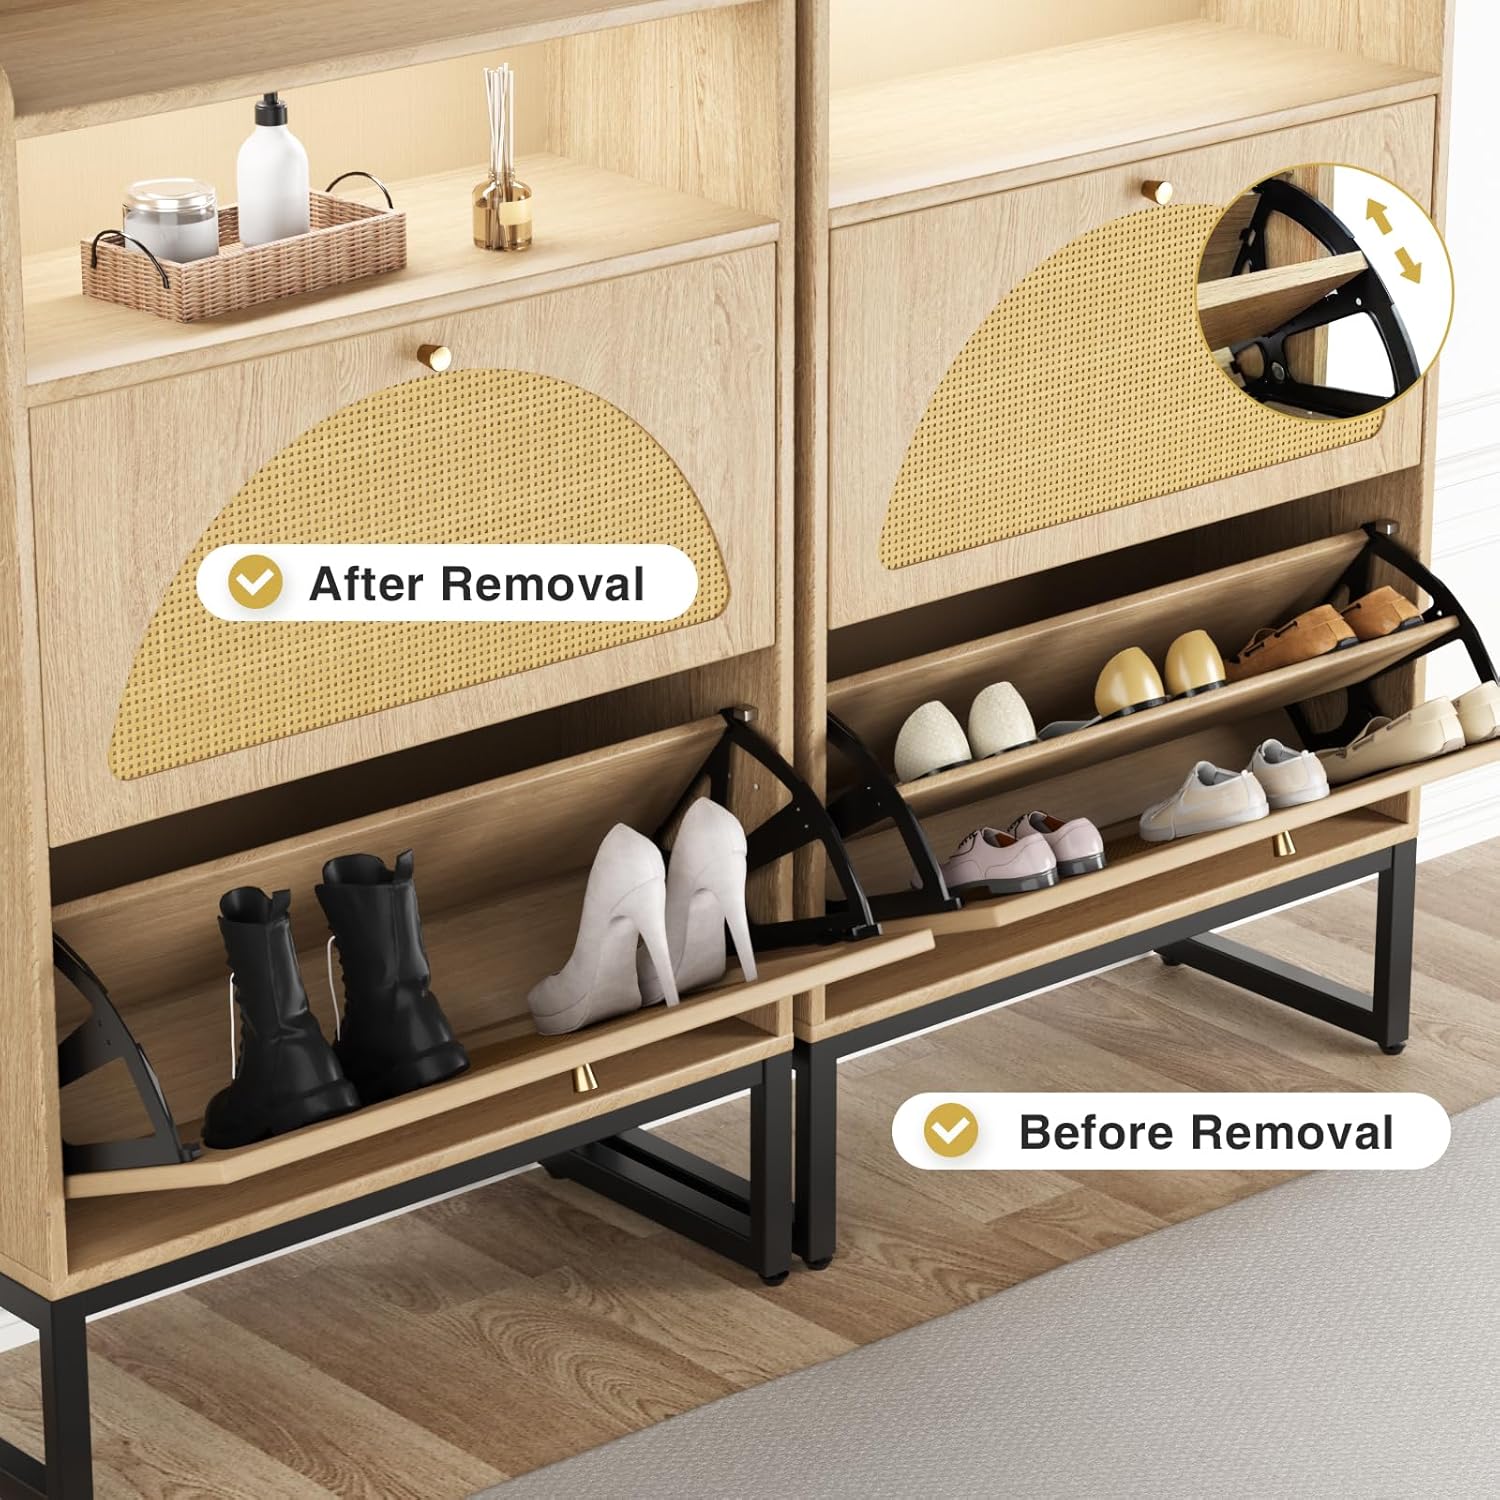
Image: A visual comparison demonstrating the flexibility of the flip drawers. One side shows standard shoe storage, while the other illustrates how removing an internal shelf allows for storage of taller items like boots.
Operation
Using the Flip Drawers
The cabinet features two flip drawers designed for efficient shoe storage. Gently pull the handle to open each drawer. Shoes can be placed on the internal shelves. For taller footwear like boots, the internal divider shelf within each flip drawer can be removed to create more vertical space.
Sensor Light Functionality
The embedded sensor light automatically illuminates the top shelf area when motion is detected, providing convenience in low-light conditions. Ensure the sensor is not obstructed for optimal performance. The light is energy-efficient and designed for ease of use.

Image: A detailed view of the top shelf, highlighting the integrated sensor light and its illumination, with various items placed on the shelf.
Top Shelf Usage
The top shelf provides additional space for accessories, decor, or daily essentials such as keys, wallets, or small decorative items. The raised edge (fence) helps prevent items from falling off.

Image: A close-up of the cabinet's top shelf, showing it being used to hold small items like keys, a phone, and a small decorative plant, demonstrating its utility as a drop zone.
Maintenance
Proper care and maintenance will extend the life and appearance of your shoe cabinet.
- Cleaning: Wipe surfaces with a soft, damp cloth. Avoid harsh chemicals or abrasive cleaners that may damage the finish or rattan.
- Rattan Care: For the rattan panels, use a soft brush or vacuum cleaner with a brush attachment to remove dust. Avoid excessive moisture.
- Hardware: Periodically check all screws and fasteners to ensure they remain tight. Re-tighten as needed to maintain stability.
- Sensor Light: Keep the sensor area clean and free from dust to ensure proper function.
Troubleshooting
If you encounter any issues with your shoe cabinet, refer to the following common solutions:
| Problem | Possible Cause | Solution |
|---|---|---|
| Cabinet is wobbly | Uneven floor; loose fasteners | Adjust the levelers on the bottom of the legs. Check and tighten all assembly screws. |
| Flip drawer does not open/close smoothly | Obstruction; misaligned mechanism | Check for shoes or debris blocking the mechanism. Ensure the drawer mechanism was installed correctly during assembly. |
| Sensor light not working | Sensor obstructed; battery issue (if applicable); light malfunction | Ensure the sensor area is clear. If battery-operated, check or replace batteries. Contact support if the issue persists. |
| Anti-tipping device not secure | Improper installation; unsuitable wall anchors | Ensure the bracket is firmly attached to the cabinet and the wall. Use appropriate wall anchors for your wall type (e.g., drywall, concrete). |
Specifications
| Feature | Detail |
|---|---|
| Brand | FiveWillowise |
| Model Name | shoe cabinet |
| Item Model Number | L1B016 |
| Color | Brown |
| Product Dimensions | 9.8"D x 23.6"W x 43.3"H |
| Item Weight | 48.9 pounds |
| Weight Limit | 60 Pounds |
| Mounting Type | Floor Mount |
| Installation Type | Freestanding |
| Materials | Metal (Frame), Engineered Wood (Back Material), Rattan (Top Material Type) |
| Special Features | Adjustable Shelf, Customizable, Durable, Sensor Light |
| Assembly Required | Yes |
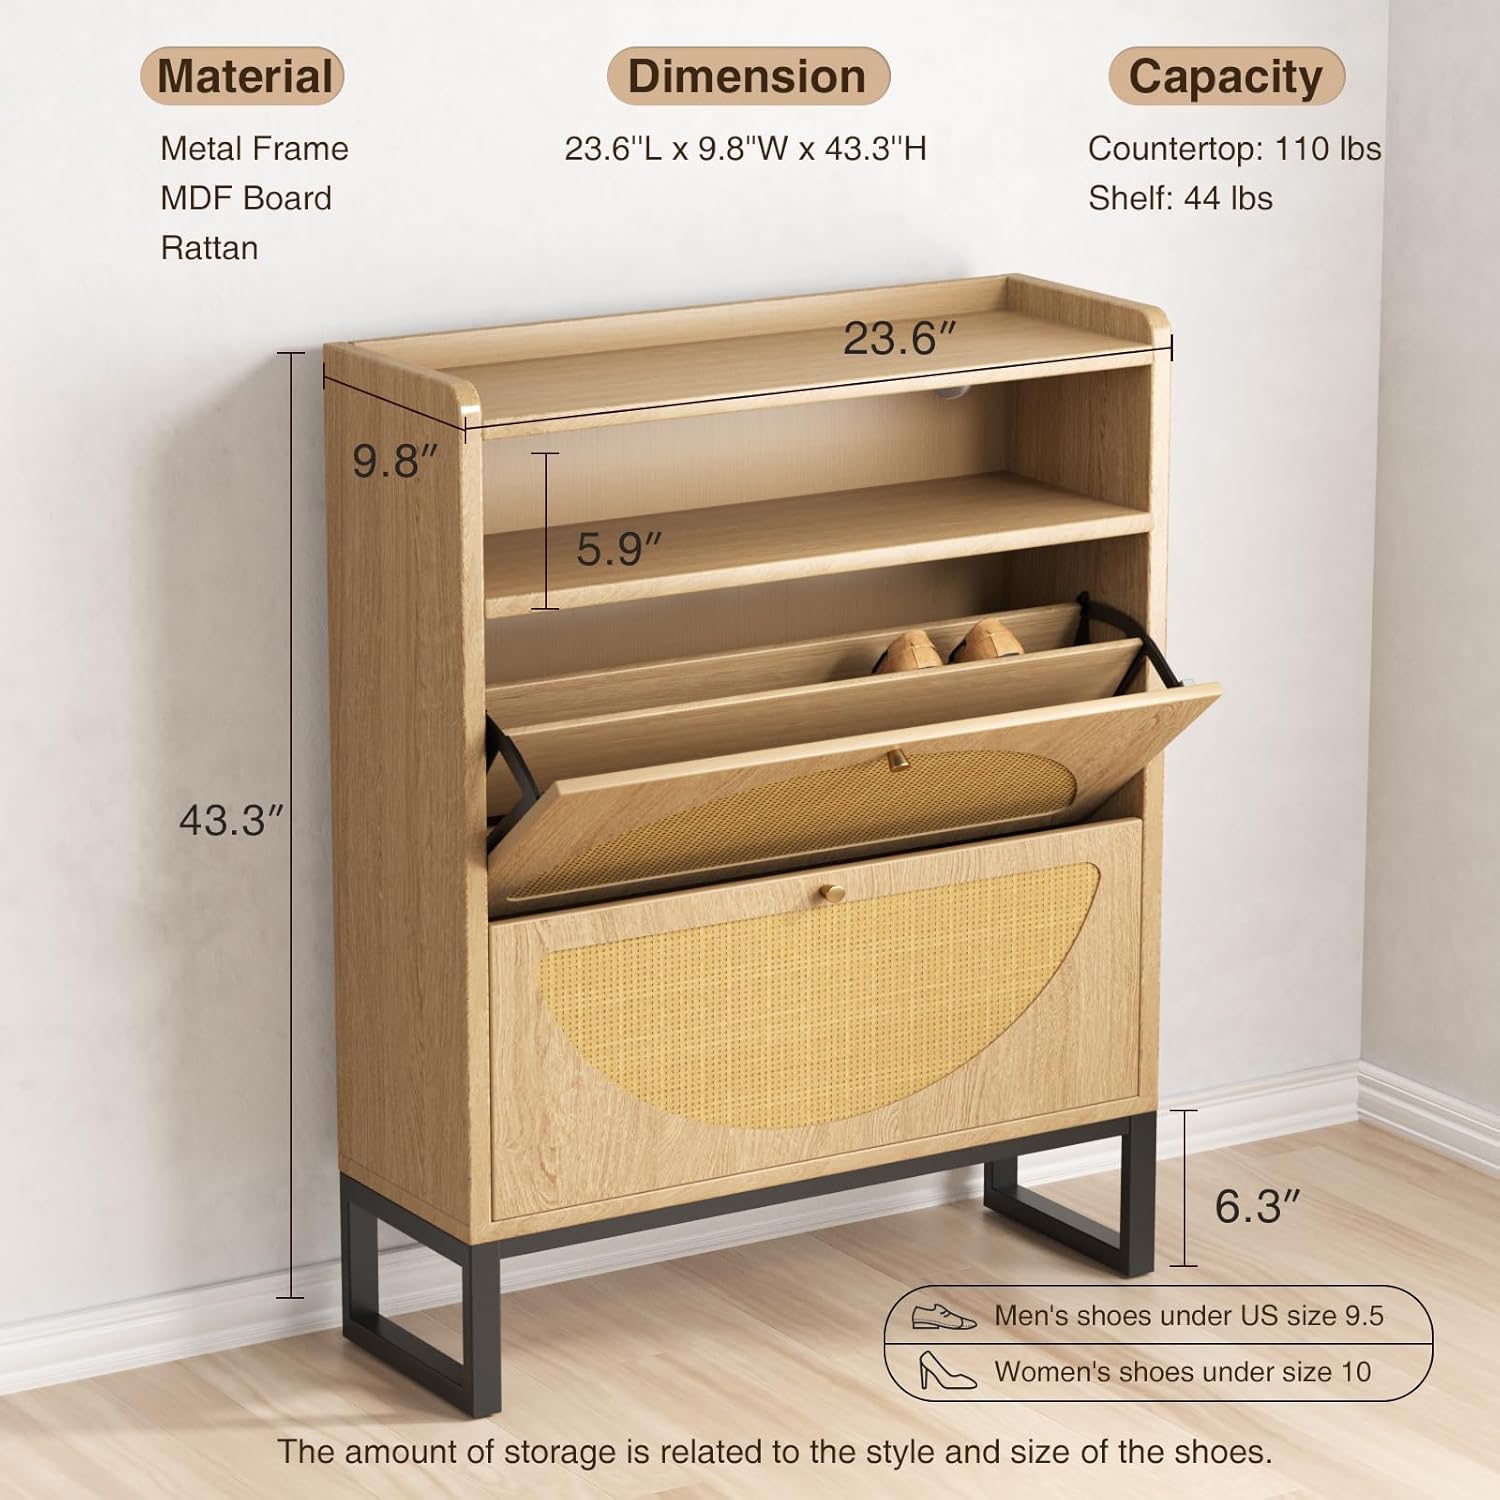
Image: A detailed diagram illustrating the dimensions of the shoe cabinet (23.6"L x 9.8"W x 43.3"H) and its capacity, noting that it can accommodate men's shoes under US size 9.5 and women's shoes under size 10, with countertop and shelf weight limits.
Warranty and Support
Warranty Information
Specific warranty details for the FiveWillowise Rattan Shoe Storage Cabinet are typically provided with your purchase documentation or can be obtained from the retailer where the product was purchased. Please refer to these documents for information regarding warranty coverage, terms, and conditions.
Customer Support
For further assistance, missing parts, or technical support, please contact FiveWillowise customer service through the retailer's platform or the official FiveWillowise website. Have your model number (L1B016) and purchase information ready when contacting support.


