1. Introduction
This manual provides detailed instructions for the installation, operation, and maintenance of your FINYQBET 10.3-inch Portable Car Stereo. This device is designed to enhance your in-car entertainment and connectivity with features such as a 10.3-inch HD IPS touchscreen, wireless Apple CarPlay, Android Auto, Mirrorlink, FM transmitter, and Bluetooth connectivity.
2. Safety Information
- Always operate the device responsibly and ensure it does not distract you from driving.
- Do not attempt to install or service the unit while the vehicle is in motion.
- Ensure all cables are securely connected and do not obstruct driving controls.
- Avoid exposing the device to extreme temperatures, direct sunlight for prolonged periods, or moisture.
- Use only the provided power cable and accessories to prevent damage or fire.
3. Package Contents
Verify that all items are present in the package:
- 1 x 10.3-inch Portable Car Stereo
- 1 x Universal Display Base
- 1 x Installation Sticker
- 1 x User Manual (this document)
- 1 x Cigarette Lighter Plug (Power Cable)
- 1 x 3-meter Auxiliary Cable
4. Product Overview
The FINYQBET 10.3-inch Portable Car Stereo features a high-definition touchscreen and various connectivity options. Below are the general dimensions of the unit and its mounting options.
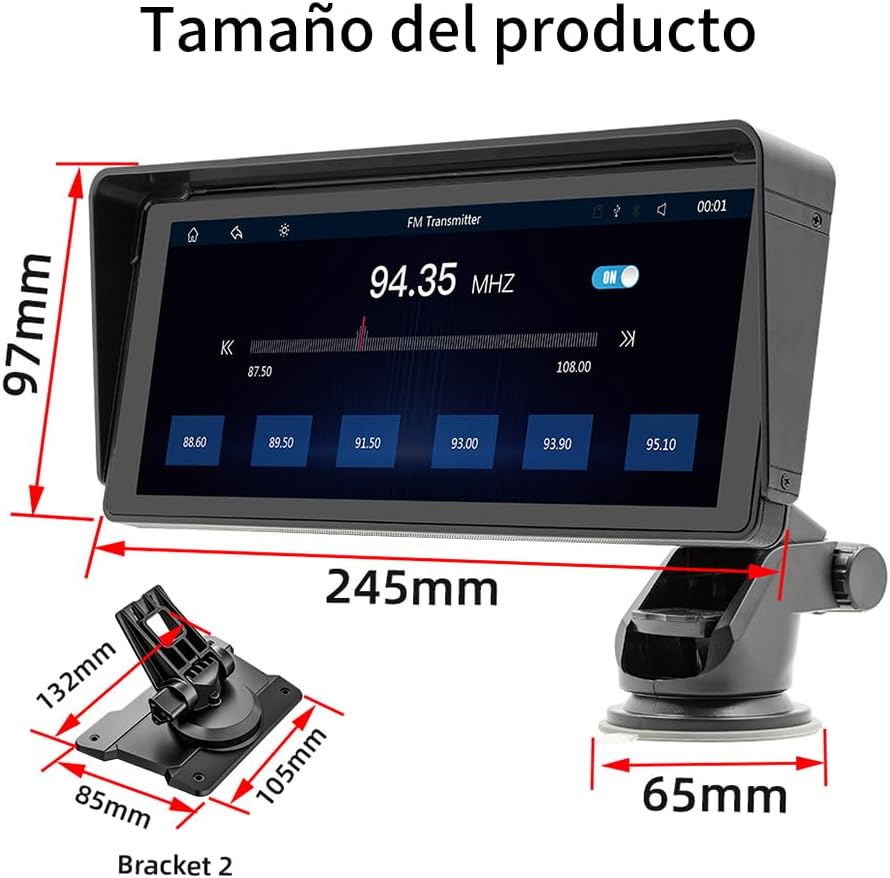
Figure 4.1: Product Dimensions. The main unit measures 97mm in height and 245mm in length. The suction cup base has a width of 65mm. Bracket 2 dimensions are 132mm x 85mm x 105mm.
5. Setup
5.1 Mounting the Device
The car stereo offers flexible mounting options to suit various vehicle interiors. You can choose between a suction cup mount or a base mount, both designed for easy installation and adjustment.

Figure 5.1: Mounting Options. The adjustable suction cup mount allows for free rotation, scalable length, 270-degree swivel, and includes a detachable sun visor. The base mount provides a 90-degree swivel for screen angle adjustment.
- Choose a Location: Select a suitable, flat surface on your dashboard or windshield that does not obstruct your view or interfere with airbags.
- Attach the Mount:
- For the Suction Cup Mount: Clean the surface thoroughly. Press the suction cup firmly against the surface and engage the locking lever. Adjust the arm and screen angle as desired.
- For the Base Mount: Use the provided installation sticker to secure the base to a clean, flat surface. Ensure it is firmly attached. Adjust the screen angle using the 90-degree swivel.
- Attach the Stereo: Slide the car stereo onto the chosen mount until it clicks securely into place.
5.2 Power Connection
Connect the provided cigarette lighter plug (power cable) to the car stereo and then into your vehicle's 12V power outlet (cigarette lighter socket). The device is compatible with vehicles ranging from 7V to 32V.
5.3 Initial Power On
Once powered, the device will automatically turn on. Follow any on-screen prompts for initial setup, such as language selection.
6. Operating Instructions
6.1 Touchscreen Interface
The device features a responsive 10.3-inch HD IPS touchscreen. Navigate through menus and control functions by tapping, swiping, and pinching gestures similar to a smartphone.
6.2 Wireless Apple CarPlay
Connect your iPhone wirelessly to access CarPlay features.

Figure 6.1: Apple CarPlay. The CarPlay function allows you to use various iPhone applications directly on the car stereo screen, either wirelessly or via a wired connection.
- Ensure Bluetooth and Wi-Fi are enabled on your iPhone.
- On the car stereo, select the CarPlay icon.
- On your iPhone, go to Settings > General > CarPlay and select your car stereo from the available devices.
- Follow the on-screen prompts to complete the connection.
6.3 Wireless Android Auto
Connect your Android smartphone wirelessly to use Android Auto features.

Figure 6.2: Android Auto. Connect Android Auto to display your Android applications on the car stereo screen, supporting both wireless and wired connections.
- Ensure Bluetooth and Wi-Fi are enabled on your Android phone.
- On the car stereo, select the Android Auto icon.
- On your Android phone, open the Android Auto app (or ensure it's installed and updated).
- Follow the on-screen prompts to connect your phone to the car stereo.
6.4 Mirrorlink (Screen Mirroring)
The Mirrorlink function allows you to mirror your smartphone's screen onto the car stereo display.

Figure 6.3: Mirrorlink. This feature enables mobile screen projection, compatible with both Android and iPhone. For Android, an app may be required, and touch control from the stereo might be limited. iPhones can project screens when connected but do not support two-way touch control.
- Select the Mirrorlink icon on the car stereo.
- Follow the specific instructions displayed on the screen for Android or iPhone connection. Android devices may require a specific app for screen projection. iPhones can project their screen but may not support touch control from the stereo.
6.5 Audio Output Methods
The stereo offers multiple ways to output audio to your vehicle's sound system.

Figure 6.4: Audio Output Methods. Audio can be transmitted via FM (selecting one of 12 preset frequencies), connected via a 3.5mm AUX cable to the car's original speakers, or played through the stereo's built-in speaker.
- FM Transmitter: Select the FM Transmitter function on the stereo. Choose an unused FM frequency from the available presets (e.g., 94.35 MHz). Tune your vehicle's original radio to the same FM frequency to hear the stereo's audio through your car speakers.
- Auxiliary (AUX) Cable: Connect the provided 3.5mm auxiliary cable from the stereo's AUX output to your vehicle's AUX input. Select the AUX input on your car's original radio.
- Built-in Speaker: The stereo has a built-in 1W speaker for direct audio playback, suitable for personal listening or when external audio connection is not desired.
6.6 Multimedia Playback
The device supports playback of multimedia files from USB drives and TF (MicroSD) cards.

Figure 6.5: Multimedia Player. The stereo supports playing media from TF cards and USB drives, and features a built-in 1W speaker.
- Insert a USB drive into the USB port or a TF card into the designated slot.
- Select the 'Multimedia' or 'Player' icon on the stereo's screen.
- Browse and select your desired audio or video files for playback.
6.7 Rear View Camera Compatibility
The stereo is compatible with external rear-view cameras (not included). When a compatible camera is connected and the vehicle is in reverse gear, the stereo will automatically display the camera feed.

Figure 6.6: Rear View Camera. The system automatically switches to the reverse camera image when reverse gear is engaged, featuring high definition, night vision, waterproof protection, and a 170-degree viewing angle.
7. Maintenance
- Cleaning the Screen: Use a soft, lint-free cloth to gently wipe the screen. For stubborn smudges, slightly dampen the cloth with water or a screen-cleaning solution. Do not use harsh chemicals or abrasive materials.
- General Care: Keep the device free from dust and debris. Avoid placing heavy objects on the unit.
- Cable Management: Ensure all cables are neatly routed and not pinched or tangled to prevent damage.
8. Troubleshooting
| Problem | Possible Cause | Solution |
|---|---|---|
| No power | Power cable not connected; vehicle's 12V outlet not working; fuse blown. | Check power cable connection. Test 12V outlet with another device. Check vehicle's fuse box. |
| No sound | Volume too low; incorrect audio output selected; AUX cable loose; FM frequency interference. | Increase volume. Select correct audio output (FM, AUX, built-in speaker). Ensure AUX cable is secure. Try a different FM frequency. |
| CarPlay/Android Auto not connecting | Bluetooth/Wi-Fi off on phone; phone not paired; app issues. | Ensure Bluetooth/Wi-Fi are on. Re-pair phone. Restart phone and stereo. Update CarPlay/Android Auto app. |
| Screen unresponsive | Temporary software glitch; extreme temperature. | Restart the device by disconnecting and reconnecting power. Allow device to return to normal operating temperature. |
9. Specifications
- Model: B5313
- Brand: FINYQBET
- Screen Size: 10.3 inches
- Screen Resolution: 1024 x 600 HD IPS
- Dimensions (Main Unit): Approximately 10 cm (height) x 24 cm (length)
- Connectivity Technology: Auxiliary, Bluetooth, USB
- Special Features: Apple CarPlay, Android Auto, FM Tuner, Touchscreen, Mirrorlink
- Compatible Devices: Smartphone, Television (for video input if supported)
- Connector Type: 3.5mm Jack, USB
- Audio Output Mode: Stereo
- Number of Channels: 4 (Implied audio processing/output capability)
- Control Method: Touchscreen, Voice (via connected smartphone)
- Audio Output Type: Speakers (Built-in and via vehicle's system)
- GPS: No built-in GPS
- TV Function: Yes (Requires external tuner/source if not built-in)
- Power Compatibility: 7V - 32V
10. Warranty and Support
For warranty information, please refer to the documentation provided at the time of purchase or contact your retailer. For technical support, please visit the manufacturer's official website or contact their customer service department.