Introduction
This manual provides essential instructions for the safe and efficient operation, maintenance, and troubleshooting of your Vevor Commercial Cold Beverage Dispenser, Model LYJ18Lx2. This unit is designed for commercial use, featuring two 9.5-gallon tanks for serving a variety of cold beverages.
Safety Instructions
Please read and understand all safety warnings and instructions before operating this appliance. Failure to follow these instructions may result in electric shock, fire, or serious injury.
- Ensure the appliance is connected to a grounded power outlet with the correct voltage.
- Do not operate the machine with a damaged power cord or plug.
- Keep hands and foreign objects away from moving parts during operation.
- Do not immerse the main unit in water or other liquids.
- Unplug the appliance before cleaning, maintenance, or when not in use.
- This appliance is for commercial use only and should be operated by trained personnel.
- Do not block ventilation openings on the unit.
- Use only food-grade liquids in the tanks.
Product Overview
The Vevor Commercial Cold Beverage Dispenser is constructed with a durable stainless steel body and features two transparent food-grade polycarbonate tanks. It is designed for efficient cooling and mixing of various cold beverages.

Figure 1: Front view of the Vevor Commercial Cold Beverage Dispenser, showcasing its dual tanks and dispensing spigots.

Figure 2: Diagram illustrating the premium materials used in the dispenser's construction, including food-grade polycarbonate tanks and a multi-layered stainless steel body.
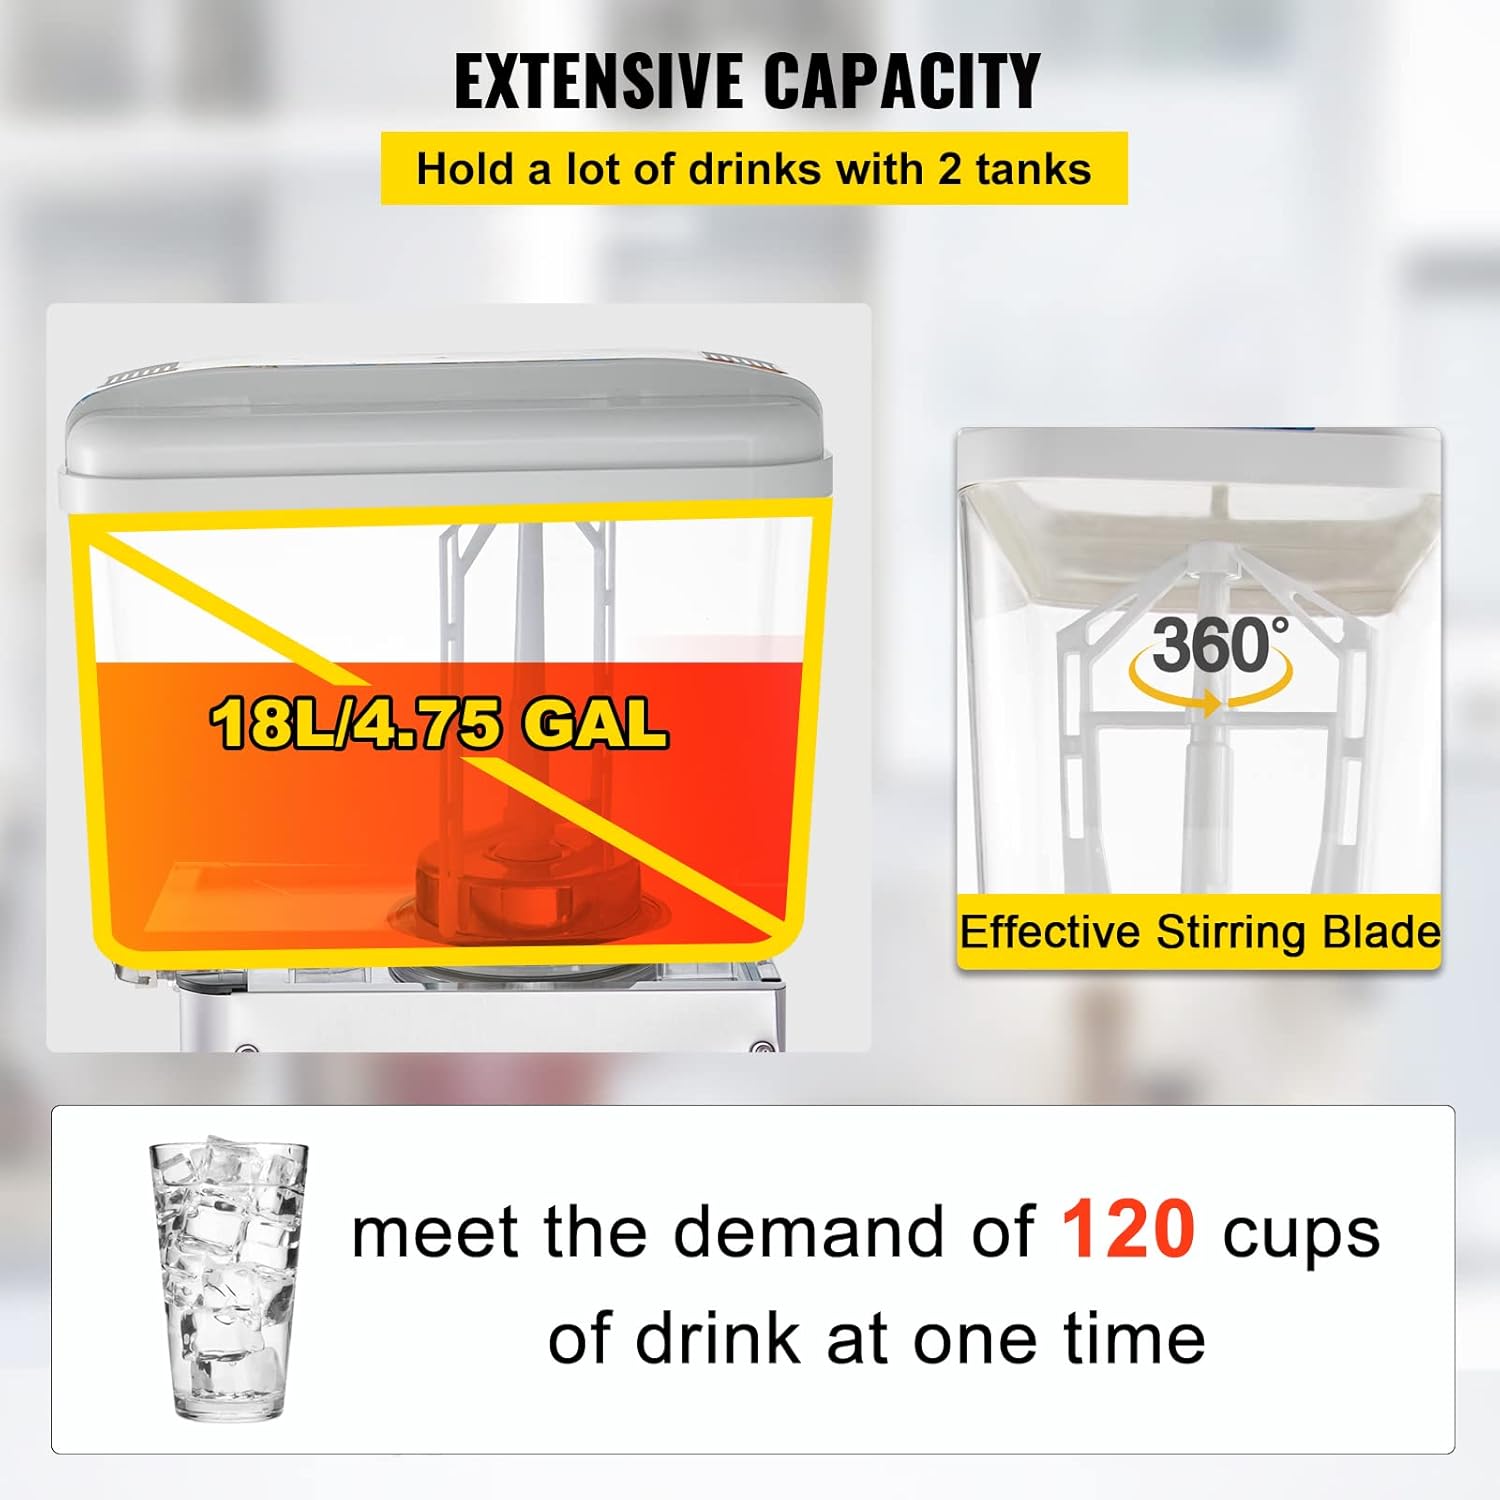
Figure 3: Illustration of the dispenser's extensive capacity, with each tank holding 18 liters (4.75 gallons) and featuring a 360-degree stirring blade for consistent mixing.

Figure 4: Overview of the high-efficiency cooling system, detailing its low noise operation, easy controls, efficient condenser, and stable compressor, maintaining temperatures between 7-12°C.

Figure 5: Detailed view of user-friendly design elements, including non-slip feet, an effortless drink outlet, detachable drip trays for easy cleaning, and effective vent holes for heat dissipation.
Setup
Follow these steps for initial setup of your beverage dispenser:
- Unpacking: Carefully remove all packaging materials. Inspect the unit for any damage incurred during shipping.
- Placement: Place the dispenser on a stable, level surface. Ensure there is adequate ventilation around the unit, especially at the back and sides where the vent holes are located. Avoid placing it near heat sources or in direct sunlight.
- Cleaning: Before first use, thoroughly clean the polycarbonate tanks, lids, stirring rods, and dispensing spigots. Refer to the 'Maintenance' section for detailed cleaning instructions.
- Assembly: Ensure the stirring rods are correctly installed in each tank. Place the cleaned tanks securely onto the main unit.
- Drip Trays: Install the detachable drip trays beneath the spigots.
- Power Connection: Connect the power cord to a grounded electrical outlet that matches the voltage requirements of the unit.
Operating Instructions
Once the unit is set up and cleaned, you can begin operation:
- Fill Tanks: Pour your desired cold beverages into the polycarbonate tanks. Do not overfill beyond the 'MAX' line indicated on the tanks.
- Secure Lids: Place the ABS external lids securely on top of each tank.
- Power On: Turn on the main power switch, usually located on the back or side of the unit.
- Activate Cooling: Locate the 'COOLING' switch (refer to Figure 4 for typical control panel layout) and turn it ON. The unit will begin to cool the beverages to the set temperature range of 7-12°C.
- Activate Mixing: If your beverage requires continuous stirring (e.g., juice with pulp), locate the 'MIXING' switch and turn it ON. The 360-degree stirring blades will activate to prevent sediment and ensure consistent mixing.
- Dispensing: To dispense a drink, place a cup under the spigot and press the comfortable push handle. Release the handle to stop the flow.
- Temperature Adjustment: The unit maintains a temperature range of 7-12°C. If specific temperature adjustments are available, refer to the control panel for detailed instructions.
Maintenance
Regular cleaning and maintenance are crucial for the longevity and hygienic operation of your dispenser.
- Daily Cleaning: After each day of use, or when changing beverages, empty the tanks.
- Disassembly: Turn off and unplug the unit. Carefully remove the tanks, lids, stirring rods, and drip trays.
- Washing Components: Hand wash all removable parts (tanks, lids, stirring rods, drip trays, spigots) with warm, soapy water. Rinse thoroughly with clean water.
- Main Unit Cleaning: Wipe the exterior of the main unit with a damp cloth. Do not use abrasive cleaners or immerse the main unit in water.
- Drying: Ensure all parts are completely dry before reassembling to prevent water spots or bacterial growth.
- Reassembly: Reassemble the unit, ensuring all parts are correctly in place.
- Ventilation: Periodically check and clean the ventilation openings to ensure proper airflow and prevent overheating.
Note: While some specifications indicate dishwasher safety, hand washing is recommended for optimal care and longevity of components.
Troubleshooting
This section addresses common issues you might encounter with your beverage dispenser.
| Problem | Possible Cause | Solution |
|---|---|---|
| Unit does not power on. | No power supply; power cord not plugged in; main power switch off. | Check power outlet and plug connection. Ensure main power switch is ON. Check circuit breaker. |
| Beverages are not cooling. | Cooling switch is OFF; ventilation blocked; ambient temperature too high. | Ensure 'COOLING' switch is ON. Clear any obstructions from ventilation openings. Operate in a cooler environment. |
| Stirring mechanism not working. | Mixing switch is OFF; stirring rod improperly installed. | Ensure 'MIXING' switch is ON. Verify stirring rod is correctly seated in the tank. |
| Beverage leakage from spigot. | Spigot not fully closed; worn sealing rings. | Ensure spigot handle is fully released. Inspect and replace sealing rings if worn. |
| Excessive noise during operation. | Unit not level; internal component issue. | Ensure the unit is on a level surface. If noise persists, contact customer support. |
Specifications
Detailed technical specifications for the Vevor Commercial Cold Beverage Dispenser.
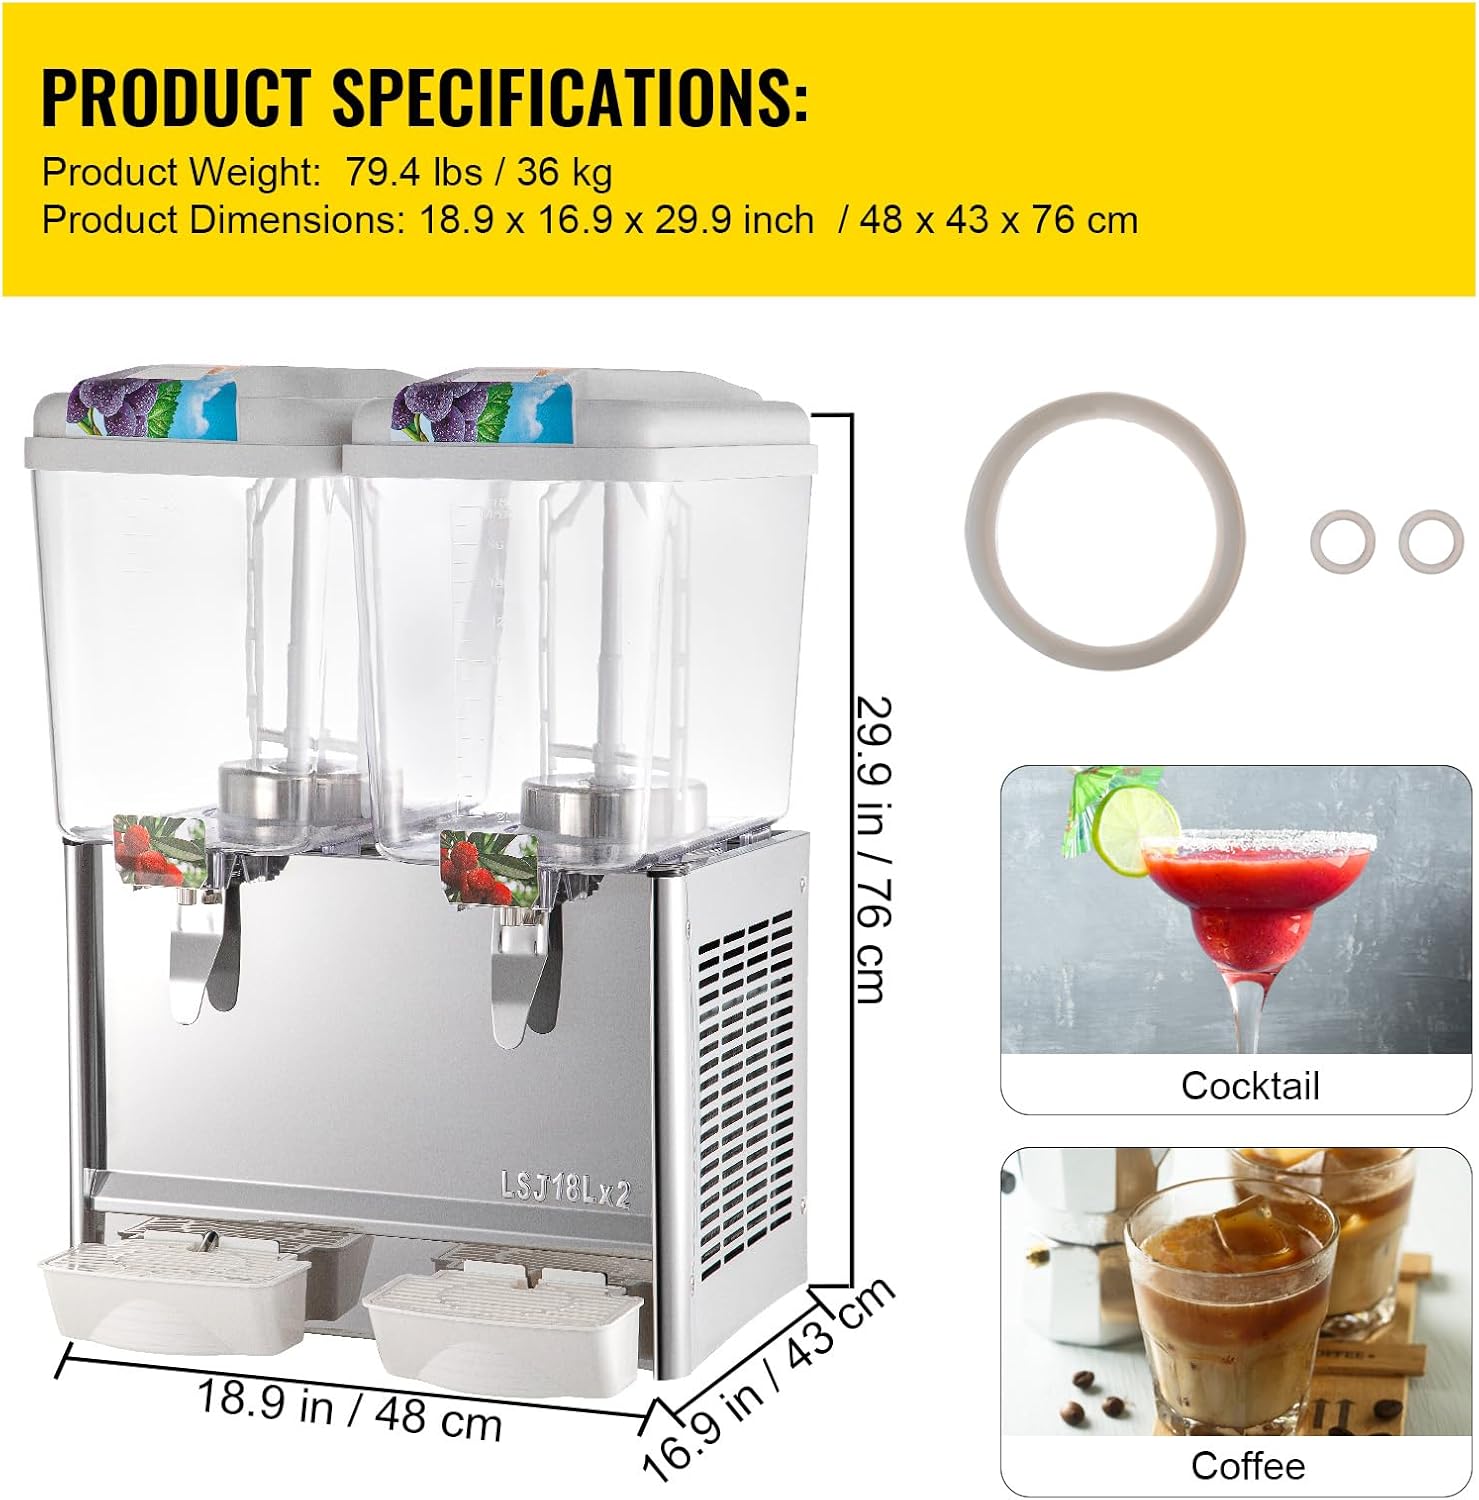
Figure 6: Visual representation of key product specifications and typical uses.
| Feature | Specification |
|---|---|
| Brand | Vevor |
| Model Number | LYJ18Lx2 |
| Rated Power | 300 Watts |
| Total Capacity | 9.5 US Gallons (2 x 4.75 Gallons / 2 x 18 Liters) |
| Cooling Temperature Range | 7-12°C (45-54°F) |
| Tank Material | Food-grade Polycarbonate |
| Body Material | Stainless Steel |
| Product Weight | 24.49 kg (54 lbs) |
| Product Dimensions (L x W x H) | 48.01 x 42.93 x 64.01 cm (18.9 x 16.9 x 25.2 inches) |
| Color | Black |
| Care Instructions | Hand wash only (for removable parts) |
| UPC | 197988563969 |
Warranty and Support
For warranty information or technical support, please refer to the warranty card included with your product or visit the official Vevor website. Keep your purchase receipt as proof of purchase for any warranty claims.
For further assistance, you may contact Vevor customer service through their official channels.


