1. Introduction
This manual provides essential information for the safe and efficient operation of your PLASMARGON PLC65Pro Plasma Cutter Machine. Please read all instructions carefully before use to ensure proper setup, operation, and maintenance. Retain this manual for future reference.
Key Features:
- Dual Voltage Compatibility: Supports automatic power switching between 110V and 220V (50/60Hz).
- Non-Contact Pilot Arc + HF Technology: Enables efficient cutting on rough, painted, or rusty surfaces, extending P80 consumable lifespan.
- IGBT Inverter Technology: Offers over 85% energy conversion efficiency, stable current output, and reduced slag.
- LED Digital Display: Provides real-time current and gas pressure readings for precise adjustments.
- Comprehensive Protection: Includes IP21-level waterproof protection, overload, and overheating safeguards.
2. Safety Information
Always prioritize safety when operating plasma cutting equipment. Failure to follow safety guidelines can result in serious injury or equipment damage.
- Wear appropriate personal protective equipment (PPE), including welding helmet, gloves, protective clothing, and safety shoes.
- Ensure adequate ventilation in the work area to disperse fumes.
- Keep flammable materials away from the cutting area.
- Do not operate the machine in wet conditions or near water.
- Ensure the workpiece is properly grounded.
- Disconnect power before performing any maintenance or changing consumables.
- Only use the machine for its intended purpose.
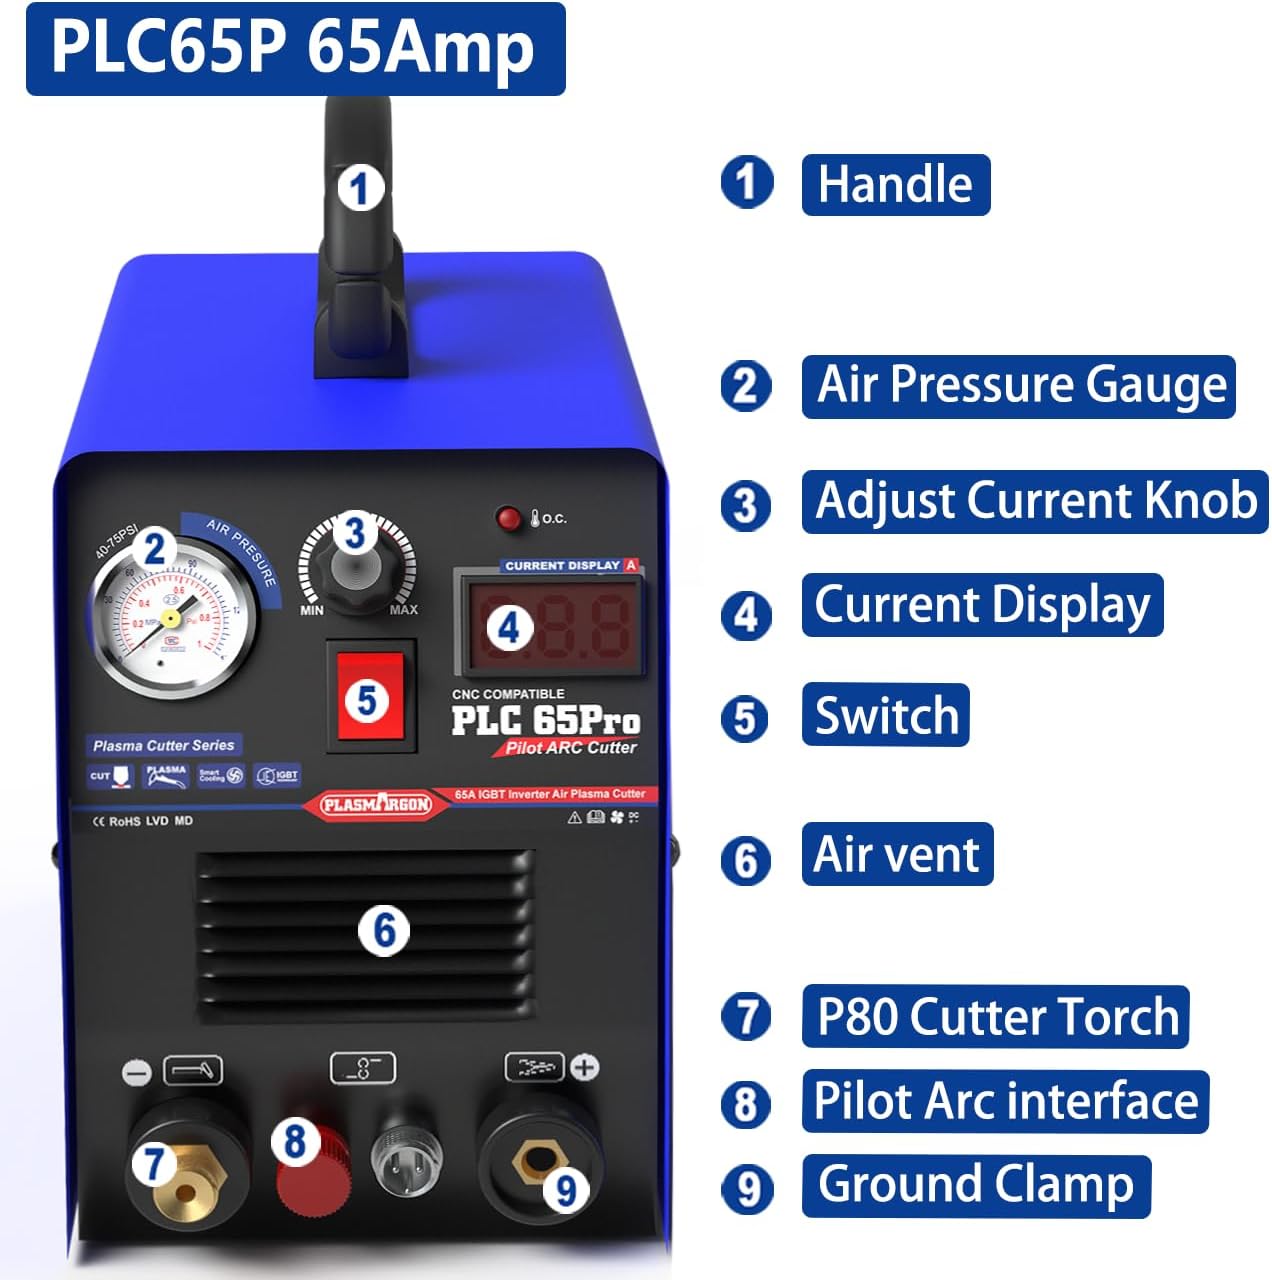
3. Product Components
Familiarize yourself with the main components of your PLC65Pro Plasma Cutter Machine.

Included Accessories:

- PLC65P plasma cutter machine (1 unit)
- P80 Plasma Cutting Torch (1 unit)
- P80 Consumables (3 sets)
- Ground Clamp (1 unit)
- Pressure Filter and Accessories
- User Guide
4. Setup
Follow these steps to set up your plasma cutter for operation.
- Connect the P80 Plasma Cutting Torch: Securely attach the P80 Plasma Cutting Torch to the designated connection points on the front panel of the machine (refer to Figure 3.1, item 7). Ensure all connections are tight to prevent air leaks or electrical issues.
- Connect the Ground Clamp: Attach the ground clamp cable to the ground clamp connection on the front panel (refer to Figure 3.1, item 9). The ground clamp must be securely attached to the workpiece or a clean, bare metal part of the work table to ensure a proper electrical circuit.
- Connect the Air Supply: Connect your compressed air supply to the air inlet on the rear of the machine. Ensure the air pressure is set according to the recommended range (typically 50-60 PSI for optimal cutting). The machine includes a pressure filter to ensure clean air supply.
- Power Connection: Connect the machine to an appropriate power source (110V or 220V) using the provided power cord. The machine automatically detects the voltage.

5. Operating Instructions
Once the machine is set up, follow these steps for safe and effective cutting.
- Power On: Turn on the main power switch (refer to Figure 3.1, item 5). The LED digital display will illuminate.
- Adjust Current: Use the Adjust Current Knob (refer to Figure 3.1, item 3) to set the desired cutting current. The LED Digital Display (refer to Figure 3.1, item 4) will show the real-time current. Adjust the current based on the material type and thickness. For 3/5 inch (15mm) thickness at 220V, a higher current (up to 65A) may be used. For 12mm thickness at 110V, adjust accordingly.
- Check Air Pressure: Verify the air pressure on the Air Pressure Gauge (refer to Figure 3.1, item 2). Ensure it is within the recommended operating range.
- Pilot Arc Initiation: The PLC65Pro features Non-Contact Pilot Arc technology. This allows the arc to initiate without direct contact with the workpiece, which is beneficial for cutting rusty or painted metals.
- Begin Cutting: Position the P80 Plasma Cutting Torch over the workpiece. Activate the torch trigger to initiate the pilot arc and begin cutting. Maintain a consistent travel speed and torch height for a clean cut.
- Monitor Performance: Observe the cut quality and adjust current or travel speed as needed. The IGBT inverter technology ensures stable current output, resulting in narrow and smooth cutting gaps.


6. Maintenance
Regular maintenance ensures the longevity and optimal performance of your plasma cutter.
- Consumables: Regularly inspect and replace P80 consumables (nozzle, electrode, shield cup) as they wear out. Worn consumables can lead to poor cut quality and reduced efficiency.
- Air Filter: Periodically check and clean or replace the air filter element in the pressure filter to ensure a clean and dry air supply to the torch. Moisture and contaminants in the air can damage the torch and affect cut quality.
- Cleaning: Keep the machine clean and free from dust and metal particles. Use compressed air to blow out internal components if necessary, ensuring the machine is unplugged.
- Cable Inspection: Inspect all cables and connections for damage, fraying, or loose connections before each use.
7. Troubleshooting
This section addresses common issues you might encounter during operation.
| Problem | Possible Cause | Solution |
|---|---|---|
| No arc initiation | No power, poor ground connection, worn consumables, insufficient air pressure. | Check power supply, ensure ground clamp is secure, replace consumables, verify air pressure. |
| Poor cut quality (rough, dross) | Incorrect current setting, worn consumables, incorrect travel speed, improper torch height, contaminated air. | Adjust current, replace consumables, optimize travel speed and torch height, check air filter. |
| Machine overheats | Exceeding duty cycle, blocked air vents. | Allow machine to cool down, ensure air vents are clear. |
| Air leaks | Loose air connections. | Tighten all air hose connections. |
8. Technical Specifications
| Specification | Value |
|---|---|
| Model Number | PLC65P |
| Manufacturer | PLASMARGON |
| Part Number | CUT55P P80 |
| Input Voltage | 110V/220V (Dual Voltage) |
| Rated Output Current | 65 Amperes (Adjustable range 30-65A) |
| Frequency | 50/60Hz |
| Max Cutting Thickness (220V) | 18mm (Precise cutting up to 15mm / 3/5 inches) |
| Max Cutting Thickness (110V) | 12mm (Precise cutting) |
| Technology | IGBT Inverter, Non-Touch Pilot Arc, HF Arc Initiation |
| Protection Level | IP21 |
| Item Weight | 8 kg |
| Parcel Dimensions | 47.6 x 37.59 x 29.59 cm |
9. Warranty and Support
PLASMARGON products are manufactured to high-quality standards. For warranty information, technical support, or service inquiries, please refer to the contact details provided with your purchase documentation or visit the official PLASMARGON website. Keep your proof of purchase for warranty claims.