
Mount-It! MI-14009
Mount-It! Heavy Duty XXL Tilting TV Wall Mount MI-14009 Instruction Manual
Brand: Mount-It! | Model: MI-14009
1. Introduction and Product Overview
This manual provides detailed instructions for the safe and proper installation and operation of your Mount-It! Heavy Duty XXL Tilting TV Wall Mount MI-14009. This mount is designed for extra-large flat or curved TVs ranging from 60 to 120 inches, supporting up to 264 lbs. It features a tool-free tilt option to reduce glare and optimize viewing angles.

Image 1: Mount-It! Heavy Duty XXL Tilting TV Wall Mount MI-14009. This image shows the main components of the wall mount, including the wall plate and the two vertical brackets that attach to the TV.
2. Safety Information
WARNING: Failure to read and follow all instructions may result in personal injury or damage to property. If you do not understand these instructions or have doubts about the safety of the installation, please contact customer support or a qualified installer.
- This product is designed for installation on wood studs or solid concrete/brick walls only. DO NOT install into drywall alone.
- Ensure the mounting surface can safely support the combined weight of the equipment and all attached hardware.
- Do not exceed the maximum weight capacity of 264 lbs (120 kg).
- Use plastic anchors only for concrete or masonry walls.
- Always use an assistant for lifting and positioning the TV.
3. Package Contents
Verify that all components are present and undamaged before installation. If any parts are missing or defective, contact Mount-It! customer support.

Image 2: All components included in the Mount-It! Heavy Duty XXL Tilting TV Wall Mount package. This includes the wall plate, TV brackets, various screws, washers, spacers, a bubble level, an Allen wrench, and an installation template.
- Wall Plate (1)
- TV Brackets (2)
- Mounting Hardware Kit (various screws, washers, spacers)
- Bubble Level (1)
- Allen Wrench (1)
- Installation Template (1)
- Instruction Manual (1)
4. Tools Required
The following tools are required for installation (not included):
- Pencil
- Phillips Head Screwdriver
- Drill
- Drill Bits (appropriate for wall type and lag bolt size)
- Stud Finder (for wood stud installation)
- Tape Measure
- Hammer (for concrete anchors)
5. Setup and Installation
Follow these steps carefully to ensure a secure and correct installation of your TV wall mount.
5.1. Attaching TV Brackets to the TV
- Carefully place your TV face down on a soft, clean surface to prevent scratches.
- Identify the VESA mounting holes on the back of your TV.
- Select the correct size screws, washers, and spacers from the hardware kit that fit your TV's mounting holes. Ensure screws are not too long or too short.
- Attach the two vertical TV brackets to the back of your TV using the selected hardware. Ensure the brackets are centered and securely fastened. The pull cords should hang freely below the TV.

Image 3: Close-up view of the TV brackets being attached to the back of a television using a drill. The brackets are aligned with the VESA mounting holes.
5.2. Installing the Wall Plate
The wall plate can be installed on wood studs or solid concrete/brick walls.
5.2.1. For Wood Stud Installation
- Use a stud finder to locate the edges and center of two or three adjacent wood studs. Mark the center of the studs.
- Position the installation template on the wall at your desired TV height, aligning it with the marked stud centers. Use the included bubble level to ensure the template is perfectly horizontal.
- Mark the drilling locations through the template onto the wall.
- Pre-drill pilot holes at the marked locations using a 3/16" (4.5mm) drill bit to a depth of 2.2" (55mm).
- Align the wall plate with the pre-drilled holes. Insert the lag bolts with washers through the wall plate and into the studs. Tighten the lag bolts securely with a socket wrench until the wall plate is firmly attached to the wall. Do not overtighten.

Image 4: Diagram showing the wall plate mounted on wood studs with 16", 17.7", and 23.6" stud spacing options. This image also shows the included installation template, bubble level, and hardware.
Video 1: Mount-It! Heavy Duty Tilt TV Wall Mount MI-14009 Installation Guide. This video demonstrates the step-by-step process of installing the wall mount, including marking drill holes, attaching the wall plate to the wall, and securing the TV brackets.
5.2.2. For Solid Concrete/Brick Wall Installation
- Position the installation template on the wall at your desired TV height. Use the included bubble level to ensure the template is perfectly horizontal.
- Mark the drilling locations through the template onto the wall.
- Pre-drill pilot holes at the marked locations using a 3/8" (10mm) masonry drill bit to a depth of 2.75" (70mm).
- Insert the concrete anchors into the pre-drilled holes until they are flush with the wall surface.
- Align the wall plate with the installed anchors. Insert the lag bolts with washers through the wall plate and into the anchors. Tighten the lag bolts securely with a socket wrench until the wall plate is firmly attached to the wall. Do not overtighten.
5.3. Hanging the TV on the Wall Mount
- With an assistant, carefully lift the TV with the attached brackets.
- Hook the TV brackets onto the top edge of the installed wall plate.
- Gently lower the TV until the bottom of the TV brackets engage with the wall plate. The quick release cords should hang freely below the TV.
- Pull down on the quick release cords to ensure the TV is securely locked onto the wall plate.
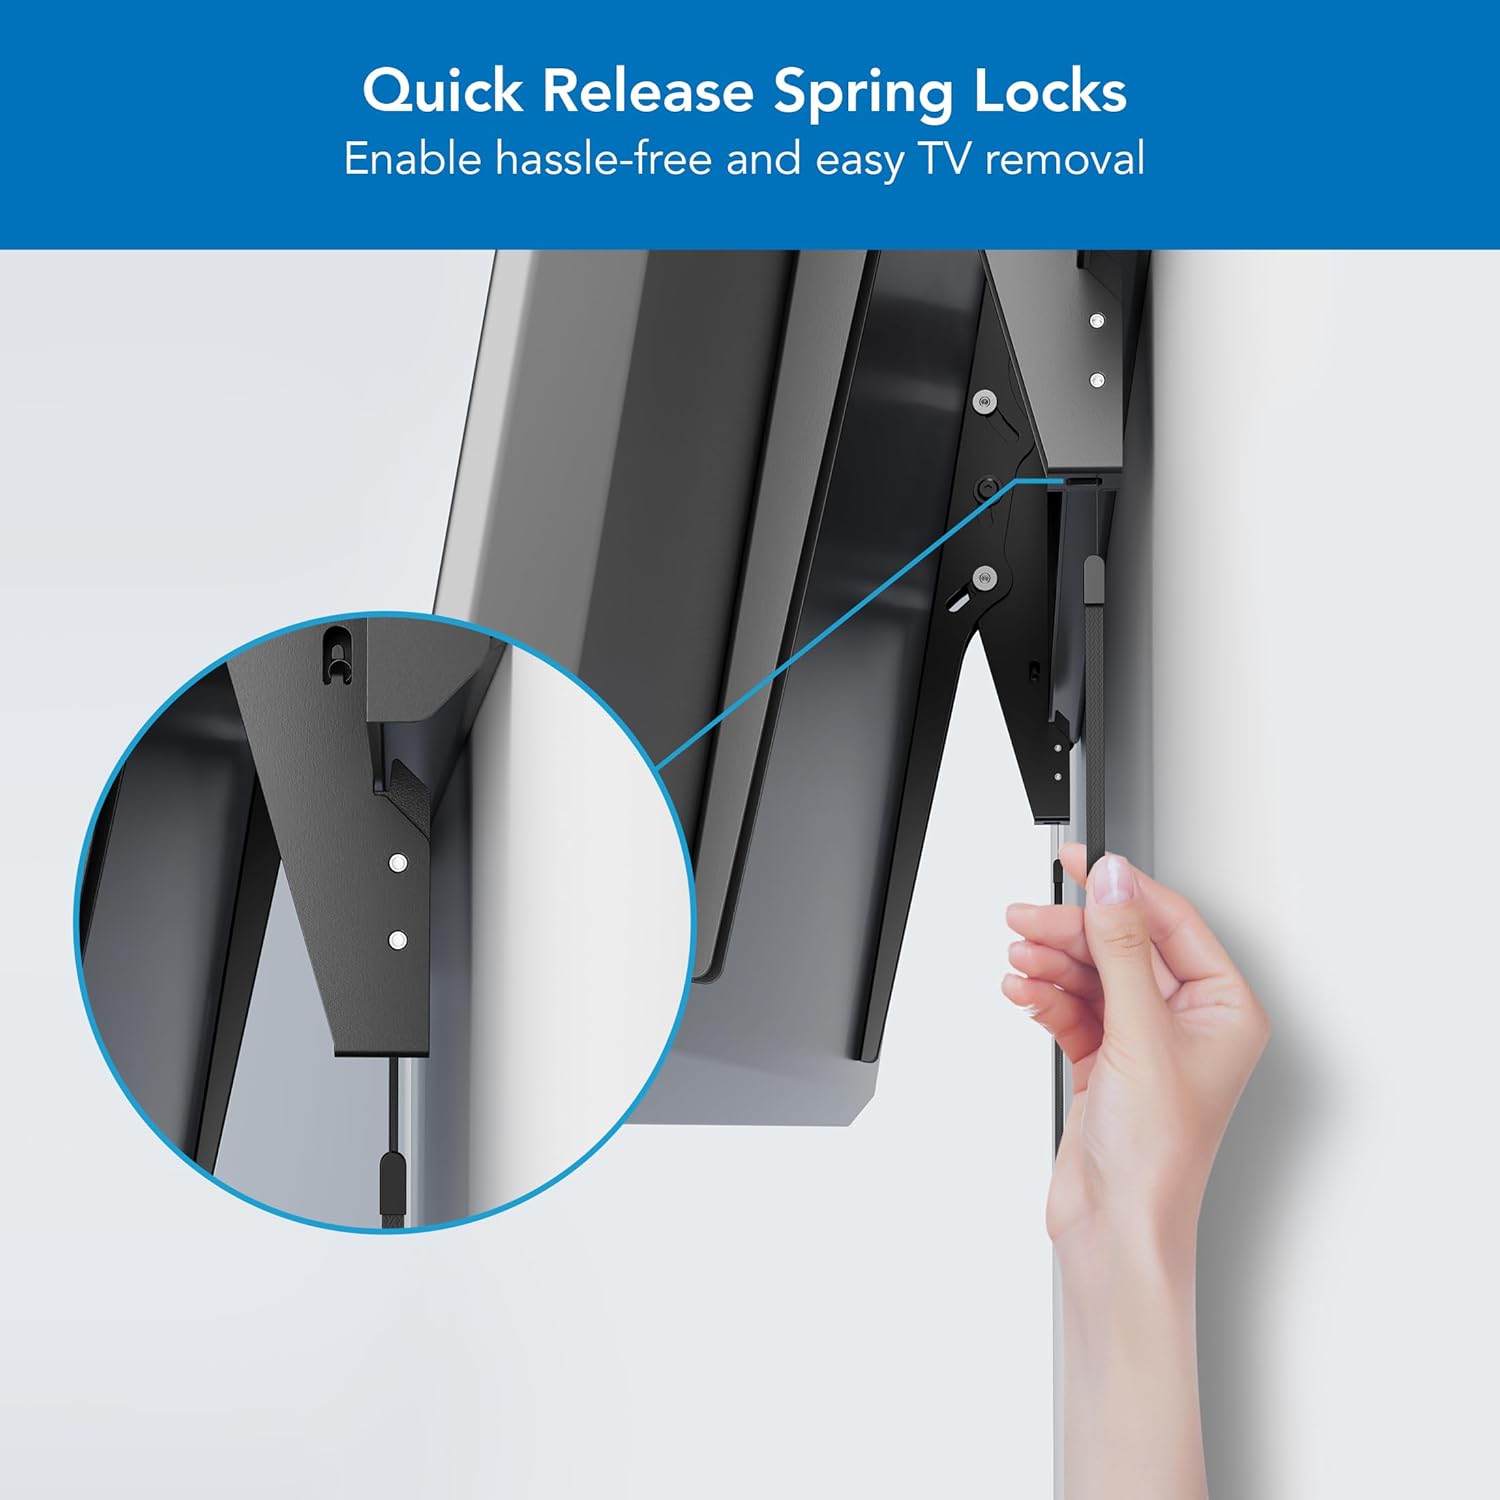
Image 5: Close-up view of the quick release spring locks on the TV brackets. These allow for easy removal of the TV from the wall mount by pulling the cords.
6. Operating Instructions
6.1. Adjusting Tilt Angle
The MI-14009 mount features a tool-free tilt adjustment. Gently push or pull the top or bottom of your TV to achieve the desired tilt angle (up to ±10 degrees). This helps reduce glare and optimize your viewing experience.

Image 6: Illustration demonstrating the tool-free tilt feature of the TV mount, allowing for an adjustment of ±10 degrees to reduce glare.
6.2. TV Centering
The sliding wall plate design allows for precise centering of your TV after installation. Gently slide the TV left or right along the wall plate to achieve the perfect position.
6.3. Cable Management
The open architecture of the wall plate provides easier access to wires and outlets, helping to keep your setup organized and clutter-free.
7. Specifications
| Feature | Specification |
|---|---|
| Model Number | MI-14009 |
| TV Size Compatibility | 60" - 120" |
| Weight Capacity | Up to 264 lbs (120 kg) |
| VESA Compatibility | 50x50mm to 900x600mm |
| Tilt Angle | ±10 Degrees |
| Wall Distance | 2.1 inches (53mm) |
| Material | Alloy Steel |
| Color | Black |
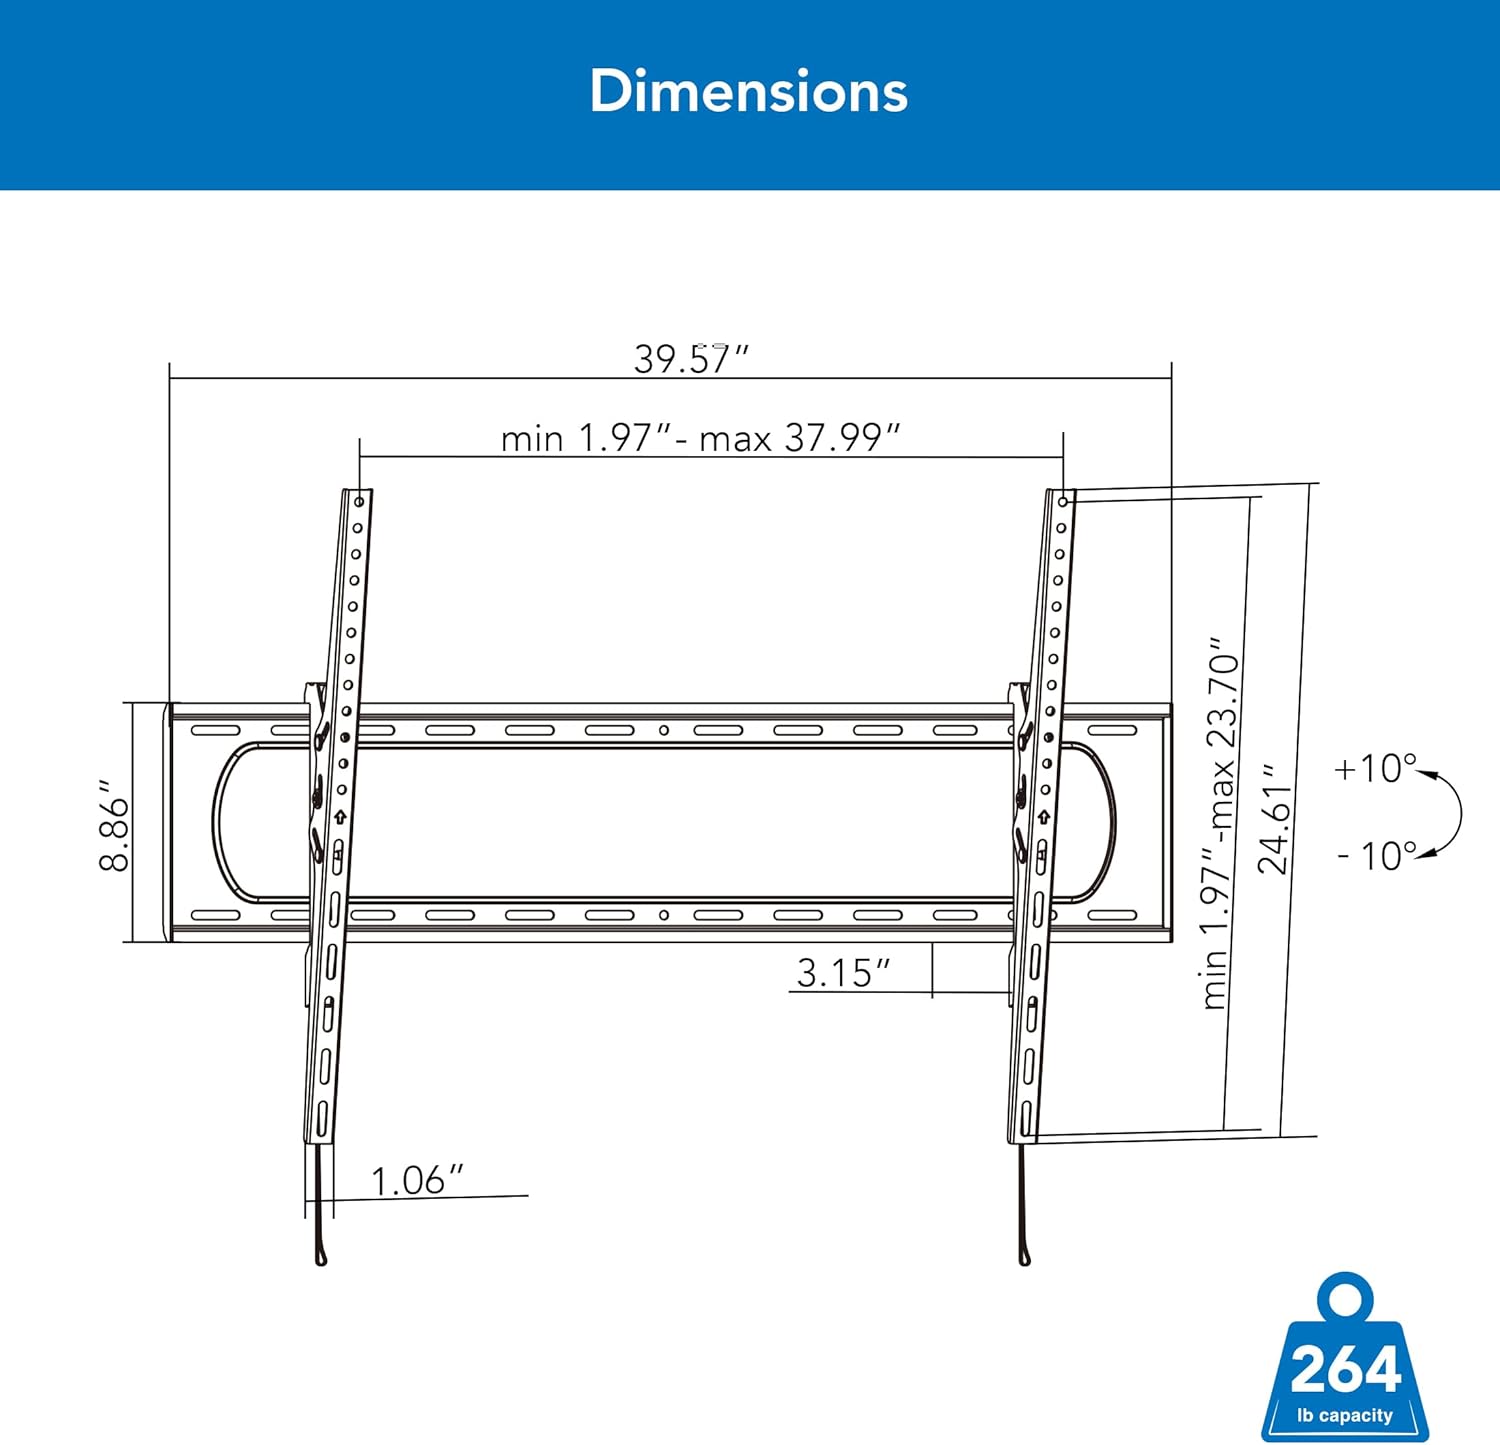
Image 7: Detailed technical drawing showing the dimensions of the Mount-It! Heavy Duty XXL Tilting TV Wall Mount, including width, height, and tilt range.
8. Maintenance and Troubleshooting
Regularly check that the mount and all fasteners are secure. If any components appear loose or damaged, tighten or replace them as necessary. Clean the mount with a soft, dry cloth.
If you encounter any issues during installation or operation, please refer to the detailed graphical installation guide included in the package or contact customer support.
9. Warranty and Support
Mount-It! Heavy Duty Tilt TV Wall Mount Brackets come with a LIFETIME warranty. Our knowledgeable and responsive US-based customer support team is available to answer any questions you may have during standard business hours.
For assistance, please visit the Mount-It! website or contact our customer support team directly.
Related documentsMI-14009


Ask a question about this manual
Ask about setup, troubleshooting, compatibility, parts, safety, or missing instructions. Manuals+ will review the question and use this page’s manual context to help answer it.