
1. Introduction
This manual provides essential information for the safe and effective operation, assembly, maintenance, and troubleshooting of your Pulsar 212cc 20-Inch Gas Powered Rear Tine Tiller. Please read this manual thoroughly before operating the tiller to ensure proper use and to prevent injury or damage.
The Pulsar PTG1120R is designed for breaking up and cultivating soil in gardens and other outdoor areas. Its powerful 212cc engine and counter-rotating tines make it suitable for various tilling tasks, including preparing new garden beds or maintaining existing ones.
2. Important Safety Information
WARNING: Failure to follow these safety instructions could result in serious injury or death.
- Wear protective gear, including eye protection, hearing protection, sturdy footwear, and gloves, during operation.
- Keep hands and feet away from all moving parts, especially the tines, during operation.
- Clear the work area of all debris, rocks, and other obstructions before starting the tiller.
- Turn off the engine and allow it to cool before refueling. Always refuel in a well-ventilated area away from open flames or sparks.
- Do not operate the tiller in wet conditions, on excessively steep slopes, or when fatigued or under the influence of alcohol or drugs.
- Store the tiller in a dry, secure place, out of reach of children and unauthorized users.
- Always ensure the depth regulator is properly set before tilling to maintain consistent depth and control.
3. Product Overview
The Pulsar PTG1120R Tiller is equipped with features designed for efficient soil cultivation.
Key Features:
- Heavy Duty 212cc gasoline powered OHV engine for powerful soil separation.
- Four 13-inch counter-rotating tines providing a 20-inch tilling width and up to 6.5-inches in depth.
- Large 13.5-inch tractor style wheels with neutral and drive cotter pin settings for maneuverability.
- Built-in depth regulator for consistent tilling depth.
- Forward and Reverse drive with safety lock for enhanced control and accident prevention.
Component Identification:

Figure 3.1: Overall view of the Pulsar Rear Tine Tiller.

Figure 3.2: Key controls and components of the tiller.

Figure 3.3: Detail of the Forward/Reverse control with safety lock.
4. Setup and Assembly
Your Pulsar Tiller requires some assembly before its first use. While assembly is generally straightforward, it is recommended to follow the detailed instructions provided in the separate assembly guide that accompanies the product. Ensure all fasteners are securely tightened.
Fluid Levels:
The tiller includes 85W140 gear oil (1 quart pre-filled) and 10W-30 engine oil. Before initial operation, always verify the oil levels. Refer to the engine and transmission sections of the assembly guide for specific instructions on checking and topping off fluids. Incorrect fluid levels can affect performance and may void the warranty.
5. Operating Instructions
Starting the Engine:
- Ensure the tiller is on a level surface and the area is clear.
- Set the fuel valve to the 'ON' position.
- Move the choke lever to the 'CHOKE' position (for cold starts).
- Set the engine switch to the 'ON' position.
- Pull the recoil starter handle firmly until the engine starts.
- Once the engine starts, gradually move the choke lever to the 'RUN' position.
Tilling Operation:
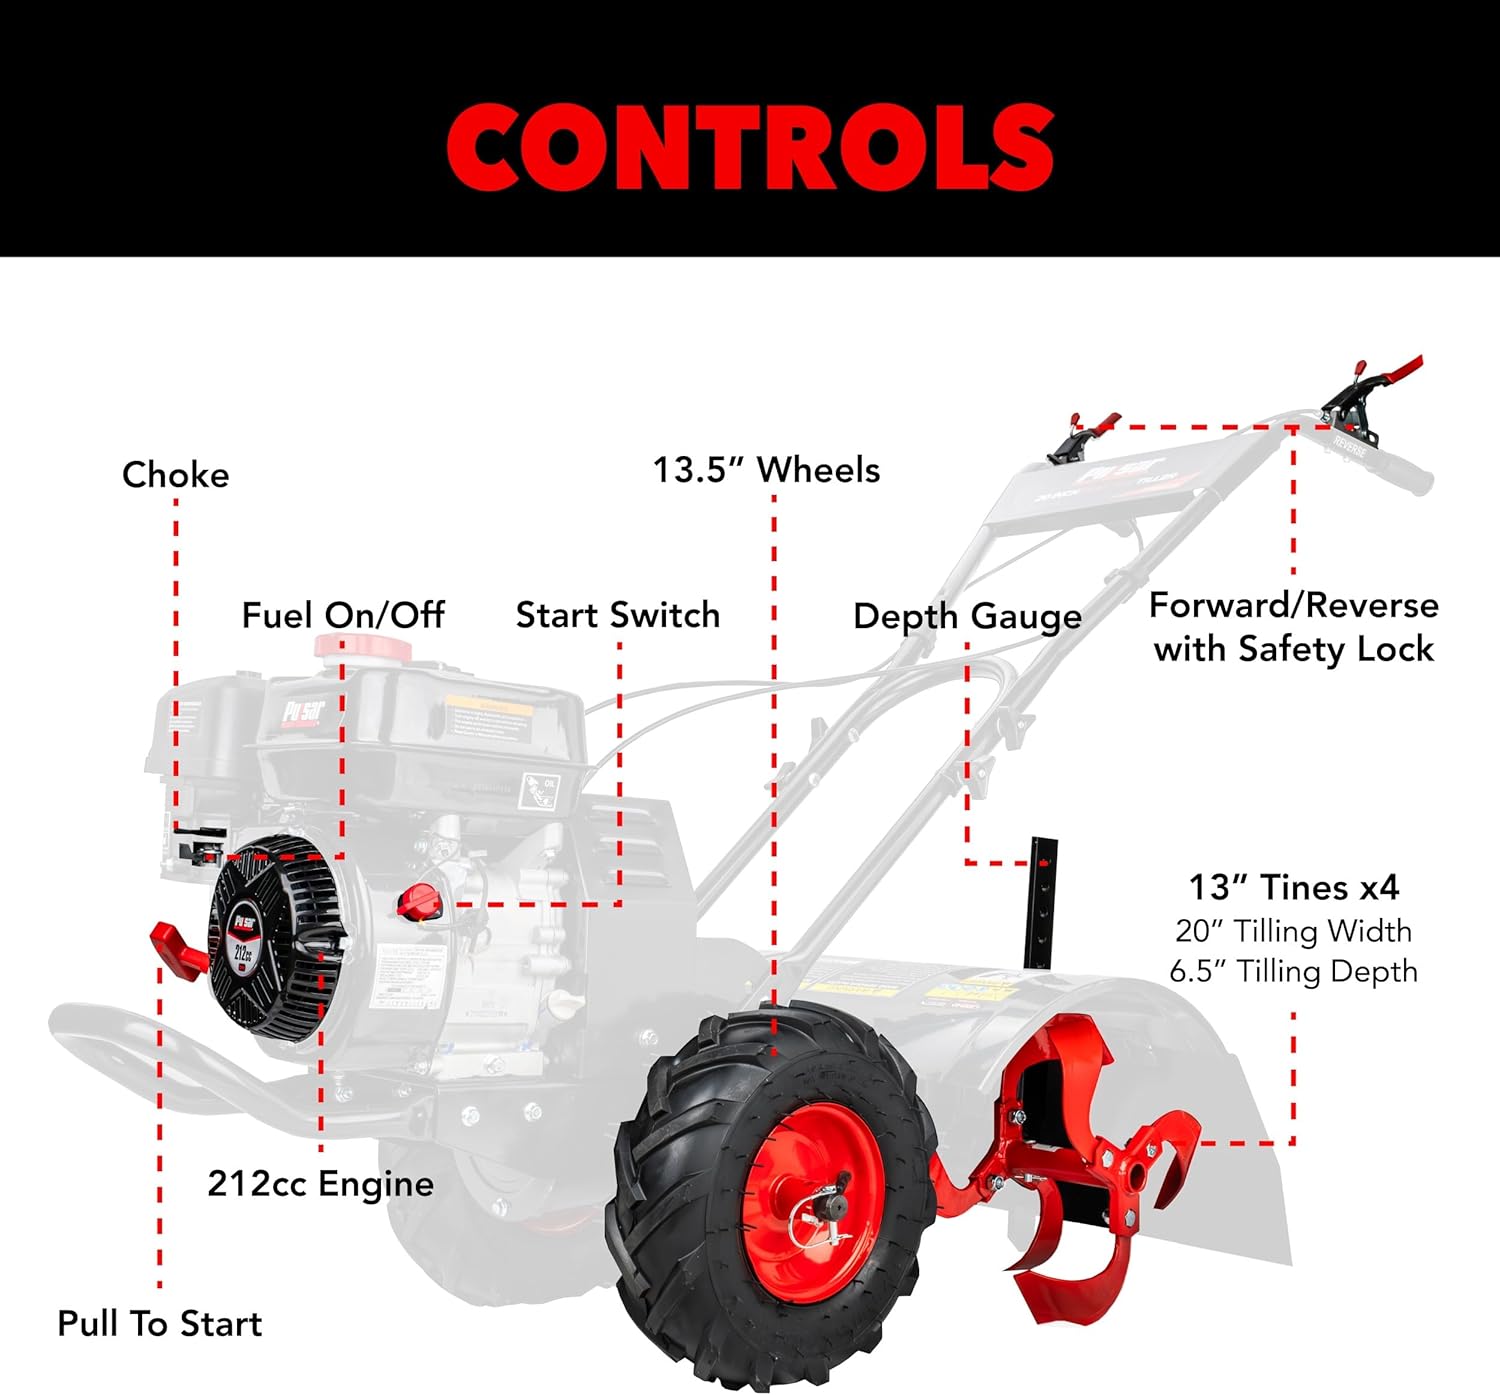
Figure 5.1: Tiller in use, demonstrating its soil cultivation capability.
- To engage the tines and move the tiller forward, depress the forward drive lever on the handle.
- To engage reverse, use the reverse drive lever, ensuring the safety lock is disengaged.
- Adjust the depth regulator to achieve the desired tilling depth, up to 6.5 inches. For deeper tilling, make multiple passes, gradually increasing the depth.
- Guide the tiller at a steady pace. Allow the tines to do the work; do not force the machine.
- When turning, lift the tines slightly to pivot the machine.
6. Maintenance
Regular maintenance is crucial for the longevity and optimal performance of your tiller.
Engine Oil:
- Check engine oil level before each use.
- Change engine oil after the first 5 hours of operation, then every 25 hours or annually, whichever comes first. Use 10W-30 engine oil.
Gear Oil:
- Check gear oil level periodically. The transmission uses 85W140 gear oil. Note that the transmission fill point is a plug, not a dipstick, requiring careful measurement to ensure correct level.
General Maintenance:
- Clean the tiller thoroughly after each use, removing soil and debris from the tines and engine area.
- Inspect tines for wear or damage. Replace worn tines as needed.
- Check air filter regularly and clean or replace if dirty.
- Inspect spark plug and clean or replace as necessary.
- Ensure all nuts, bolts, and fasteners are tight.
7. Troubleshooting
This section provides solutions to common issues you might encounter with your tiller.
Engine Does Not Start:
- Check fuel level and ensure the fuel valve is open.
- Verify the engine switch is in the 'ON' position.
- Ensure the choke is set correctly for starting (full choke for cold engine, no choke for warm engine).
- Check the spark plug for fouling or damage.
Tiller Not Tilling Effectively:
- Check for debris wrapped around the tines.
- Ensure the depth regulator is set appropriately for the soil conditions.
- Verify the tines are not excessively worn.
For issues not covered here, or if problems persist, please contact Pulsar customer support.
8. Specifications
| Specification | Value |
|---|---|
| Brand | Pulsar |
| Model Number | PTG1120R |
| Engine Displacement | 212cc |
| Power Source | Gas Powered |
| Tilling Width | 20 inches |
| Tilling Depth | Up to 6.5 inches |
| Tine Type | Counter-Rotating, 13-inch (x4) |
| Wheel Size | 13.5 inches |
| Product Dimensions (DxWxH) | 43"D x 27"W x 40"H |
| Item Weight | 154 Pounds |
| Material | Metal |
| Color | Black, Red, Gray |
| UPC | 814726026455 |
9. Warranty and Support
Pulsar products are designed for durability and performance. For specific warranty details, please refer to the warranty card included with your product or visit the official Pulsar website. Keep your proof of purchase for warranty claims.
For technical assistance, parts, or customer support, please contact Pulsar directly. Contact information can typically be found on the product packaging or the manufacturer's website.
Thank you for choosing Pulsar.