CENMATE 4 Bay Hard Drive External RAID Enclosure User Manual
Model: 4 Bay Raid
1. Introduction
This manual provides comprehensive instructions for the installation, operation, and maintenance of your CENMATE 4 Bay Hard Drive External RAID Enclosure. This device is designed to provide reliable external storage for 2.5-inch and 3.5-inch SATA HDDs and SSDs, supporting a maximum capacity of 72TB (18TB per drive) and various RAID configurations.
Please read this manual thoroughly before using the product to ensure proper setup and optimal performance.
2. Safety Information
- Ensure the device is placed on a stable, flat surface to prevent accidental falls.
- Do not expose the enclosure to water, moisture, or extreme temperatures.
- Use only the provided power adapter. Using an incorrect power adapter may damage the device and void the warranty.
- Avoid blocking the ventilation openings to ensure proper cooling.
- Do not attempt to disassemble or repair the device yourself. Refer to qualified service personnel for any repairs.
- Always safely eject the device from your computer before disconnecting it or turning off the power to prevent data loss.
3. Package Contents
Verify that all items are present in the package:
- CENMATE 4 Bay Hard Drive External RAID Enclosure
- USB A/C 3.0 Cable
- Power Cord
- Power Adapter (DC 12V)
- User Manual (this document)
4. Product Overview
The CENMATE 4 Bay Hard Drive External RAID Enclosure is designed for efficient and secure data storage. It features four drive bays, a built-in cooling fan, and multiple connectivity options.

Figure 4.1: Front view of the CENMATE 4 Bay Hard Drive External RAID Enclosure, showing four drive bays with blue illuminated slots and individual HDD activity indicators.
4.1. LED Indicators

Figure 4.2: Close-up of the LED indicators on the enclosure, showing blue, red, and purple light states.
- Blue: Indicates standby mode or power on.
- Red (Flashing): Indicates active reading or writing to the hard drive.
- Purple: Indicates a hard drive problem.
4.2. Cooling System
The enclosure features a built-in aluminum alloy housing and a 2-inch silent fan to dissipate heat and ensure data security. The fan requires a USB or eSATA cable to be connected to function.

Figure 4.3: Diagram showing the internal cooling fan and aluminum housing of the enclosure, illustrating airflow.

Figure 4.4: Illustration emphasizing the heat dissipation capabilities of the metal material and internal fan.
5. Setup
5.1. Hard Drive Installation
The enclosure supports 2.5-inch and 3.5-inch SATA HDD/SSD drives. It features a screwless installation design for 3.5-inch drives.

Figure 5.1: The enclosure with hard drives installed, illustrating its large capacity capability.

Figure 5.2: Detail showing the screwless installation mechanism for 3.5-inch drives and the non-slip feet at the bottom of the enclosure.
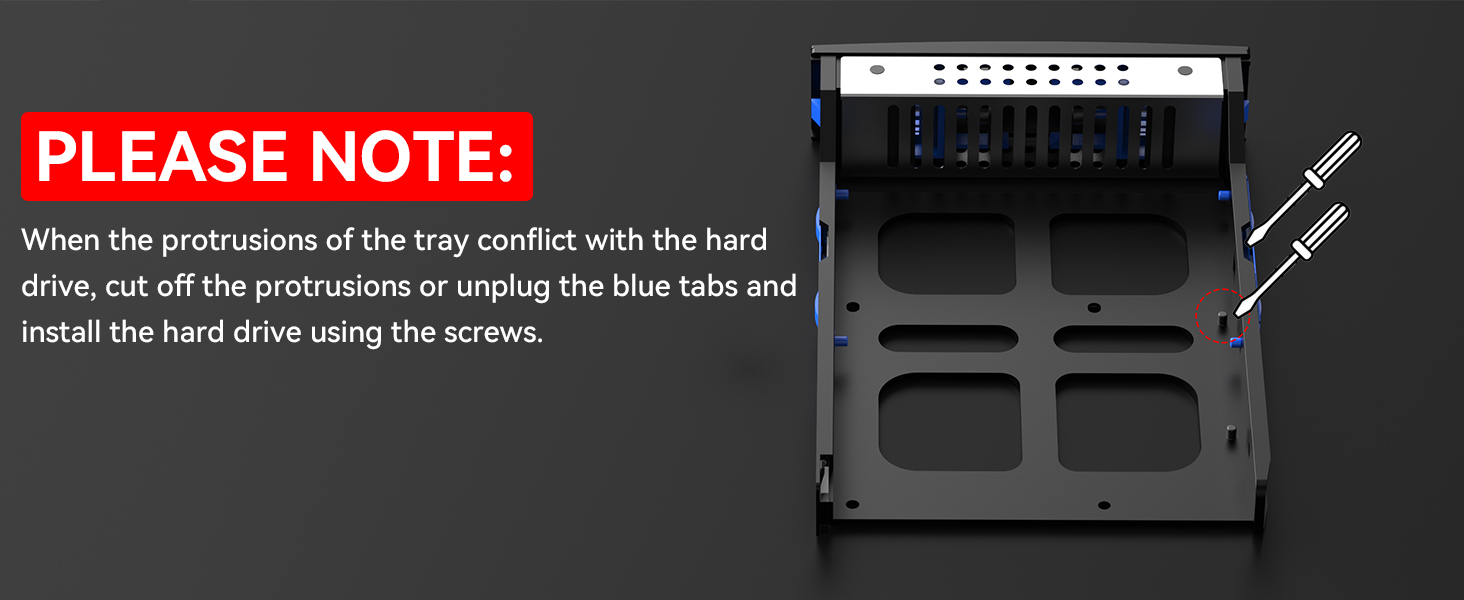
Figure 5.3: Important note illustrating how to handle tray protrusions that may conflict with hard drives during installation, suggesting to cut them off or disconnect blue tabs and use screws.
Important Note: When the tray protrusions conflict with the hard drive, cut off the projections or disconnect the blue tabs and install the hard drive using the screws.
5.2. Connecting to Your Computer
The enclosure is equipped with USB A/C 3.0 and eSATA interfaces for high-speed data transfer (up to 6Gbps).

Figure 5.4: The enclosure connected to a laptop, highlighting the DC 12V power input for stable data transfer.

Figure 5.5: Illustration of the DC 12V5A power adapter providing sufficient power for steady data transmission.
- Insert the hard drives into the bays.
- Connect the appropriate data cable (USB A/C 3.0 or eSATA) from the enclosure to your computer.
- Connect the power adapter to the enclosure and plug it into a power outlet.
- Turn on the enclosure. It is plug-and-play compatible with Windows 7 and above, Mac 9.1 and above, and Linux operating systems.
6. Operating
6.1. RAID Modes Configuration
The enclosure supports 8 RAID modes: RAID 0, 1, 3, 5, 10, CLONE, LARGE, and NORMAL. These modes are configured using DIP switches located on the device.

Figure 6.1: Visual guide for setting the 8 RAID modes using the DIP switches (1-4) on the enclosure.

Figure 6.2: Overview of the 8 RAID modes, showing the corresponding DIP switch settings for each mode.
Important: When changing RAID modes, you must first return the setting to NORMAL mode. Changing RAID modes may result in data loss. MAC OS does not support RAID software for this device.
RAID Mode Setting Procedure:
- Ensure the USB cable is connected to your computer.
- Power off the enclosure.
- Set the DIP switches to NORMAL mode (all switches down).
- Hold the reset button (located near the DIP switches) BEFORE you flick the ON switch. Continue holding the reset button for approximately 10 seconds after turning the power on.
- Power off the enclosure again.
- Set the DIP switches to your desired RAID mode according to the diagrams above.
- Repeat steps 1 to 4 to apply the new RAID configuration.
6.2. Data Transfer
The enclosure supports data transfer speeds of up to 6Gbps, facilitated by the JMS567+JMB393 chip and USB 3.0/eSATA interfaces under UASP control.

Figure 6.3: Illustration depicting high-speed data transfer at up to 5Gbps (note: product specifications state 6Gbps).

Figure 6.4: Graphic emphasizing the fast data transfer capability of up to 5Gbps.
7. Maintenance
To ensure the longevity and optimal performance of your CENMATE enclosure:
- Keep the device clean and free from dust. Use a soft, dry cloth for cleaning.
- Ensure adequate ventilation around the enclosure. Do not place it in enclosed spaces that could restrict airflow.
- The built-in fan helps maintain optimal operating temperatures. Ensure the fan is not obstructed.
- The fan noise is typically around 40-50 decibels. This is normal operation.

Figure 7.1: Image highlighting the silicone anti-skid pads on the bottom of the enclosure, which provide stability and protect against damage.
8. Troubleshooting
- Device Disappears Randomly: Ensure the USB cable is securely connected and the power supply is stable. Try connecting to a different USB port or using a different cable. Restarting the unit may temporarily resolve the issue.
- Fan Not Working: The fan requires a USB or eSATA cable to be connected to function. Ensure a data cable is properly connected to your computer.
- Hard Drive Not Recognized / Purple LED: Check if the hard drive is properly seated in its bay. Ensure the tray protrusions do not conflict with the hard drive; if they do, follow the instructions in Section 5.1 to modify the tray or use screws for installation. Try the hard drive in a different bay or test it directly with a computer if possible.
- Data Loss After RAID Configuration: Always back up your data before changing RAID modes. When replacing RAID, you must return to NORMAL mode first and then set the desired RAID mode, following the specific procedure outlined in Section 6.1.
- Slow Data Transfer: Ensure you are using a USB 3.0 or eSATA port on your computer. Verify that the cables are not damaged.
9. Specifications
| Feature | Specification |
|---|---|
| Model | 4 Bay Raid |
| Max Number of Supported Devices | 4 |
| Compatible Drive Types | 2.5"/3.5" SATA HDD/SSD |
| Max Capacity | 80TB (18TB per drive) |
| Data Transfer Rate | Up to 6Gbps (5 Gigabits Per Second) |
| Hardware Interface | USB 3.0, eSATA |
| Compatible Operating Systems | Windows 7 and above, Mac 9.1 and above, Linux |
| Material Type | Aluminum |
| Color | Black |
| Product Dimensions | 20.07 x 13.21 x 13.97 cm (7.9 x 5.2 x 5.5 inches) |
| Item Weight | 1.91 kg (4.2 Pounds) |
10. Warranty and Support
CENMATE provides technical support for this product. If you encounter any questions or issues regarding the product, please feel free to contact us. We aim to reply and solve your problem within 24 hours.
For support, please refer to the contact information provided with your purchase or visit the official CENMATE website.


