1. Introduction
This manual provides comprehensive instructions for the installation, operation, and maintenance of your ANGEL POS 21.5-inch Open Frame 1080p FHD Touchscreen Monitor, Model 21.5-Open. Designed for industrial, retail, and commercial applications, this monitor features a 10-point capacitive multi-touch display within a durable metal housing. Please read this manual thoroughly before using the product to ensure proper functionality and longevity.
2. Safety Information
Observe the following safety precautions to prevent damage to the monitor and ensure user safety:
- Do not expose the monitor to excessive moisture, dust, or extreme temperatures.
- Ensure proper ventilation around the unit to prevent overheating.
- Use only the power adapter supplied with the monitor.
- Avoid placing heavy objects on the power cord or monitor.
- Disconnect the power cable before cleaning or servicing the unit.
- Do not attempt to open the monitor casing; refer all servicing to qualified personnel.
3. Package Contents
Verify that all items are present in the package:
- ANGEL POS 21.5-inch Open Frame Touchscreen Monitor
- HDMI Cable
- VGA Cable
- Power Adapter
- Power Cord
- USB Cable (for touch functionality)

Figure 3.1: Included accessories for the ANGEL POS 21.5-inch Open Frame Touchscreen Monitor. This image displays the monitor along with an HDMI cable, VGA cable, power adapter, power cord, and a USB cable, which are all part of the standard package contents.
4. Product Overview
4.1 Key Features
- 21.5-inch Full HD (1920 x 1080) Display: Provides clear and detailed visuals.
- 10-Point Capacitive Multi-Touch: Supports simultaneous touch inputs for interactive experiences.
- Open Frame Design: Facilitates integration into kiosks, industrial panels, and custom enclosures.
- Seamless Flat Touch Screen: Enhances resilience against water and dust ingress.
- Durable Metal Housing: Engineered for demanding industrial and commercial environments.
- Enhanced Cooling: Open design allows for better airflow and heat dissipation.
- Plug & Play: No driver installation required for multi-touch on Windows 8/10/11; single-touch on Windows 7/XP/2000.
4.2 Monitor Components and Ports

Figure 4.1: Front view of the ANGEL POS 21.5-inch Open Frame Touchscreen Monitor. This image shows the monitor displaying a colorful graphic, with a hand demonstrating the touch functionality.

Figure 4.2: Rear view of the ANGEL POS 21.5-inch Open Frame Touchscreen Monitor. This image highlights the robust metal housing, control buttons, and various mounting points on the back of the unit.

Figure 4.3: Connectivity ports located on the side of the monitor. From left to right, these include the USB port for touch control, HDMI input, VGA input, and the DC power input.
4.3 Dimensions
The physical dimensions of the monitor are provided for integration planning.
- Product Dimensions: 1.97 x 22.56 x 14.17 inches
- Standing Screen Display Size: 21.5 Inches
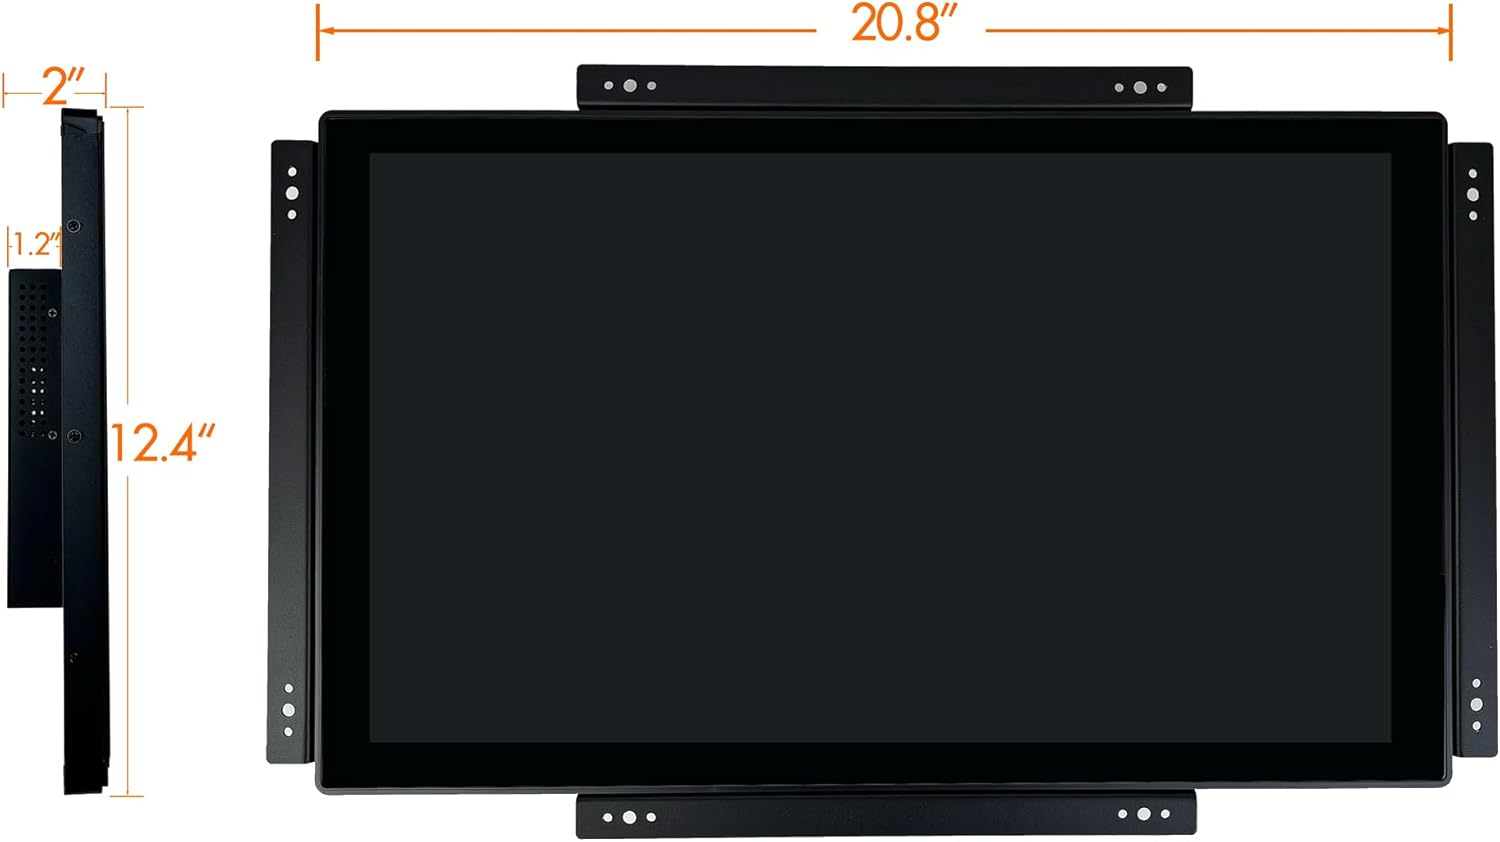
Figure 4.4: Key dimensions of the monitor. This diagram illustrates the monitor's width as approximately 20.8 inches and height as 12.4 inches, along with its side profile thickness.

Figure 4.5: Technical drawing providing detailed measurements and mounting specifications for the monitor. This includes various views (front, side, top, bottom, rear) with precise dimensions for integration purposes, including VESA mounting hole patterns.
5. Setup
5.1 Physical Installation
The open frame design allows for flexible installation. The monitor features integrated mounting brackets and VESA holes for secure integration into various setups.
- Integrated Mounting: Utilize the pre-drilled holes on the side brackets to secure the monitor within a custom enclosure or panel.
- VESA Mounting: The rear of the monitor includes standard VESA mounting points (e.g., 75x75mm or 100x100mm, refer to Figure 4.5 for exact pattern) for attachment to compatible VESA arms or wall mounts.
5.2 Connecting Cables
- Video Connection: Connect one end of the HDMI or VGA cable to the corresponding port on the monitor (refer to Figure 4.3) and the other end to your computer or video source.
- Touch Connection: Connect the supplied USB cable from the USB port on the monitor (labeled "USB Port For Touch Control" in Figure 4.3) to an available USB port on your computer.
- Power Connection: Connect the power adapter to the DC power input on the monitor (Figure 4.3), then plug the power cord into the adapter and a suitable electrical outlet.
5.3 Driver Installation
The monitor is designed for plug-and-play functionality:
- Windows 8/10/11: Multi-touch functionality is automatically supported without the need for additional driver installation.
- Windows 7/XP/2000: The monitor will operate with single-touch capability without driver installation.
6. Operating Instructions
6.1 Powering On/Off
- Power On: After connecting all cables, press the power button located on the rear of the monitor (refer to Figure 4.2). The power indicator light will illuminate.
- Power Off: Press the power button again to turn off the monitor. For extended periods of non-use, it is recommended to disconnect the power cord from the electrical outlet.
6.2 Touchscreen Operation
The monitor features a 10-point capacitive multi-touch screen, allowing for intuitive interaction.
- Single Touch: Tap the screen to select items or activate functions, similar to a mouse click.
- Multi-Touch Gestures: On compatible operating systems (Windows 8/10/11), use gestures such as pinch-to-zoom, swipe, and rotate for enhanced interaction.
- Calibration: In most cases, calibration is not required. If touch accuracy issues arise, refer to your operating system's display settings for touch calibration options.

Figure 6.1: The monitor in an interactive kiosk setting. This image demonstrates the monitor's application in a commercial environment, with a user engaging with the touchscreen interface.
7. Maintenance
7.1 Cleaning the Monitor
- Always disconnect the power cord before cleaning.
- Use a soft, lint-free cloth lightly dampened with water or a non-abrasive screen cleaner.
- Do not spray cleaning solutions directly onto the screen or into the monitor's vents.
- Avoid using harsh chemicals, abrasives, or solvents.
7.2 Component Access
The open frame design allows for easier access to internal components for maintenance or replacement, reducing downtime. However, any internal servicing should only be performed by qualified technicians.
8. Troubleshooting
| Problem | Possible Cause | Solution |
|---|---|---|
| No display on screen |
|
|
| Touchscreen not responding |
|
|
| Inaccurate touch response |
|
|
9. Specifications
| Feature | Detail |
|---|---|
| Model Number | 21.5-Open |
| Screen Size | 21.5 Inches |
| Resolution | 1920 x 1080 (FHD 1080p) |
| Aspect Ratio | 16:9 |
| Touch Technology | 10-Point Capacitive Multi-Touch |
| Connectivity | HDMI, VGA, USB (for touch) |
| Housing Material | Metal |
| Product Dimensions (L x W x H) | 1.97 x 22.56 x 14.17 inches |
| Item Weight | 10 pounds |
| Manufacturer | Angel Canada |
| Screen Surface Description | Glossy |
10. Warranty and Support
For warranty information and technical support, please refer to the official ANGEL POS website or contact your retailer. Keep your purchase receipt for warranty claims.
Manufacturer: Angel Canada


