1. Introduction
This manual provides essential information for the setup, operation, and maintenance of your Taiahiro Retro Typewriter Wireless Mechanical Gaming Keyboard, Model 981. Please read this manual thoroughly before using the product to ensure proper functionality and longevity.

Image 1.1: The Taiahiro Retro Typewriter Wireless Mechanical Gaming Keyboard, Model 981, in pink. This keyboard features round keycaps and a retro design.
2. Package Contents
Verify that all items listed below are included in your package:
- Retro Typewriter Backlit Mechanical Gaming Keyboard (Model 981)
- Detachable USB-C Cable
- Keycap Puller
- Blue Switches (2 extra)
- User Manual
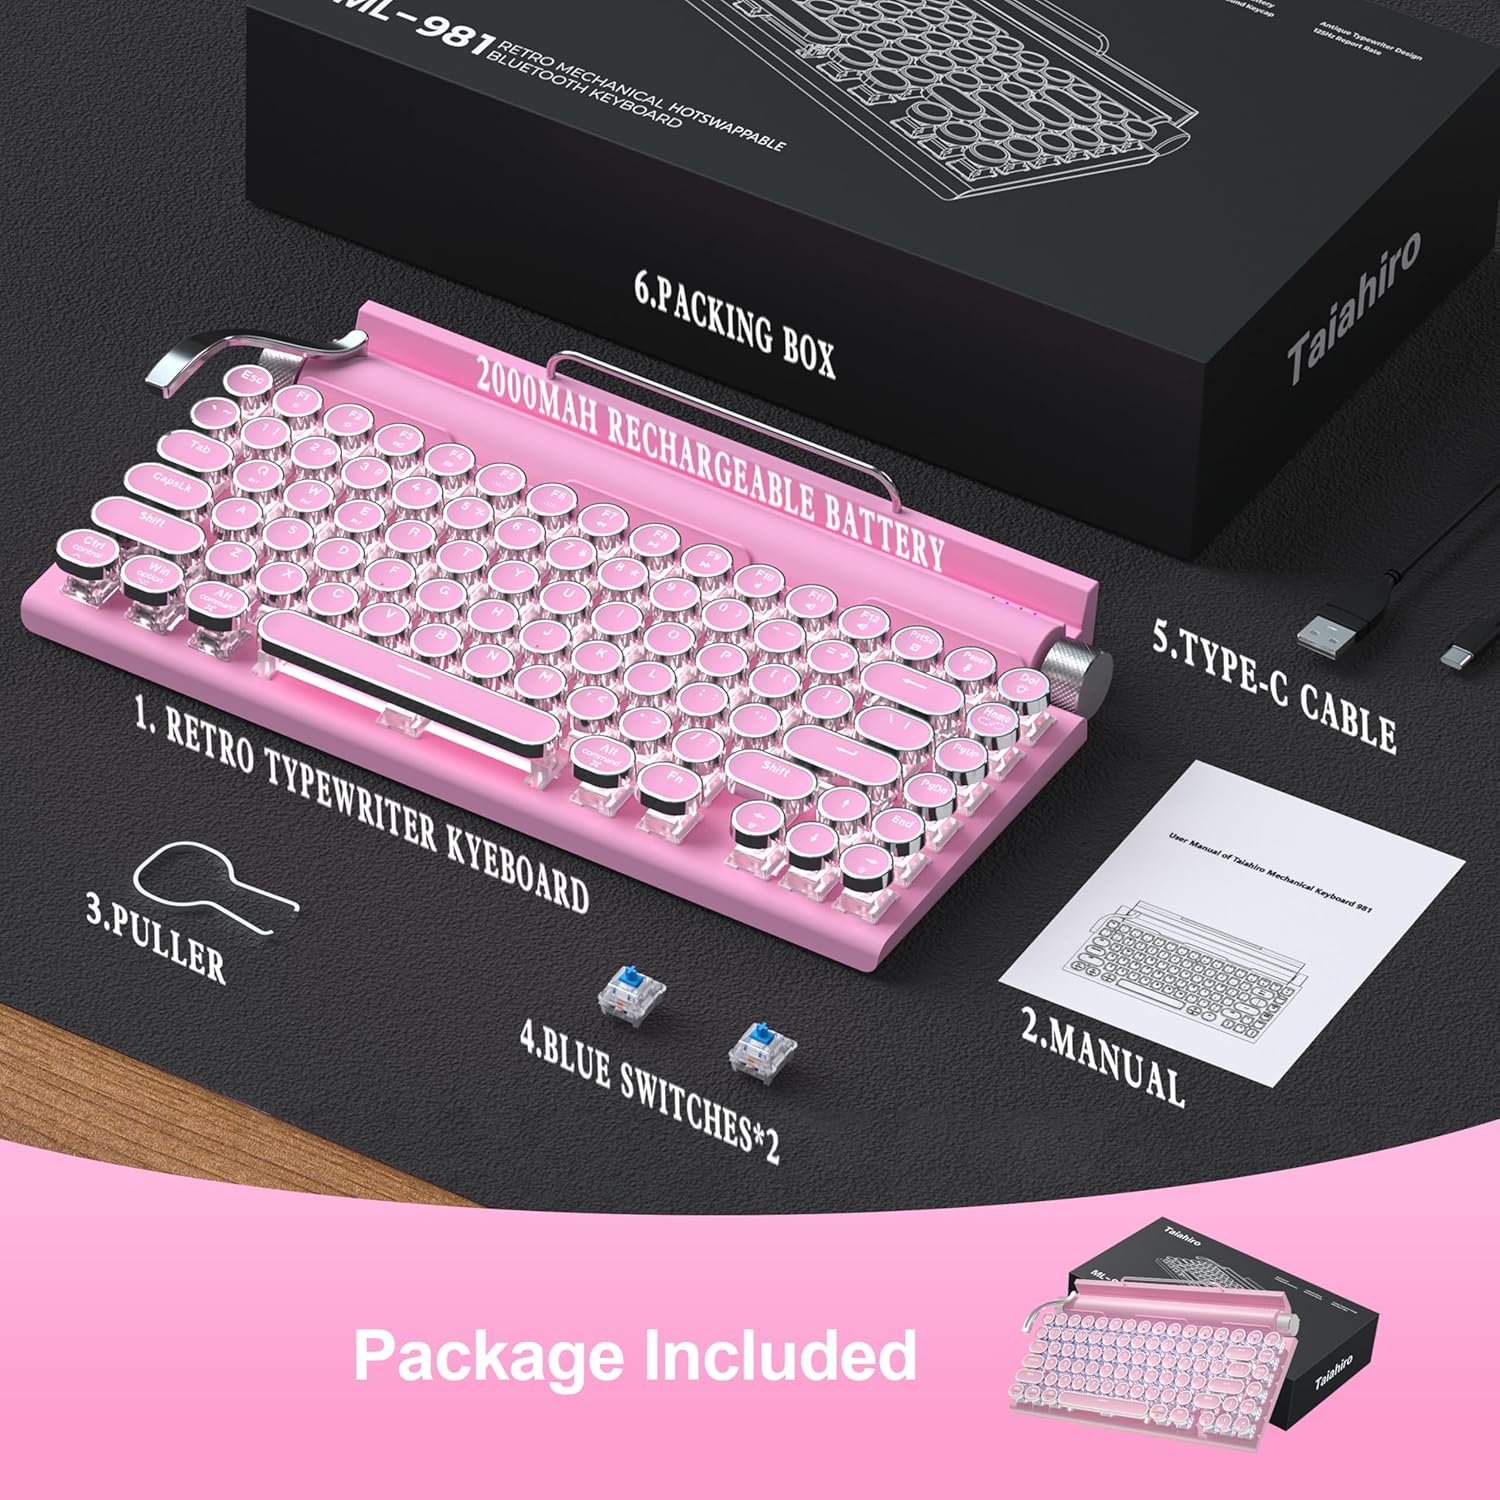
Image 2.1: All components included in the Taiahiro keyboard package.
3. Setup
3.1 Initial Charging
Before first use, it is recommended to fully charge the keyboard using the provided USB-C cable. Connect the USB-C end to the keyboard and the USB-A end to a power source (e.g., computer USB port, USB wall adapter).
3.2 Connectivity Modes
The keyboard supports three connectivity modes: Bluetooth, 2.4G Wireless (via dongle), and Wired (via USB-C cable).
- Bluetooth Mode: Ideal for connecting to up to three different devices (tablet, laptop, phone). Use the switch on the back of the keyboard to select Bluetooth mode. Press Fn+1, Fn+2, or Fn+3 to pair with a specific device slot. The corresponding LED indicator will blink during pairing and become solid once connected.
- 2.4G Wireless Mode: For devices with a USB-A port. Insert the 2.4G wireless dongle (located in the keyboard's battery compartment) into your device's USB-A port. Switch the keyboard to 2.4G wireless mode using the switch on the back. The keyboard should connect automatically.
- Wired Mode: Connect the keyboard directly to your computer using the provided USB-C cable. This mode also charges the keyboard.

Image 3.1: The keyboard offers versatile connectivity options for various devices.
3.3 System Compatibility
The keyboard is compatible with Windows, macOS, Android, and iOS operating systems. Ensure the correct system mode is selected on the keyboard (usually via a switch or Fn key combination) for optimal performance.
4. Operating Instructions
4.1 Key Functions (Fn Combinations)
Utilize the Function (Fn) key in combination with other keys to access various features:
- Fn + 1/2/3: Switch between paired Bluetooth devices.
- Fn + L: Cycle through 14 different backlight modes.
- Fn + Arrow Up/Down: Adjust backlight brightness (5 levels).
- Fn + Arrow Left/Right: Adjust backlight speed (for dynamic modes).
- Fn + Win: Lock/Unlock Windows key.
4.2 Backlight Control
The keyboard features a classic white LED backlight with 14 customizable modes. Use the stainless-steel lever on the left side of the keyboard to cycle through these modes. The left knob controls brightness, and the right knob controls volume.

Image 4.1: The keyboard's LED backlight offers 14 different lighting modes.
4.3 Knob Functions
- Left Knob: Adjusts backlight brightness.
- Right Knob: Adjusts system volume. Pressing the knob will mute/unmute.
4.4 Device Holder
The keyboard includes an integrated device holder designed to support tablets and smartphones up to 10.9 inches and a maximum load of 1 lb. This allows for convenient viewing while typing.

Image 4.2: The integrated device holder supports various mobile devices for enhanced productivity.
5. Maintenance
5.1 Cleaning
To clean the keyboard, power it off and disconnect any cables. Use a soft, lint-free cloth slightly dampened with water or a mild cleaning solution. Avoid excessive moisture. For keycap cleaning, use the provided keycap puller to remove them and clean separately. Ensure all parts are dry before reassembling and powering on.
5.2 Hot-Swappable Switches
The keyboard features hot-swappable blue switches. This allows for easy replacement or customization without soldering. Use the provided keycap puller to remove keycaps, then use a switch puller (not included, but often integrated with keycap pullers) to carefully remove the switch. Insert a new compatible 3-pin or 5-pin mechanical switch until it clicks into place. Replace the keycap.

Image 5.1: The hot-swappable design allows for easy customization of switches and keycaps.
6. Troubleshooting
| Problem | Solution |
|---|---|
| Keyboard not responding | Ensure keyboard is charged. Check connection mode (Bluetooth, 2.4G, Wired). Re-pair Bluetooth or re-insert 2.4G dongle. Try a different USB port/cable. |
| Bluetooth pairing fails | Ensure keyboard is in Bluetooth mode (Fn+1/2/3). Make sure device Bluetooth is on and discoverable. Forget previous pairings on your device and try again. Ensure keyboard is charged. |
| Backlight not working/dim | Adjust brightness using the left knob or Fn+Arrow Up/Down. Cycle through modes with the stainless-steel lever or Fn+L. Ensure keyboard is powered on. |
| Keys not registering/double-typing | Clean under the keycaps. If issue persists, try replacing the affected switch with one of the spare blue switches using the keycap puller. |
7. Specifications
- Model: 981
- Connectivity: Bluetooth 5.0, USB-C Wired, 2.4G Wireless
- Key Switches: Blue Mechanical Switches (Hot-swappable)
- Keycaps: Round, Punk Style
- Layout: 83-Key (Tenkeyless)
- Backlight: Classic White LED with 14 modes
- Battery: 2000mAh Lithium Ion (included)
- Material: Aluminum, Metal, Plastic
- Item Weight: 2.18 pounds
- Package Dimensions: 15.16 x 8.19 x 3.19 inches
- Compatible Devices: Laptop, Mac, PC, Smartphone, Tablet
8. Official Product Videos
8.1 Retro Typewriter Mechanical Vintage Keyboard Wireless
Video 8.1: An overview of the Taiahiro Retro Typewriter Mechanical Keyboard, highlighting its vintage design and wireless capabilities.
8.2 Retro Typewriter Wireless Mechanical Gaming Keyboard PINK (Preview)
Video 8.2: A short preview showcasing the pink version of the Taiahiro Retro Typewriter Wireless Mechanical Gaming Keyboard.
9. Warranty and Support
For warranty information and technical support, please refer to the documentation included in your product package or visit the official Taiahiro website. Keep your purchase receipt for warranty claims.


