
Introduction
Thank you for choosing Nilight 15.5-inch Double Row RGB Wheel Ring Lights. This product is designed to enhance your vehicle's appearance with vibrant, customizable lighting and includes integrated turn signal and braking functions for added safety. This manual provides detailed instructions for proper installation, operation, and maintenance to ensure optimal performance and longevity of your wheel ring lights.
Safety Information
- Always disconnect the vehicle's battery before beginning any electrical installation to prevent electrical shock or damage.
- Ensure all wiring connections are secure and properly insulated to prevent short circuits.
- Mount the wheel rings securely to avoid interference with moving parts of the wheel or braking system.
- Verify that the installed lights do not obstruct any essential vehicle functions or visibility.
- Consult a professional if you are unsure about any part of the installation process.
- These lights are designed for 12V DC vehicle systems only.
Package Contents
Verify that all components are present before starting the installation:
- 4x 15.5-inch Double Row LED Wheel Ring Lights
- 4x Extension Cords
- 1x Control Box
- 1x Remote Controller
- 20x Mounting Brackets
- 1x Instruction Manual

Image: Diagram of all included components for the Nilight wheel ring light kit.
Pre-Installation Checks
Vehicle Compatibility
These wheel ring lights are designed for most 12V vehicles. Ensure your vehicle has a brake dust shield for proper mounting. Installation is not possible if your car lacks a cover plate.

Image: Visual guide for brake dust shield compatibility and 15.5-inch ring fitment.
Measure Wheel and Rotor Diameter
Accurate measurements are crucial for proper fitment. Please follow these guidelines:
- Measure the wheel diameter at the rim's inner lips. The number following 'R' on your tire specifications indicates the inner rim diameter (e.g., R19 means 19 inches).
- Measure the integrated overall diameter of the rotor and brake caliper pad, which will be considered the brake rotor's diameter.

Image: Guide for measuring hub rim diameter.
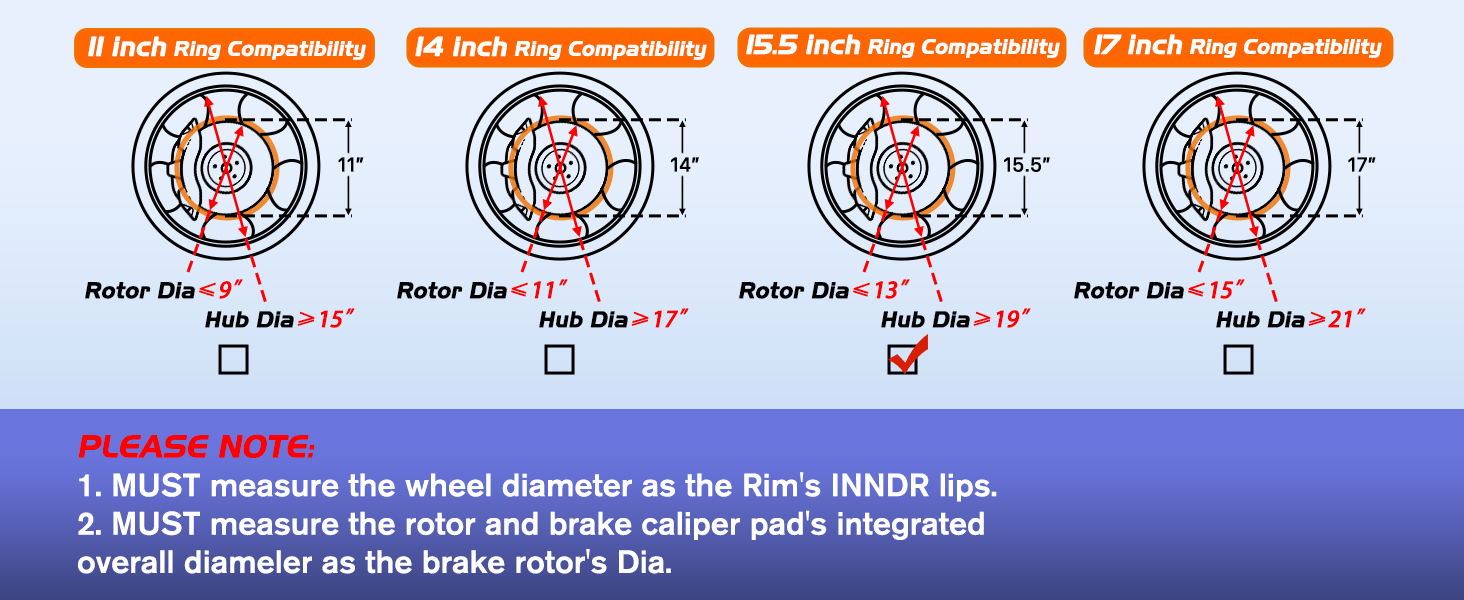
Image: Guide for measuring brake caliper pad diameter.
For 15.5-inch wheel rings, ensure the rotor diameter is ≤ 13 inches and the rim diameter is ≥ 19 inches.

Image: Wheel ring compatibility chart for various sizes, highlighting 15.5-inch requirements.
Installation Guide
Follow these steps carefully for a secure and functional installation:
- Mounting the Wheel Rings: Attach the stainless steel mounting brackets to the wheel rings using the provided hardware. Ensure the brackets are positioned correctly.
- Secure to Dust Shield: Mount the assembled wheel rings with brackets directly to the vehicle's dust shield or hub assembly. Use the provided screws and ensure a firm hold. For extra security, apply an appropriate amount of threadlocker (e.g., Loctite) to the screws.
- Wiring Connections: Connect the wheel ring lights to the control box. Each wheel ring lead is 13 feet (160 inches) long.
- Control Box Installation: Install the control box in a dry, secure location, typically in the engine compartment.
- Power and Signal Wiring: Connect the control box to your vehicle's 12V power source. Connect the specific wires for turn signals (blue for left, black for right), brake (red), and reverse (white) to the corresponding vehicle wiring. Ensure waterproof connectors are used for all external connections.

Image: Visual guide for mounting the wheel rings.

Image: Detailed wiring diagram for signal and power connections.
Operation
Your Nilight wheel ring lights can be controlled via a smartphone app (Bluetooth) or the included remote control.
Smartphone App Control
Download the dedicated app to unlock a wide range of customization options:
- Color Selection: Choose from 16 million vibrant colors.
- Brightness Adjustment: Adjust the light intensity.
- Dynamic Patterns: Access 366 cool spiral chasing modes and other dynamic features.
- Music Synchronization: Sync lights with your favorite music or sound via the built-in microphone.
- DIY Colors and Patterns: Create and save your own custom lighting effects.

Image: Mobile app control interface for the wheel lights.

Image: Wheel lights demonstrating music synchronization.
Remote Control
The included RF remote control offers quick access to various lighting modes:
- Power: Turn lights On/Off.
- Static Colors: 16 preset static lighting modes.
- Dynamic Modes: 2 preset Jump patterns, 2 preset Fading patterns.
- Speed and Brightness: Adjust the speed of dynamic patterns and the brightness of static colors.

Image: Remote control for the wheel lights.
Maintenance
- Cleaning: Clean the LED strips and wheel rings periodically with a soft, damp cloth. Avoid abrasive cleaners or high-pressure water jets directly on the LED strips.
- Connection Check: Regularly inspect all wiring connections for corrosion or looseness. Ensure waterproof connections remain sealed.
- Mounting Security: Periodically check the mounting brackets and hardware to ensure they remain securely fastened. Tighten if necessary.
- Water Resistance: The product is IP67 waterproof, designed to withstand rain and splashes. However, avoid prolonged submersion.

Image: Wheel light demonstrating IP67 waterproof feature.
Troubleshooting
| Problem | Possible Cause | Solution |
|---|---|---|
| Lights do not turn on. | No power connection, loose wiring, blown fuse, faulty control box. | Check power supply, inspect all wiring connections, replace fuse if necessary, test control box. |
| Lights flicker or display incorrect colors. | Loose connection, damaged LED strip, interference. | Verify all connections are secure. Inspect LED strips for physical damage. Relocate control box if interference is suspected. |
| Remote control not working. | Dead battery in remote, remote out of range, interference. | Replace remote battery. Ensure remote is within range of the control box. Reduce potential signal interference. |
| App control not connecting. | Bluetooth not enabled, app not updated, control box not powered. | Ensure Bluetooth is enabled on your device. Update the app to the latest version. Verify the control box has power. |
Specifications
- Model Number: TL-331
- Brand: Nilight
- Light Source Type: LED (576pcs SMD 5050 LED chips)
- Color: RGB-Double Row
- Voltage: 12V DC
- Wheel Ring Size: 15.5 inches
- Compatibility: Rotors Dia ≤ 13 inch, Rim Dia ≥ 19 inch
- Water Resistance Level: IP67 Waterproof
- Material: Stainless Steel (mounting brackets)
- Connectivity: Bluetooth (for APP control)
- Control: Smartphone APP & RF Remote Control
- Special Features: Turn Signal Function, Braking Function, Music Sync Mode, DIY Colors
- Included Components: 4x wheel ring lights, 4x extension cords, 1x control box, 1x remote controller, 20x mounting brackets, 1x instruction manual
Warranty and Support
This Nilight product comes with a 2 Years Warranty from the date of purchase. This warranty covers manufacturing defects and material flaws under normal use. It does not cover damage caused by improper installation, misuse, accidents, or unauthorized modifications.
For technical support, warranty claims, or any questions regarding your Nilight wheel ring lights, please refer to the contact information provided in your original purchase documentation or visit the official Nilight website.
