1. Important Safety Instructions
Please read all instructions carefully before operating the appliance. Retain this manual for future reference.
- Always connect the machine to a grounded power outlet with the correct voltage (110V~).
- Do not operate the machine with a damaged cord or plug. If the machine malfunctions or is damaged, discontinue use and contact customer support.
- Keep hands and foreign objects out of the tanks and dispensing nozzles during operation.
- Ensure proper ventilation around the machine. Do not block air vents.
- Do not immerse the main unit in water or other liquids. Clean only as instructed in the maintenance section.
- This appliance is intended for commercial use. Supervise children and individuals with reduced capabilities if they are near the machine.
- Use only food-grade ingredients in the tanks.
2. Product Overview
The Voohek Commercial Slushie Machine is designed for efficient production of frozen drinks, smoothies, and cocktails. It features three independent tanks for multiple flavor options.
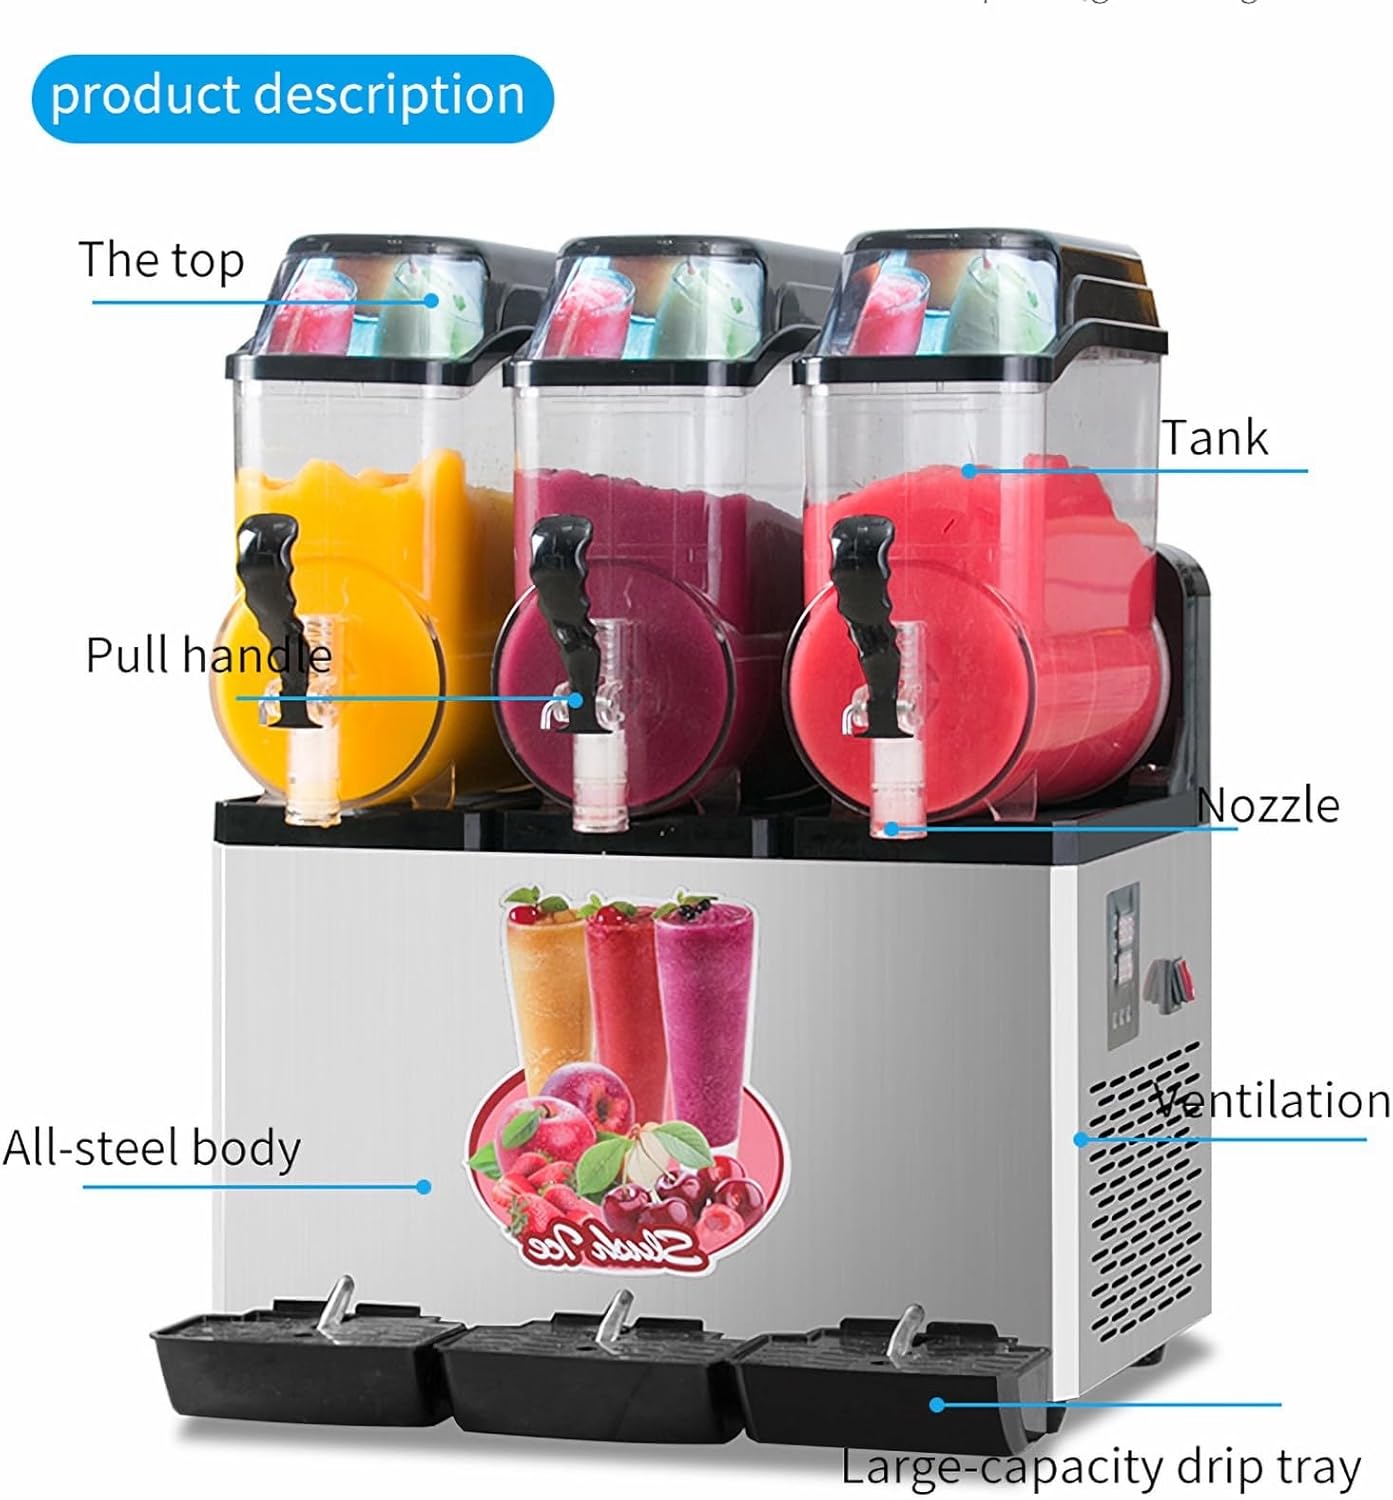
Image: Front view of the Voohek Slushie Machine with key components labeled, including the top, tanks, pull handle, nozzle, all-steel body, ventilation, and large-capacity drip tray.
Key Components:
- Tanks: Three independent 15L (total 45L) transparent tanks for holding beverage mix.
- Pull Handle: Lever for dispensing frozen beverages from each tank.
- Nozzle: Dispensing spout for each tank.
- All-steel Body: Durable SUS304 stainless steel construction for the main unit.
- Ventilation: Side vents for heat dissipation from the compressor.
- Large-capacity Drip Tray: Collects spills and drips below the nozzles.
- LCD Controller: Digital display for temperature and voltage, with control buttons for operation and cleaning.
3. Specifications

Image: Detailed product parameters including model, voltage, frequency, power, bowl capacity, lowest temperature, net/gross weight, and dimensions.
| Feature | Detail |
|---|---|
| Brand | Voohek |
| Model Name | Slushie Machine Commercial Margarita Frozen Drink Smoothie Maker (YC4174 Slushy Machine) |
| Capacity | 45 Liters (15L x 3 Tanks) |
| Power | 1100W |
| Voltage | 110V~ |
| Frequency | 60Hz |
| Temperature Range | 23℉ to 41℉ (-5°C to 5°C) |
| Material | Food Grade SUS304 Stainless Steel, Thickened PC Material |
| Product Dimensions (L x W x H) | 25.59" x 23.62" x 35.43" (650mm x 600mm x 880mm packed) |
| Item Weight | 154 Pounds |
| Compressor | Brand Compressor (Embraco/Wanbao) |
| Coolant | R404A/R290A |
| Special Features | Anti-Slip Base, Built-In Compressor, Digital Display, Keep Cool Function, Low Noise, One-Click Cleaning |
4. Setup
4.1 Unpacking
- Carefully remove the machine from its packaging.
- Inspect the machine for any signs of damage during transit. Report any damage to the carrier and supplier immediately.
- Remove all packing materials, protective films, and accessories.
4.2 Placement
- Place the machine on a stable, level, and sturdy surface capable of supporting its weight when full.
- Ensure there is adequate space (at least 6 inches) around all sides of the machine for proper ventilation, especially around the air vents.
- Avoid placing the machine in direct sunlight or near heat sources, as this can affect cooling efficiency.
4.3 Initial Cleaning
Before first use, thoroughly clean all parts that will come into contact with food.
- Remove the tanks, lids, and stirring rods.
- Wash these components with warm, soapy water. Rinse thoroughly with clean water.
- Wipe down the exterior of the machine with a damp cloth.
- Ensure all parts are completely dry before reassembling.
4.4 Power Connection
- Ensure the power switch is in the OFF position.
- Plug the power cord into a dedicated, grounded 110V~, 60Hz electrical outlet. Do not use extension cords or adapters.
5. Operating Instructions

Image: Close-up of the control panel showing temperature and voltage displays, along with buttons for starting cylinders, one-click cleaning, temperature regulation, and light box switch.
5.1 Filling the Tanks
- Prepare your desired beverage mix (slushie concentrate, juice, etc.). Ensure the mix is suitable for freezing.
- Pour the liquid into each tank, ensuring it does not exceed the maximum fill line.
- Securely place the lids back on the tanks.
5.2 Powering On and Setting Temperature
- Turn on the main power switch located on the side or front of the machine.
- The LCD controller will display the current temperature and voltage.
- To activate a specific tank, press the corresponding cylinder start button (1, 2, or 3) on the control panel.
- Use the + and - buttons to adjust the target temperature for each tank. The recommended temperature range for slushies is 23℉ to 41℉ (-5°C to 5°C).
- The machine will intelligently adjust the temperature to reach the set point.
5.3 Dispensing
- Once the beverage has reached the desired frozen consistency, place a cup under the nozzle of the desired tank.
- Pull the handle down to dispense the slushie.
- Push the handle back up to stop dispensing.

Image: A collage of various cold drinks like juice, coke, sprite, lemon tea, and ice tea, demonstrating the versatility of the slushie machine.
6. Cleaning and Maintenance
Regular cleaning and maintenance are crucial for the longevity and hygienic operation of your slushie machine.
6.1 One-Click Cleaning Function

Image: A hand pressing the 'one-click cleaning' button on the control panel, with water visibly circulating inside a tank, demonstrating the automated cleaning process.
- After emptying the tanks, fill them with clean water.
- Press the 'one-click cleaning' button (represented by a faucet icon) on the control panel.
- The machine will initiate a cleaning cycle, circulating water through the system.
- Drain the water through the nozzles into the drip tray or a separate container.
- Repeat this process with fresh water if necessary.
6.2 Daily Cleaning
- Perform the 'one-click cleaning' cycle.
- Turn off and unplug the machine.
- Remove the tanks, lids, stirring rods, and nozzles.
- Wash all removable parts with warm, soapy water and a soft brush. Rinse thoroughly and allow to air dry completely.
- Wipe down the exterior of the machine, including the drip tray, with a damp cloth. Do not use abrasive cleaners or scourers.
- Ensure the drip tray is emptied and cleaned regularly.
6.3 Periodic Maintenance
- Condenser Cleaning: Periodically clean the condenser coils (located behind the ventilation grilles) with a soft brush or vacuum cleaner to remove dust and debris. This improves cooling efficiency and extends the life of the compressor.
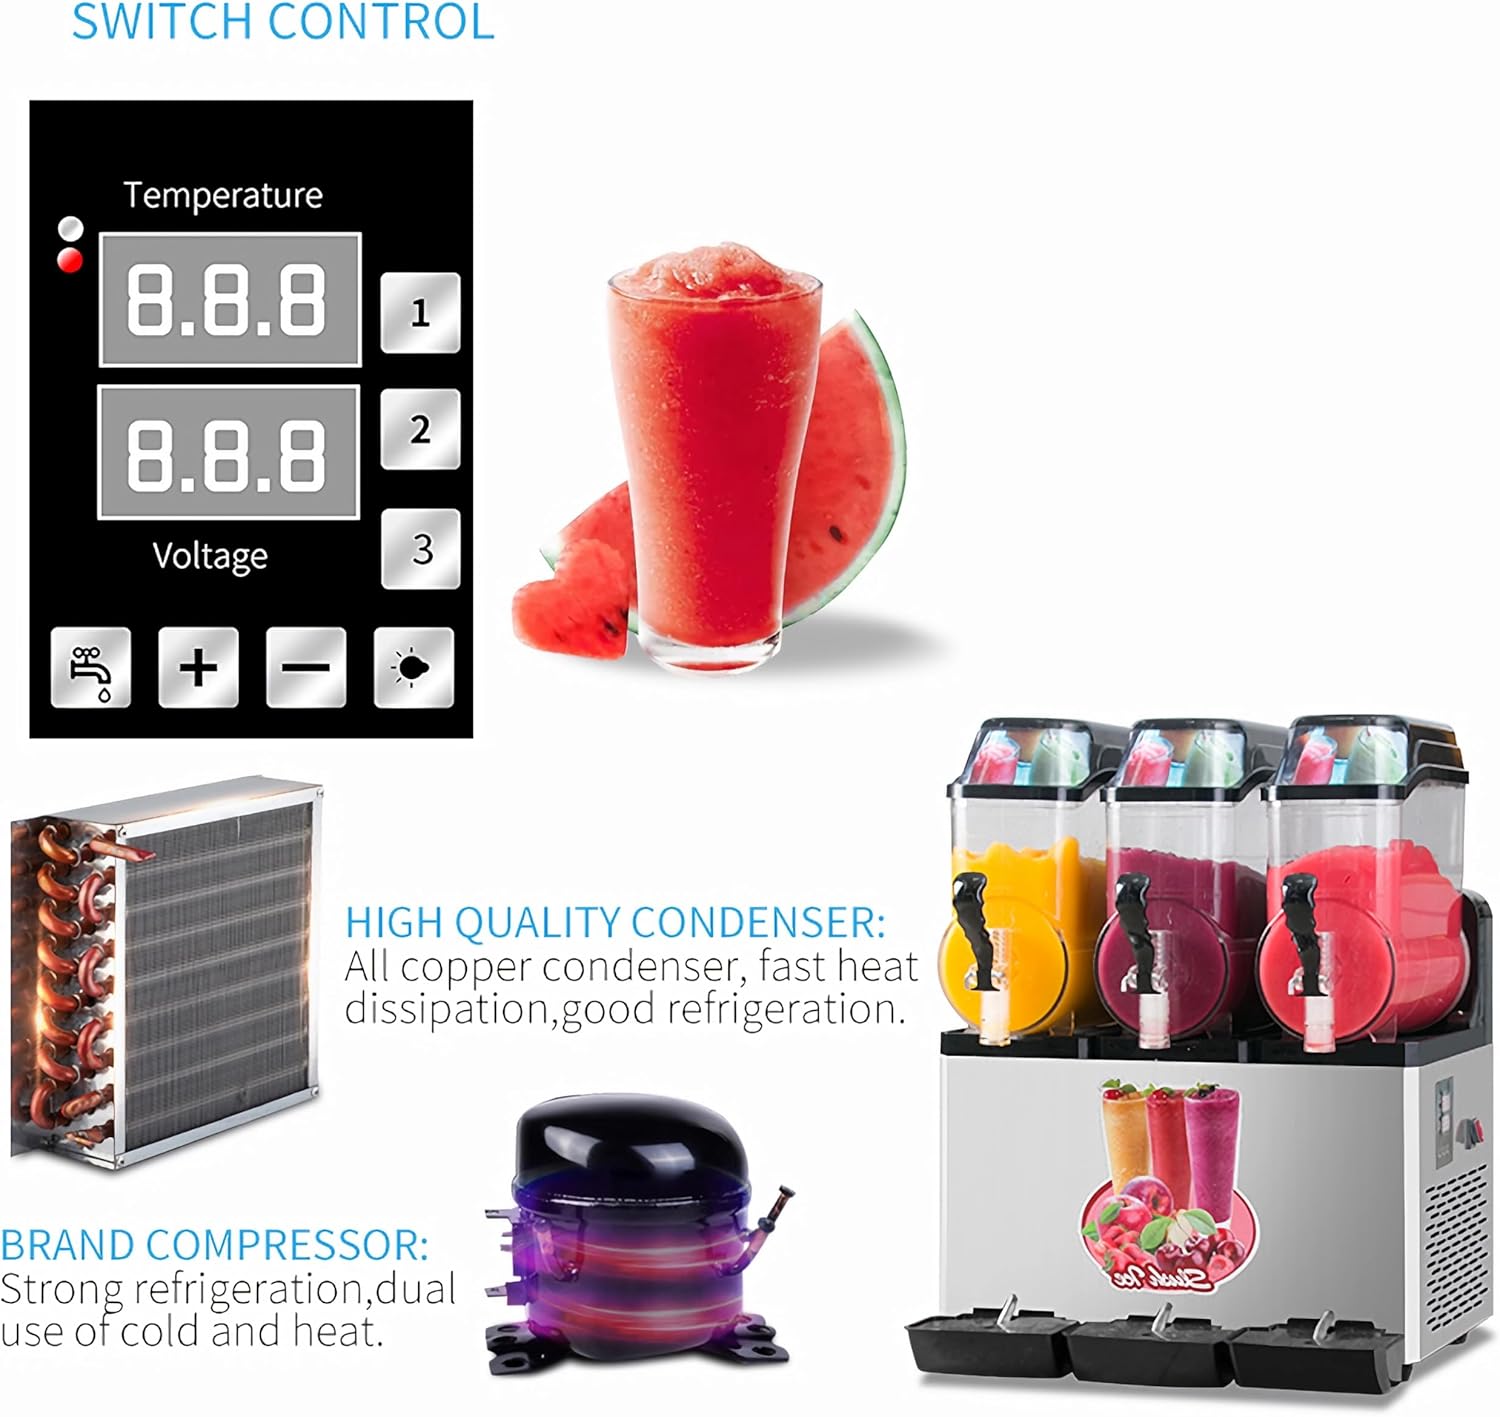
Image: Diagram showing the high-quality condenser and brand compressor, highlighting their role in refrigeration and heat dissipation.
- Seal Inspection: Check all seals and gaskets for wear or damage. Replace if necessary to prevent leaks.
7. Troubleshooting
Before contacting customer support, please refer to the following common issues and solutions:
| Problem | Possible Cause | Solution |
|---|---|---|
| Machine does not turn on | No power supply; Power switch off; Circuit breaker tripped | Check power cord connection; Ensure power switch is ON; Reset circuit breaker |
| Beverage not freezing | Temperature set too high; Insufficient ventilation; Low refrigerant; Mix too sugary | Lower temperature setting; Ensure adequate space around machine; Contact service technician; Adjust mix ratio |
| Machine is noisy | Unstable surface; Loose components; Compressor issue | Place on a level surface; Check for loose parts; Contact service technician |
| Leaking from tanks/nozzles | Improperly assembled parts; Worn seals/gaskets; Tank overfilled | Reassemble parts correctly; Inspect and replace seals; Do not overfill tanks |
| Slush is too hard/icy | Temperature set too low; Mix not suitable | Increase temperature setting; Use appropriate slushie mix |
If the problem persists after attempting these solutions, please contact Voohek customer support.
8. Warranty and Support
Voohek products are manufactured with quality and performance in mind. For warranty information, technical support, or service inquiries, please refer to the warranty card included with your purchase or visit the official Voohek website.
For direct assistance, you may contact Voohek customer service through the contact information provided on the product packaging or the Voohek brand store on Amazon.
Thank you for choosing Voohek!


