
1. Introduction
This manual provides comprehensive instructions for the operation, maintenance, and troubleshooting of your Irfora Handheld PDA Printer Smart POS Terminal, Model Q2. This intelligent payment terminal device integrates a receipt printer, camera, and supports various communication methods including 3G, WiFi, and Bluetooth 4.0. It is designed for efficient processing of sales and is suitable for various business environments.

Figure 1.1: The Irfora Handheld PDA Printer Smart POS Terminal in operation, displaying a printed receipt. This device combines a smart terminal with a thermal printer for on-the-go transactions.

Figure 1.2: Overview of the diverse applications supported by the Smart POS Terminal, highlighting its utility in various business operations.
2. Product Overview and Components
The Irfora Q2 is a compact and wireless device designed for portability and convenience. It features a 5.5-inch capacitive touchscreen and an integrated thermal printer.
2.1 Key Features

Figure 2.1: Visual representation of the terminal's core specifications and capabilities.
- Display: 5.5-inch HD (1280*720 IPS) Capacitive Touchscreen.
- Processor: Quad-Core 1.3GHz MT6580V/WA.
- Memory: 1GB RAM, 8GB NAND Flash.
- Operating System: Android 8.1.
- Printer: Built-in 58mm thermal receipt printer.
- Battery: 7.4V, 5000mAh rechargeable battery.
- Connectivity: 3G, WiFi (802.11b/g/n), Bluetooth 4.0.
- Camera: 800W Downward Compatible.
2.2 Device Layout

Figure 2.2: Detailed view of the terminal's external components and ports.
- Printer Paper Bin: Located at the top, for thermal paper rolls.
- Tear Cutter: For cleanly detaching printed receipts.
- Power Button: On the side, for turning the device on/off and screen control.
- Charging Hole: DC 12V 1.5A input for power adapter.
- Earphone Port: 3.5mm standard jack.
- SIM Card Port: For 3G communication.
- Storage Card Port: For expandable memory.
- USB OTG: Micro USB 2.0 port for data transfer and OTG functions.
- Scan Key: (If applicable to configuration) For scanning barcodes.

Figure 2.3: Physical dimensions of the Irfora Q2 terminal.
3. Setup
3.1 Initial Charging
Before first use, fully charge the device. Connect the provided charger adapter to the charging hole on the device and plug it into a power outlet. The charging indicator will illuminate. A full charge typically takes several hours.

Figure 3.1: The terminal features a built-in 5000mAh rechargeable battery for extended operation.
3.2 Installing Thermal Paper
The built-in POS receipt printer uses 58x35mm thermal printing paper.
- Gently open the printer paper bin cover located at the top of the device.
- Insert a new roll of 58x35mm thermal paper into the bin, ensuring the paper feeds out from the bottom of the roll and the printing side faces the thermal print head.
- Pull a small length of paper out past the tear cutter.
- Close the printer paper bin cover firmly until it clicks into place.
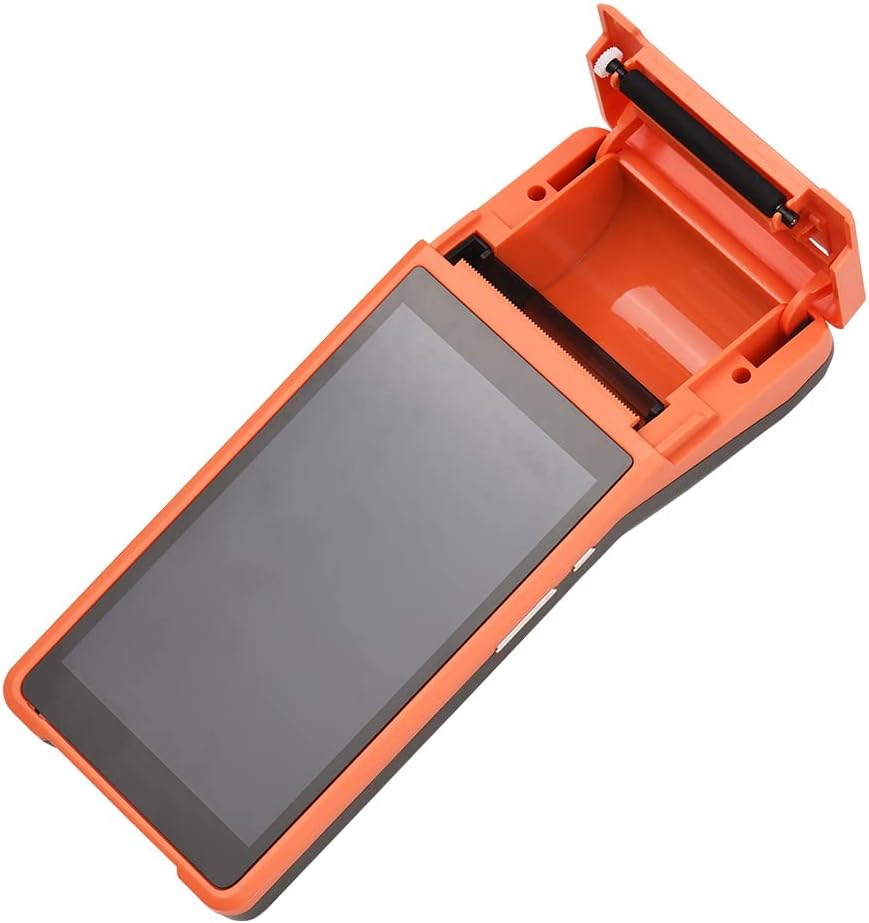
Figure 3.2: Open printer paper bin, ready for thermal paper roll installation.
3.3 Inserting SIM/Storage Cards
If your configuration supports 3G communication or you wish to expand storage, locate the SIM card port and storage card port as shown in Figure 2.2. Insert the respective cards carefully according to their orientation.
4. Operating Instructions
4.1 Power On/Off
- To Power On: Press and hold the Power Button until the screen illuminates and the device boots up.
- To Power Off: Press and hold the Power Button until a power-off menu appears on the screen. Select "Power Off" and confirm.
- Screen On/Off: Briefly press the Power Button to turn the screen on or off without powering down the device.
4.2 Basic Navigation
The device runs on Android 8.1 OS. Navigation is similar to a standard Android smartphone or tablet.
- Touchscreen: Tap to select, swipe to scroll, pinch to zoom.
- Home Screen: Access installed applications.
- Settings: Configure Wi-Fi, Bluetooth, display, sound, and other system settings.
4.3 Printing Operations
Printing functionality is typically integrated within specific POS or business applications installed on the device.
- Open the application that requires printing (e.g., a sales application).
- Initiate the print command within the application (e.g., "Print Receipt," "Print Order").
- The device will automatically print the content to the thermal printer.
- Tear off the receipt using the tear cutter.
Note: Ensure sufficient thermal paper is loaded before printing.
4.4 Connectivity
- Wi-Fi: Go to Settings > Network & Internet > Wi-Fi to connect to available wireless networks.
- Bluetooth: Go to Settings > Connected devices > Bluetooth to pair with Bluetooth peripherals.
- 3G Communication: If a SIM card is installed, configure mobile data settings via Settings > Network & Internet > Mobile network.
- USB OTG: Connect compatible USB devices (e.g., flash drives) via the Micro USB 2.0 port using an OTG adapter.
5. Maintenance
5.1 Cleaning the Device
- Use a soft, dry, lint-free cloth to clean the screen and exterior.
- For stubborn marks, slightly dampen the cloth with water or a screen cleaner. Avoid harsh chemicals.
- Do not spray liquids directly onto the device.
- Regularly clean the thermal print head with an alcohol swab to ensure clear prints. Allow it to dry completely before use.
5.2 Battery Care
- Avoid fully discharging the battery frequently.
- Charge the device regularly, especially if it will be stored for an extended period.
- Store the device in a cool, dry place when not in use.
5.3 Software Updates
Periodically check for system updates via Settings > System > System update to ensure optimal performance and security.
6. Troubleshooting
This section addresses common issues you might encounter with your Irfora Q2 terminal.
| Problem | Possible Cause | Solution |
|---|---|---|
| Device does not power on. | Low battery; device crash. | Charge the device for at least 30 minutes. If unresponsive, perform a forced restart by holding the power button for 10-15 seconds. |
| Printer not printing. | No paper; paper jammed; print head dirty; application error. | Check paper roll and replace if empty. Clear any paper jams. Clean the thermal print head. Restart the printing application or the device. |
| Poor print quality. | Dirty print head; low quality paper; paper inserted incorrectly. | Clean the thermal print head. Use recommended 58x35mm thermal paper. Ensure paper is inserted with the correct side facing the print head. |
| Wi-Fi/Bluetooth connectivity issues. | Incorrect settings; out of range; interference. | Verify Wi-Fi password or Bluetooth pairing. Move closer to the access point/device. Restart Wi-Fi/Bluetooth on the terminal. |
| Device is slow or unresponsive. | Too many apps running; low storage; software glitch. | Close unnecessary applications. Clear cache or uninstall unused apps. Restart the device. Consider a factory reset if issues persist (backup data first). |
7. Technical Specifications
Detailed technical specifications for the Irfora Handheld PDA Printer Smart POS Terminal (Model Q2).
| Feature | Specification |
|---|---|
| Model | Q2 |
| CPU | Quad-Core 1.3GHz MT6580V/WA |
| RAM | 1GB |
| NAND Flash | 8GB |
| Operating System | Android 8.1 |
| Primary Screen | 5.5 Inch, 1280*720 IPS Screen Capacitive Touchscreen |
| Communication Method | 3G (fits all kinds of networks) |
| Back Camera | 800W Downward Compatible |
| Battery | 7.4V, 5000mAh |
| Charging Interface | DC, 12V 1.5A |
| Earphone Interface | 3.5mm Standard Earphones |
| OTG | Support |
| USB Interface | Micro USB2.0 * 1 |
| Audio System | Built-in Speaker, Buzzer, Microphone |
| WiFi | 802.11b/g/n |
| GSM | GSM850/900/1800/1900 |
| WCDMA | B1 |
| Bluetooth | BT4.0 |
| Printing | Thermal Printer, Paper Scroll 58*35 (not included) |
| Printer Size | 21.5 * 8.6 * 5.3cm / 8.46 * 3.39 * 2.1in |
| Printer Weight | 462g / 16.3oz |
| Product Dimensions (Package) | 24.5 * 13.3 * 9cm / 9.65 * 5.24 * 3.54 inches |
| Manufacturer | Irfora |
| Country of Origin | China |
8. Warranty and Support
Your Irfora Handheld PDA Printer Smart POS Terminal comes with a user manual (English & Chinese) included in the package. For any technical assistance, troubleshooting beyond this manual, or warranty inquiries, please contact your point of purchase or the official Irfora customer support channels.
Please retain your purchase receipt for warranty validation.