1. Introduction
Thank you for choosing the KIMO QM-3603-500N·m Electric Impact Wrench. This powerful and versatile cordless tool is designed for a wide range of applications, from automotive maintenance like tire changes to various DIY projects and professional tasks. Featuring a high-capacity 4000mAh battery, intelligent control modes, and robust construction, it provides efficient and reliable performance. Please read this manual thoroughly before operation to ensure safe and optimal use of your new tool.
2. Safety Instructions
WARNING: Read all safety warnings, instructions, illustrations, and specifications provided with this power tool. Failure to follow all instructions listed below may result in electric shock, fire, and/or serious injury.
- Always wear appropriate personal protective equipment, including safety glasses, hearing protection, and gloves.
- Keep the work area clean and well-lit. Cluttered or dark areas invite accidents.
- Do not operate power tools in explosive atmospheres, such as in the presence of flammable liquids, gases, or dust.
- Keep children and bystanders away while operating a power tool. Distractions can cause you to lose control.
- Ensure the battery pack is fully charged before use.
- Do not force the power tool. Use the correct power tool for your application.
- Disconnect the battery pack from the power tool before making any adjustments, changing accessories, or storing power tools.
- Store idle power tools out of the reach of children and do not allow persons unfamiliar with the power tool or these instructions to operate the power tool.
- Maintain power tools and accessories. Check for misalignment or binding of moving parts, breakage of parts, and any other condition that may affect the power tool’s operation.
- Use the power tool, accessories, and tool bits in accordance with these instructions, taking into account the working conditions and the work to be performed.
- Do not expose power tools to rain or wet conditions. Water entering a power tool will increase the risk of electric shock.
3. Product Overview
3.1 Components
The KIMO QM-3603-500N·m Electric Impact Wrench comes with the following components:
- KIMO QM-3603-500N·m Impact Wrench Unit
- 20V 4000mAh Lithium-Ion Battery
- Fast Charger
- Impact Sockets (15mm, 17mm, 19mm, 21mm)
- Drill Bits (for wood, metal, screws)
- Storage Bag
- User Manual

Image: KIMO Electric Impact Wrench and its complete accessory set, including battery, charger, various sockets, and drill bits.
3.2 Key Features
- High Torque Output: Delivers a maximum torque of 500N·m, capable of loosening stubborn bolts and nuts.
- Long-lasting Battery & Fast Charging: Equipped with a 20V 4000mAh lithium-ion battery, providing approximately 20-40 minutes of continuous use. The included fast charger fully charges the battery in just 120 minutes.
- Intelligent Automatic Stop Mode: Prevents overtightening and damage to bolts/nuts by automatically stopping rotation when the fastener is loose. This feature is active in forward rotation only.
- Multi-functional 3-in-1 Design: Functions as an impact wrench, electric drill, and electric driver, making it suitable for a wide array of tasks.
- Three Operating Modes: Easily switch between Automatic Stop Mode, High Efficiency Mode (0-2600 RPM), and Power Saving Mode (0-1600 RPM) to optimize performance for different materials and tasks.
- Stepless Speed Control & Forward/Reverse: Adjust rotation speed by varying pressure on the trigger. A convenient lever allows for quick switching between forward (tightening) and reverse (loosening) rotation.
- Lightweight & Ergonomic Design: Weighing only 1.1kg, it reduces arm fatigue during prolonged use, making it comfortable for all users.
- Integrated LED Light: Illuminates the work area, providing clear visibility in dark or confined spaces.
- Low Noise Operation: Engineered for reduced noise levels, allowing for more comfortable use in various environments.

Image: Visual representation of the KIMO Impact Wrench's 500N·m maximum torque and its impact on product life, power, spark, and noise.

Image: Close-up of the KIMO Impact Wrench's 4000mAh battery, highlighting its large capacity and the integrated battery level indicator.

Image: Illustration of the KIMO Impact Wrench's three adjustable modes: High Efficiency Mode, Power Saving Mode, and Automatic Stop Mode.
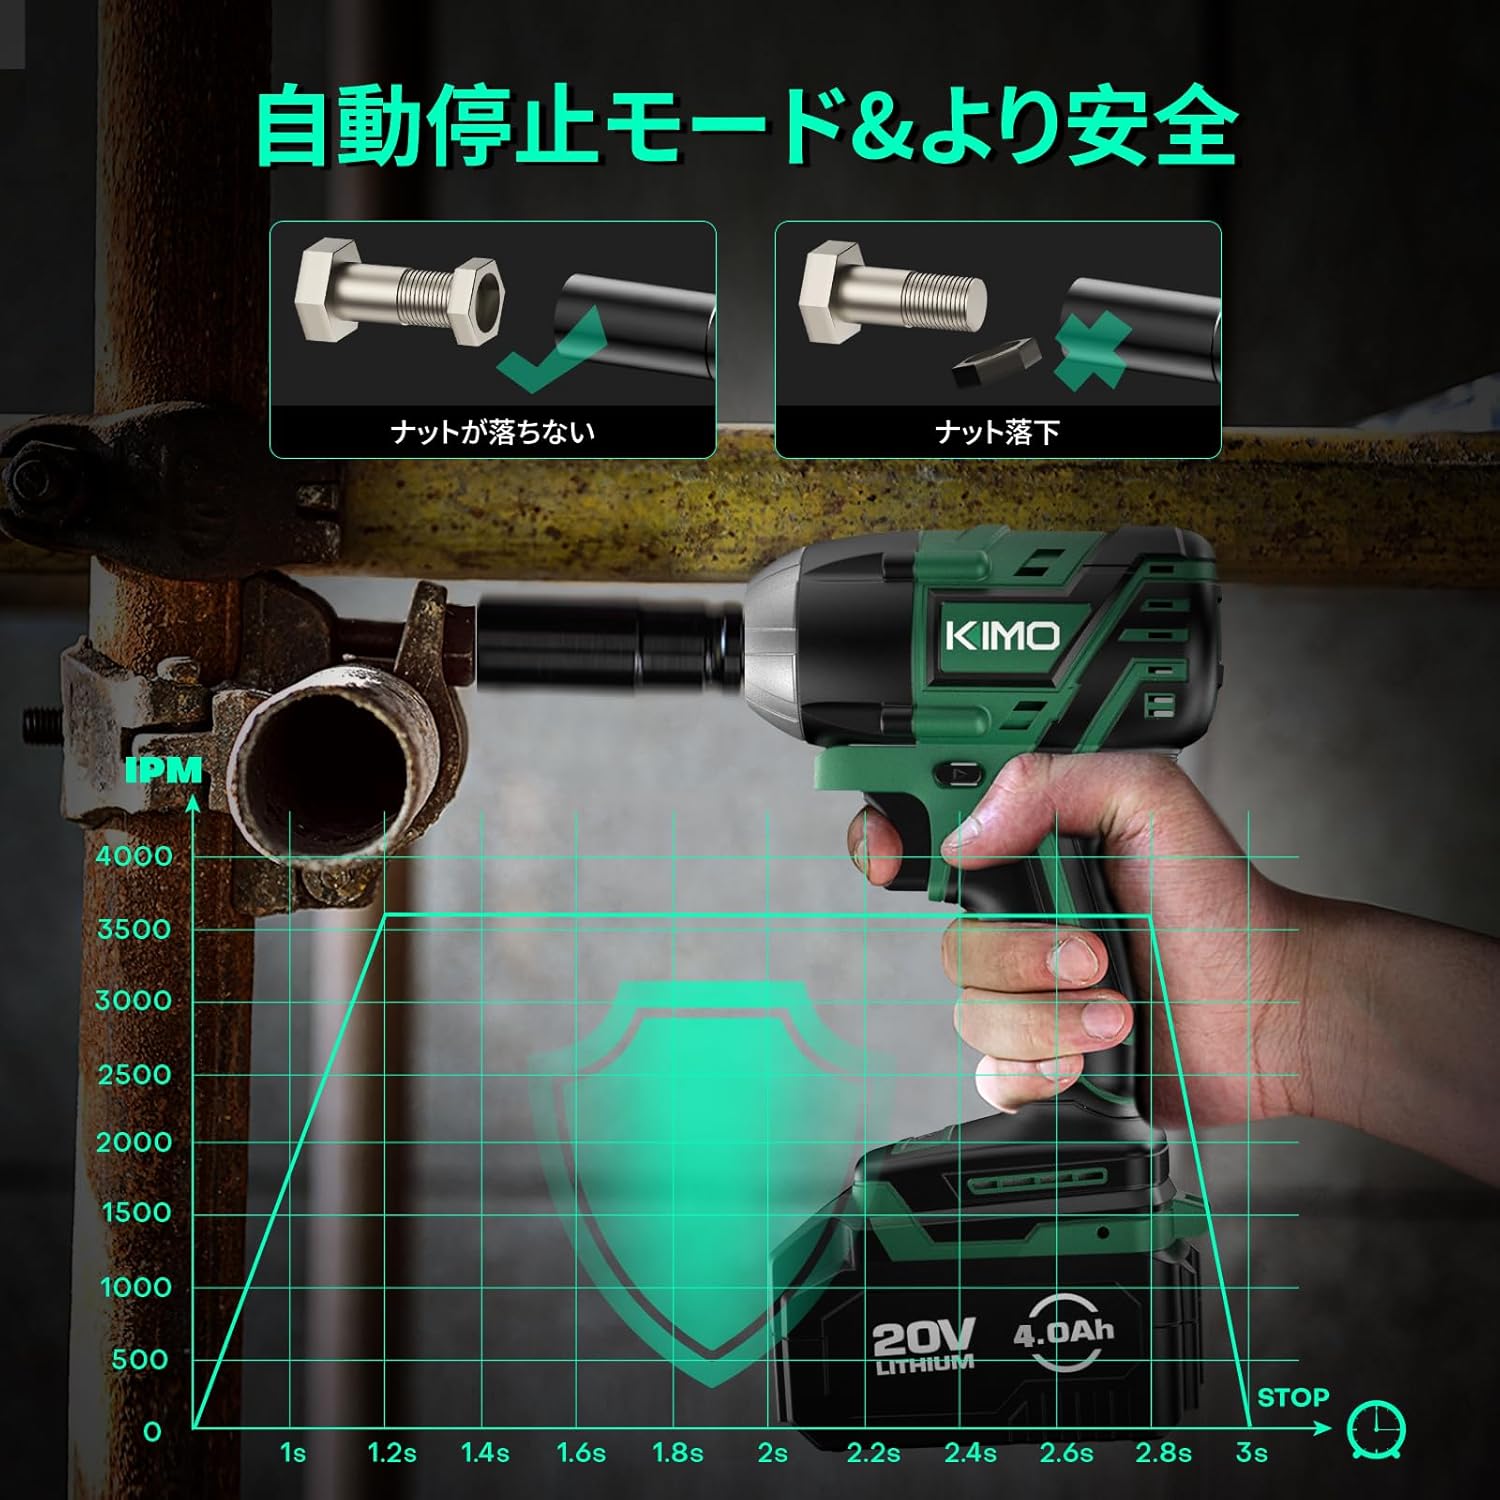
Image: Depiction of the KIMO Impact Wrench's automatic stop mode, showing how it prevents bolts from falling off or overtightening for enhanced safety.

Image: The KIMO Impact Wrench in use, demonstrating its integrated LED light illuminating a dark work area for improved visibility.

Image: Diagram illustrating the forward (F) and reverse (R) rotation capabilities of the KIMO Impact Wrench for tightening and loosening nuts.
4. Setup
4.1 Charging the Battery
- Ensure the battery pack is securely inserted into the fast charger.
- Plug the charger into a standard power outlet.
- The indicator lights on the charger will show the charging status. A full charge typically takes 120 minutes.
- Once fully charged, disconnect the charger from the power outlet and remove the battery pack.
4.2 Attaching Sockets/Bits
- Ensure the tool is off and the battery pack is removed before attaching or removing accessories.
- For impact sockets, align the square drive of the socket with the anvil on the tool and push firmly until it clicks into place.
- For drill bits or screwdriver bits, use the appropriate adapter (if necessary) and insert the bit into the chuck. Tighten the chuck securely to hold the bit in place.
- To remove, pull the socket or bit firmly away from the anvil/chuck.
5. Operating Instructions
5.1 Powering On/Off
To power on the tool, simply press the trigger. The tool will start rotating. To power off, release the trigger.
5.2 Changing Modes
The tool features three operating modes: Automatic Stop Mode, High Efficiency Mode, and Power Saving Mode. Press the mode selection button on the tool to cycle through these modes. The indicator lights will show the currently selected mode.
- Automatic Stop Mode: Ideal for loosening nuts and bolts. The tool will automatically stop rotation once the fastener is loose to prevent it from flying off. This mode only works in forward rotation.
- High Efficiency Mode: Provides maximum speed (0-2600 RPM) for heavy-duty tasks and quick fastening/loosening.
- Power Saving Mode: Operates at a lower speed (0-1600 RPM) to conserve battery life and for more precise work. This mode is ideal for delicate adjustments or re-tightening.
5.3 Forward/Reverse Rotation
A lever located near the trigger allows you to switch between forward and reverse rotation:
- Push the lever to the left (F) for forward rotation (tightening).
- Push the lever to the right (R) for reverse rotation (loosening).
Ensure the tool has come to a complete stop before changing the direction of rotation.
5.4 Tightening and Loosening
- Select the appropriate socket or bit for the fastener.
- Choose the desired operating mode (e.g., High Efficiency for initial loosening, Automatic Stop for controlled loosening).
- Set the forward/reverse lever to the correct direction.
- Place the socket/bit firmly onto the fastener.
- Gradually press the trigger to start rotation. Apply more pressure for higher speed.
- For tightening, always finish with a torque wrench to ensure proper torque specifications are met, especially for critical applications like wheel nuts.
6. Maintenance
6.1 Cleaning
- Always disconnect the battery pack before cleaning.
- Use a soft, damp cloth to wipe down the tool's exterior. Do not use harsh chemicals or abrasive cleaners.
- Keep the ventilation openings clear of dust and debris. Use compressed air if necessary.
6.2 Battery Care
- Store battery packs in a cool, dry place away from direct sunlight and extreme temperatures.
- Do not store battery packs in a discharged state for extended periods. Recharge them periodically if not in use.
- Avoid dropping or physically damaging the battery pack.
6.3 Storage
- Store the tool and accessories in the provided storage bag or a suitable case.
- Keep the tool in a secure location, out of reach of children and unauthorized users.
7. Troubleshooting
If you encounter issues with your KIMO Electric Impact Wrench, please refer to the table below for common problems and solutions.
| Problem | Possible Cause | Solution |
|---|---|---|
| Tool does not turn on. | Battery not charged or not inserted correctly. | Ensure battery is fully charged and securely inserted. |
| Low power or inconsistent operation. | Battery charge is low. | Recharge the battery. |
| Socket/bit falls off. | Not properly attached or worn anvil/chuck. | Ensure secure attachment. If issue persists, contact support for inspection. |
| Tool overheats. | Prolonged heavy use or blocked ventilation. | Allow tool to cool down. Clear ventilation openings. |
If the problem persists after attempting these solutions, please contact KIMO customer support for further assistance.
8. Specifications
| Specification | Value |
|---|---|
| Brand | KIMO |
| Model Number | QM-3603 |
| Product Dimensions | 28.4 x 18.4 x 18.1 cm |
| Item Weight | 1.1 kg |
| Color | Green |
| Material | Plastic |
| Voltage | 20 Volts |
| Wattage | 4.9 W |
| Torque | 500 Newton Meters |
| Max Rotation Speed | 2600 RPM |
| Battery Capacity | 4000mAh |
| Charging Time | Approx. 120 minutes |
9. Warranty and Support
KIMO conducts thorough quality inspections on every product before shipment to ensure it meets our high standards. In the unlikely event that you encounter any issues with your product or have questions, please do not hesitate to contact our customer support team. We are committed to providing excellent after-sales service and will respond to your inquiries in the order they are received.
For support, please refer to the contact information provided in your product packaging or visit the official KIMO website.


