1. Introduction
Thank you for choosing the YIYIBYUS 135" Fixed Aluminum Frame Projector Screen. This manual provides essential information for the safe and correct installation, operation, and maintenance of your projector screen. Please read this manual thoroughly before installation and retain it for future reference.
This projector screen is designed for home theater and professional environments, offering a 16:9 aspect ratio and a wide 160° viewing angle for an immersive viewing experience. Its fixed frame design ensures a consistently flat projection surface.
2. Safety Information
- Read all instructions before installation and use.
- Ensure the screen is installed on a sturdy wall capable of supporting its weight.
- Keep all components, especially small parts, out of reach of children to prevent choking hazards.
- Do not attempt to modify or disassemble the screen components beyond what is described in this manual.
- Avoid exposing the screen material to direct sunlight for prolonged periods, as this may cause damage or discoloration.
- Use only the provided hardware for installation.
3. Package Contents
Verify that all components listed below are present in your package:
- Projector screen material (white glass fiber)
- Aluminum alloy frame sections
- Upper and lower hanging pieces (for wall mounting)
- Metal pieces (connectors)
- Spring hooks
- Hexagon wrench
- Springs (for tensioning)
- Hexagon screws
- Rubber plugs
- Wall screws
4. Product Features
- Thickened Alloy Frame: Constructed with a robust aluminum alloy frame, designed for durability and resistance to bending or deformation.
- Wide Viewing Angle: Features a >160° viewing angle, ensuring clear and consistent image quality from various positions.
- High-Definition Eye Protection: The screen material is optimized for high-definition projection, aiming to reduce eye fatigue during extended viewing.
- Easy to Clean Surface: The smooth screen surface allows for direct scrubbing and can be cleaned with a damp cloth and clean water.
- Surrounding Spring Tension Structure: An advanced tensioning system applies uniform force across all four sides and corners of the screen, preventing wrinkles and maintaining long-lasting flatness.

Image: The screen's design emphasizes a wrinkle-resistant surface, contributing to a consistently flat projection area.
5. Setup Instructions
5.1. Unpacking
Carefully remove all components from the packaging. Lay out all parts on a clean, soft surface to prevent scratches or damage during assembly. Refer to the 'Package Contents' section to ensure all parts are present.
5.2. Frame Assembly
- Connect the aluminum alloy frame sections using the provided metal pieces and hexagon screws. Ensure all connections are secure.
- Once the frame is assembled, place it on a clean, flat surface.
5.3. Screen Material Installation and Tensioning
- Carefully unroll the white glass fiber screen material. Identify the front (projection) side.
- Lay the screen material flat over the assembled frame, ensuring it is centered.
- Attach the springs to the screen material's grommets and then to the corresponding points on the frame. Use the spring hooks for easier attachment.
- Begin tensioning from the center of each side, working outwards, to ensure even tension. The surrounding spring tensioning system is designed to distribute force uniformly, preventing wrinkles.
- Ensure the screen material is taut and flat across the entire frame.

Image: The rear view illustrates the aluminum frame and the spring tensioning system, which ensures a flat screen surface.
5.4. Wall Mounting
- Determine the desired mounting location on the wall. Ensure the wall is structurally sound.
- Measure and mark the positions for the upper and lower hanging pieces on the wall, corresponding to the screen's dimensions. Refer to the specifications for exact measurements.
- Drill pilot holes at the marked locations. Insert the rubber plugs into the holes.
- Secure the upper and lower hanging pieces to the wall using the provided wall screws.
- Carefully lift the assembled screen and hang it onto the installed wall brackets. Ensure it is level and securely seated.
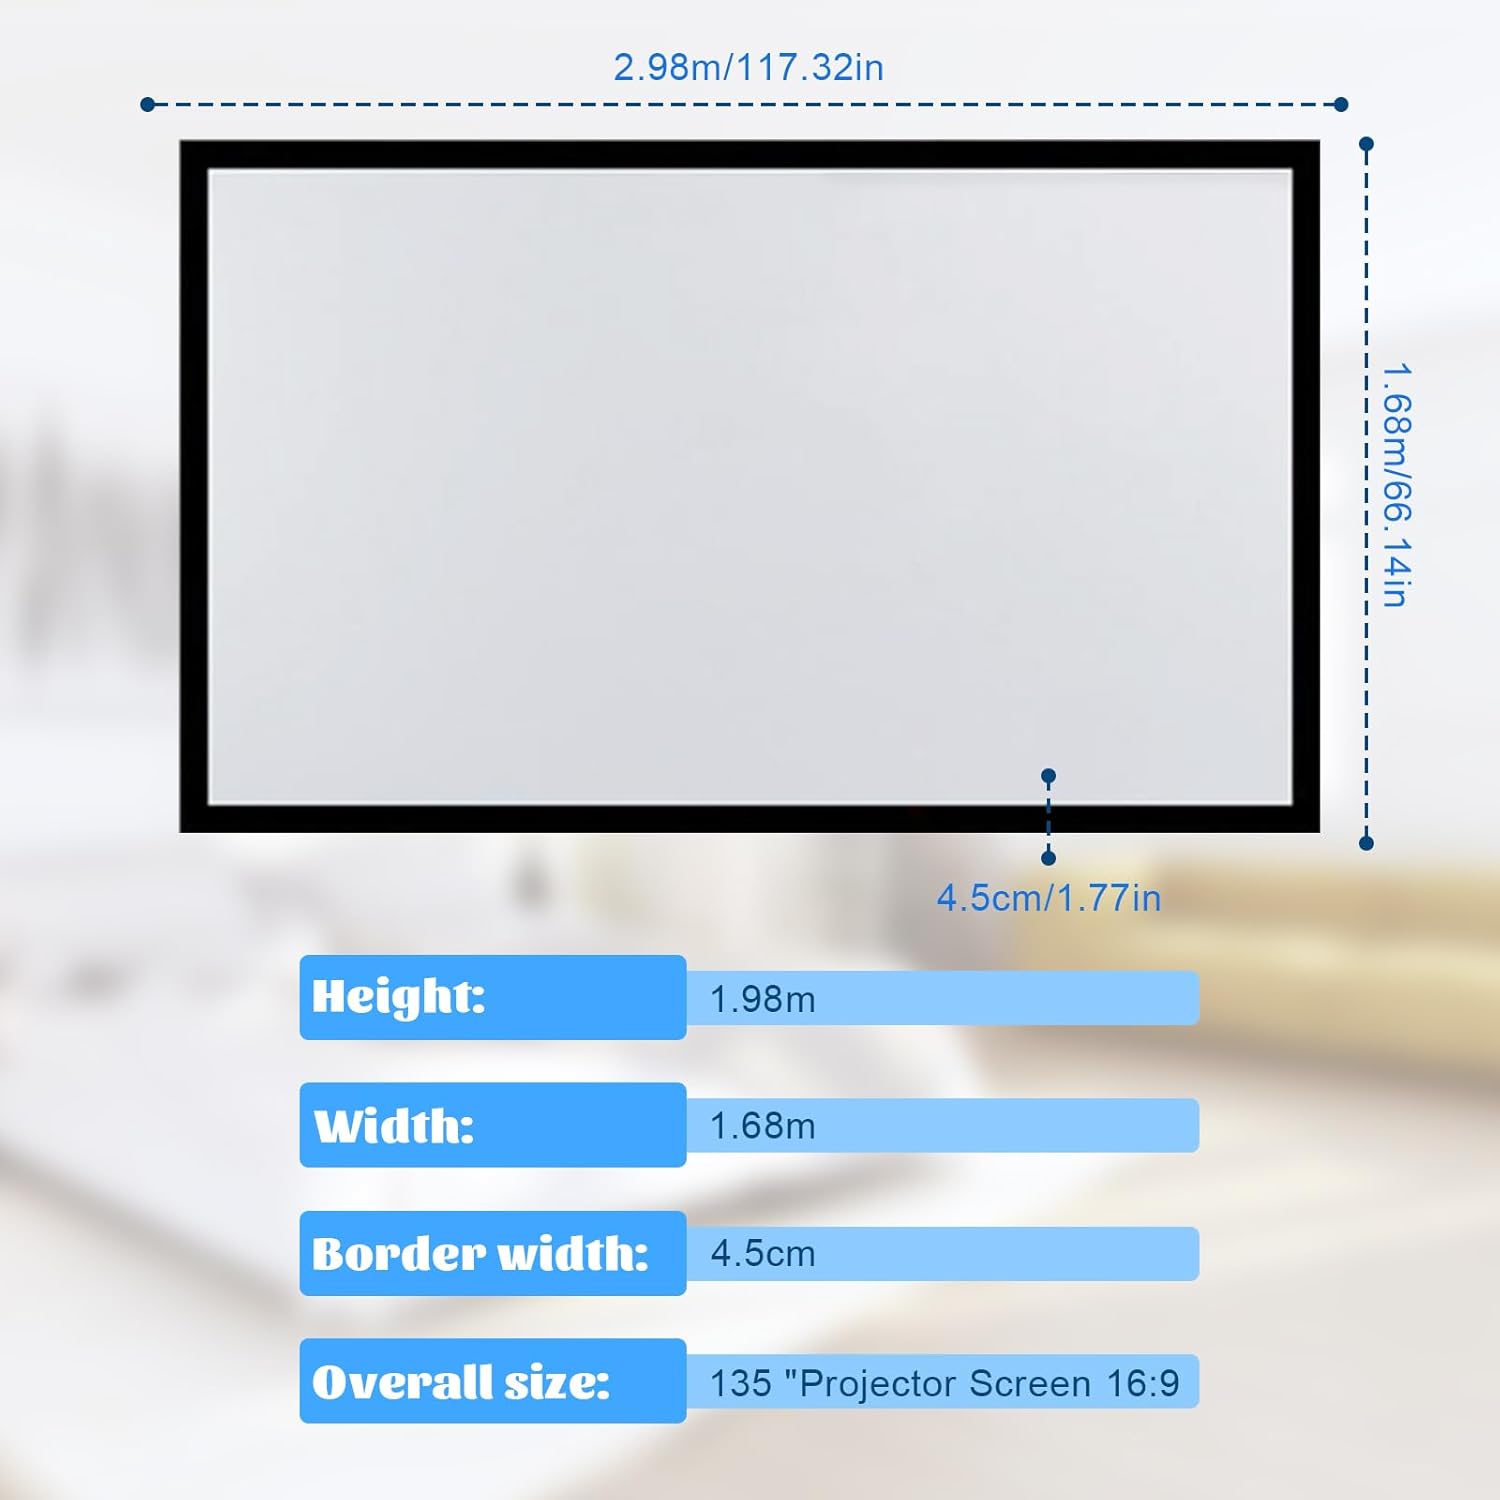
Image: Dimensional diagram of the 135" projector screen, indicating height, width, and border width for accurate installation planning.
6. Operating the Projector Screen
6.1. Projection
Once installed, the screen is ready for use. Position your projector to cast an image that fills the screen area. Adjust the projector's focus, zoom, and keystone correction settings to achieve a clear and rectangular image.
6.2. Viewing Angle
The screen offers a wide 160° viewing angle, allowing viewers to enjoy a clear image from various positions within the room. This wide angle minimizes brightness and color degradation when viewed from off-center positions.

Image: The screen provides an ultra-wide viewing angle, ensuring consistent image quality across a broad audience area.
6.3. Applications
This projector screen is suitable for a variety of applications, including home theater setups, business presentations, educational environments, and gaming. Its fixed frame design provides a professional and permanent installation.

Image: The screen is versatile for various environments, including home theaters, offices, and entertainment spaces.
7. Maintenance
7.1. Cleaning the Screen Surface
The screen surface is designed for easy cleaning. To remove dust or stains, gently wipe the surface with a soft, clean cloth dampened with clean water. Avoid using harsh chemicals, abrasive cleaners, or excessive force, as these can damage the screen material.
7.2. Frame Care
Wipe the aluminum frame with a soft, dry cloth to remove dust. If necessary, a slightly damp cloth can be used, followed by immediate drying.
8. Troubleshooting
- Wrinkles or Uneven Surface: Ensure all springs are correctly attached and evenly tensioned around the frame. Re-adjust tension if necessary.
- Poor Image Quality: Check your projector's settings (focus, keystone, resolution). Ensure the projector is aligned correctly with the screen.
- Screen Not Level: Verify that the wall mounting brackets are installed level. Adjust if needed.
- Loose Frame Connections: Re-tighten all hexagon screws on the frame connections using the provided hexagon wrench.
9. Specifications
| Feature | Detail |
|---|---|
| Brand | YIYIBYUS |
| Model Number | YIYIBYUS |
| ASIN | B0CXDGR5GR |
| Diagonal Size | 135 inches |
| Aspect Ratio | 16:9 |
| Viewing Angle | >160° |
| Screen Material | White Glass Fiber |
| Frame Material | Aluminum Alloy |
| Frame Width | 4.5 cm (1.77 inches) |
| Projection Area (W x H) | 2.89 m x 1.59 m (113.78 inches x 62.60 inches) |
| Product Dimensions (W x H) | 113.24"W x 62.6"H (Overall frame dimensions) |
| Mounting Type | Wall Mount |
| Package Weight | 6 kg |
| Date First Available | March 7, 2024 |
10. Warranty and Support
For warranty information or technical support, please refer to the documentation provided with your purchase or contact the manufacturer directly through their official channels. Keep your purchase receipt as proof of purchase.


